Difference between revisions of "Encode video"
| Line 83: | Line 83: | ||
# From the '''Format''' dropdown list, select '''MPEG-4'''. | # From the '''Format''' dropdown list, select '''MPEG-4'''. | ||
# Click '''Options'''. The same options as above appear. | # Click '''Options'''. The same options as above appear. | ||
=== How do I check if my exported movie is in the corrected format? === | |||
# Open the video file in QuickTime Player. | |||
# '''Window''' menu > '''Show Movie Inspector'''. | |||
# The Format should be similar to this. | |||
== Related resources == | == Related resources == | ||
* '''[[Play media]]''' - Info on how to actually play movies in Second Life, after you've got them encoded. | * '''[[Play media]]''' - Info on how to actually play movies in Second Life, after you've got them encoded. | ||
Revision as of 11:50, 9 June 2009
This guide will help you learn how to encode video to be playable in Second Life on both Mac and Windows. There are many ways to do this, but this is among the simplest.
Chances are you have a movie file you want to show, but it's too big, or not in the right format to work inworld. This guide empowers you to make a single movie file that is:
- Playable in Second Life at a reasonable balance between filesize and quality — so you can share it with friends and colleagues!
- Playable on iPod and similar mobile devices.
- Playable cross-platform on most modern computers with most video players (including VLC and Windows Media Player).
- Perfectly uploadable to YouTube, Vimeo, and other web video services.
- AWESOME. (I hope.)
Initial setup
- Download Apple QuickTime and upgrade it to QuickTime Pro (US$30). (Unless you already have an app that encodes through QuickTime like Apple Final Cut Pro or Adobe Premiere Pro.)
- Open the movie file in QuickTime Player. (In other apps, usually found as an option in the File menu).
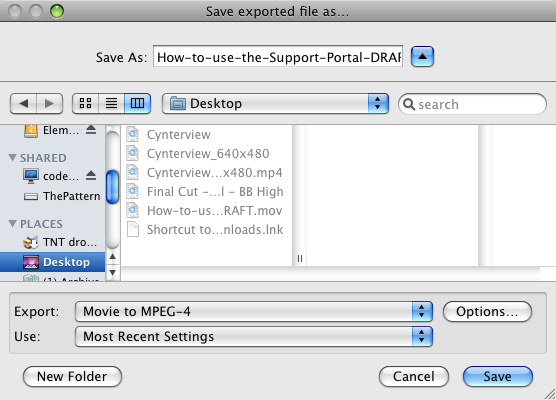
- In QuickTime Player, use File menu > Export.
- Change the Export dropdown to Movie to MPEG-4.
- To the right of the dropdown, click Options. Unfortunately, QuickTime doesn't let you make a list of custom presets, but you can use Most Recent Settings. You can always refer back here if you get lost.
If your movie file doesn't open in QuickTime or your video editor, you'll need an intermediary transcoder. I don't have a solid recommendation outside of using Sony Vegas to read predominantly Windows-based formats, like FRAPS, and make them QuickTime-friendly — any suggestions for one? Add it here.
Settings
Here's the settings you'll want to use, and why. You can tweak any one of these if you know better, but it's a good baseline, one that's been used hundreds of times and refined by Torley.
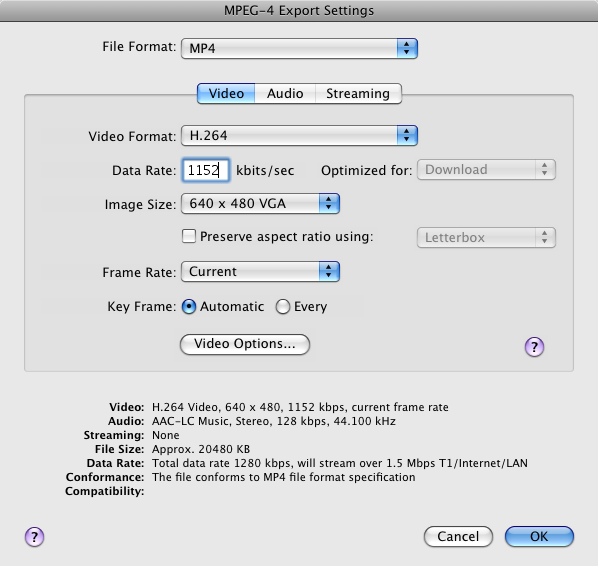
- File Format: MP4
- NOT "MP4 (ISMA)"
Video tab
- Video Format: H.264
- A popular codec that offers high-quality at small filesizes.
- Data Rate: 1152 kbits/sec
- It doesn't need to be exactly this. I chose "1152" because along with audio, it's a fine balance. Make this lower (like 200 kbits/sec) if your video is a mostly-static slideshow, or if there's lots of motion, make it higher (like 2000 kbits/sec). Don't go too high above this unless you know everyone watching the video is on a superfast broadband connection. Otherwise, they'll have to wait a long time for the video to buffer, and it'll repeatedly pause as it struggles to keep up — annoying! Remember that we suggest "768 kbps" (audio + video combined) as the minimum for playing audiovisuals in SL. While many broadband connections are faster, err on the side of an enjoyable experience.
- Optimized for: Download
- Image Size: 640x480 (or less)
- Exceeding 640x480 means your video won't play on iPods.
- Uncheck Preserve aspect ratio using: Letterbox.
- Frame Rate: Current
- Lower this if you want to sacrifice smooth motion for higher individual frame quality. For reference, I've used 20 or 24 FPS for my video tutorials, and don't suggest going below 15 — it looks like a slide show.
- Key Frame: Automatic
- Click Video Options to bring up a dialog.
- Restrict profile(s) to: Baseline
- Uncheck Main (and Extended if need be), otherwise it won't play on iPod.
- Encoding Mode: Best quality (Multi-pass)
- This matters a lot if your video has a lot of motion, but can take much longer-than-realtime to encode. If you're really short on time, chose Faster encode (Single-pass).
- Restrict profile(s) to: Baseline
Audio tab
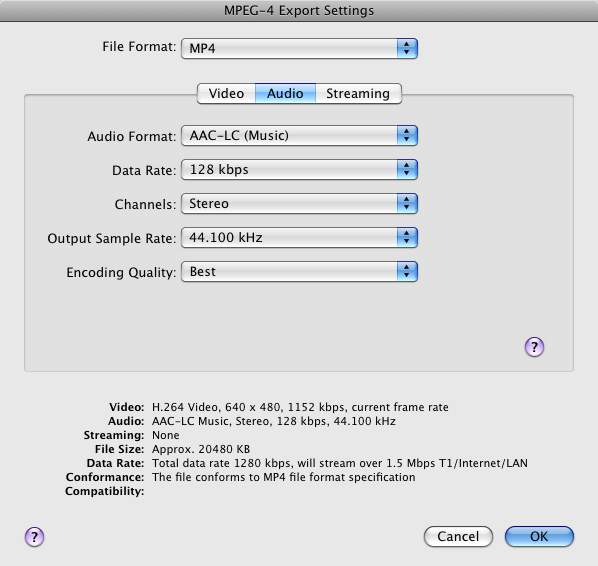
These settings will give near-CD-quality sound.
- Audio Format: AAC-LC (Music)
- Data Rate: 128 kbps
- Lower this if sound isn't so important, 64 kbps @ stereo has swishy artifacts but is tolerably listenable.
- Channels: Stereo
- If the original source is mono, simply make it so.
- Output Sample Rate: 44.100 kHz
- Similarly, if the original is lower-fidelity, lower it. You actually shouldn't be able to increase this if the source is at, say, 22.050 kHz.
- Encoding Quality: Best
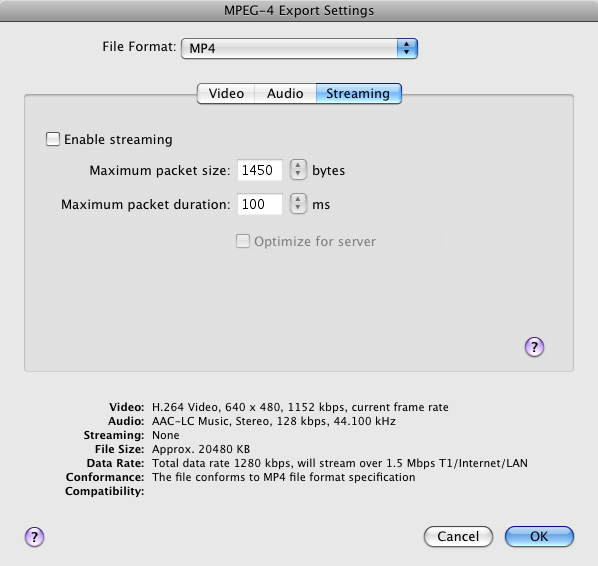
Streaming tab
- Simply leave "Enable streaming" unchecked. This is for server-side streaming, and doesn't apply to general SL purposes.
Now what?
It's time to upload your video to a server (Linden Lab employees use Amazon S3) so you can copy the URL and play it Second Life. For more info on that, see Play media.
For advanced users
You can apply most of the above to other encoders that support QuickTime. A common problem with encoders is their usability are crap and they offer too many options without telling you what they do, and on top of that, their presets aren't optimized as they could be. And sometimes they're missing one or more of the essential options above, making it a chore to test and get good results.
That being said, if you know something more elegant, add it here! ________ :)
Frequently-asked questions
I have to wait for a whole movie to load in SL, why?
It's likely because the movie isn't optimized for "Fast Start" within-seconds playback. The above guide fixes that; re-encode earlier movies as necessary.
Why choose "Movie to MPEG-4" instead of "Movie to QuickTime Movie"?
If you choose the latter, you'll have almost all of the same options as above, albeit presented in a different layout. It's a bit confusing but this can make Second Life-compatible movies too.
However, "Movie to QuickTime Movie" "wraps" the video file differently, meaning it's slightly less compatible on the Windows side of things. But most video players can do both, so overall, this isn't a big concern.
Where do I find these options in Final Cut?
- Open Final Cut (Pro or Express).
- File menu > Export > Using QuickTime Conversion.
- From the Format dropdown list, select MPEG-4.
- Click Options. The same options as above appear.
How do I check if my exported movie is in the corrected format?
- Open the video file in QuickTime Player.
- Window menu > Show Movie Inspector.
- The Format should be similar to this.
Related resources
- Play media - Info on how to actually play movies in Second Life, after you've got them encoded.


