Difference between revisions of "Linden Lab Official:Map API"
Rand Linden (talk | contribs) |
Rand Linden (talk | contribs) |
||
| Line 19: | Line 19: | ||
* [http://www.google.com/apis/maps/signup.html Sign up for a Google Maps API key]. This enables you to use the Google Maps API, which is required to use SLMAPI. See the [http://code.google.com/apis/maps/documentation/ Google Maps API documentation] for more information. | * [http://www.google.com/apis/maps/signup.html Sign up for a Google Maps API key]. This enables you to use the Google Maps API, which is required to use SLMAPI. See the [http://code.google.com/apis/maps/documentation/ Google Maps API documentation] for more information. | ||
* Download [http://slurl.com/_scripts/slmapapi.js slmapapi.js]. Alternatively, you can reference the online version in your pages; for example: | * Download [http://slurl.com/_scripts/slmapapi.js slmapapi.js]. Alternatively, you can reference the online version in your pages; for example: | ||
: <code> <script src="http://slurl.com/_scripts/slmapapi.js"><script> </code> | : <code> <script src="http://slurl.com/_scripts/slmapapi.js"><script> </code> | ||
===About coordinates=== | ===About coordinates=== | ||
Revision as of 14:40, 28 January 2009
We've made improvements and changes to the webmap, effective January 15, 2009.
Some information here may be out of date as we update this wiki with the changes. Thanks for your patience.
Getting Started
What is the Webmap API?
The Second Life Webmap API is a set of Javascript objects and functions that enable you to embed Second Life maps onto your web pages. It is a purely client-side Javascript API. If needed, you can also directly access the webmap images.
NOTE: This API is still in beta. URLs and API signatures may change.
Prerequisites
To use the Second Life Webmap API, you must first:
- Sign up for a Google Maps API key. This enables you to use the Google Maps API, which is required to use SLMAPI. See the Google Maps API documentation for more information.
- Download slmapapi.js. Alternatively, you can reference the online version in your pages; for example:
<script src="http://slurl.com/_scripts/slmapapi.js"><script>
About coordinates
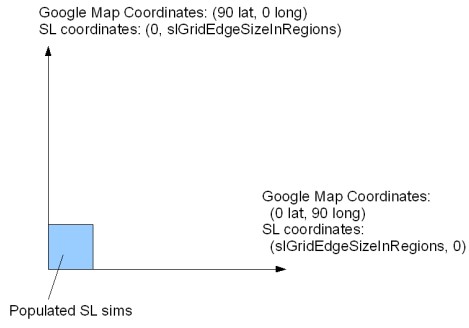
Map coordinates are based on the Second Life grid system for positioning regions.
As illustrated in the diagram above, the Webmap API maps the Second Life world to the upper right quadrant of the Google world map. A large scaling value called slGridEdgeSizeInRegions (equal to 220 or 1,048,576) defines the largest region coordinate at the top and far right edge of the displayed area. This value creates a map area with room for one trillion sims.
The little blue square illustrates where the populated sims are in Second Life.
Zoom levels
There are eight zoom levels: one through eight, one being the closest and eight being the farthest. Each level zooms by a power of two. In other words, at zoom level five, each region is twice the width as it was at zoom level six.
Browser compatibility
The Webmap API has been tested to work with the following browsers:
- Internet Explorer 6.0
- Internet Explorer 7.0
- Firefox 1.0 or greater
- Safari 2.0
Other browsers may work but little issues may appear. Unless otherwise noted, all features work in all supported browsers.
Comments and feedback
If you encounter problems or bugs or have feature requests, please email webmap@secondlife.com.
Happy coding from the Second Life Web team!
Basic concepts
The Webmap API's fundamental class is SLMap. It is a Javascript object representing the map with a large number of methods, enabling you to zoom, pan the view, and so on.
Additionally, the API includes the following key classes:
- Marker - represents an image to display at a specify (x,y) point on the map. You provide a set of images to display at each zoom level. Contains several event handlers and other properties.
- Window - represents a captioned balloon pointing to a specified map location.
- Img and Icon - represent an image to use for markers, controls, or in windows.
Basic Examples
Required image files
Some of the following examples use image files for markers. To run the examples with the code as shown, download the image files and save them in the same directory as the example HTML files. Alternatively, create the Img objects using the URLs listed in the table below that refer to the images stored on this wiki.
The following table lists the images used in the examples:
| Image | File name | URL |
|---|---|---|
| Yellow marker.gif | https://wiki.secondlife.com/w/images/2/23/Yellow_marker.gif
| |
|
Fountain.gif | https://wiki.secondlife.com/w/images/6/60/Fountain.gif |

|
Forsale.png | https://wiki.secondlife.com/wiki/Image:Forsale.png |

|
Forsale-shadow.png | https://wiki.secondlife.com/w/images/d/d9/Forsale-shadow.png |
Common HTML header
All the examples require the following "header" at the beginning of the HTML <head> element:
<html>
<head>
<meta http-equiv="Content-Type" content="text/html; charset=iso-8859-1">
<script src="http://maps.google.com/maps?file=api&v=2&key=[YOUR GOOGLE MAP API KEY HERE]"
  type="text/javascript"></script>
<script src="http://slurl.com/_scripts/slmapapi.js" type="text/javascript"></script>

<style>
div#map-container {
      width: 500px;
      height: 500px;
}
</style>
...
Additionally, all the examples require additional scripts in the HTML header, as well as some simple body content.
Simple map
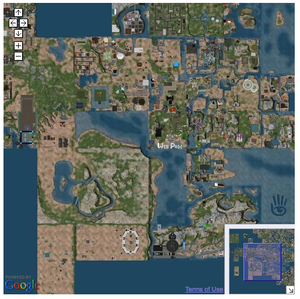
The first example is a map with basic panning and zooming capabilities. When you are done, it will look as shown here.
You can pan the map and zoom in and out.
To create this example, follow these steps:
- Include required Javascript libraries.
- Include or reference the SLMAPAPI library.
- Add HTML body and div elements.
- Add Javascript onload event handler function.
- Save and test.
Include required Javascript libraries
I think these JS files are no longer needed, but need to confirm. --Rand Linden 08:17, 26 January 2009 (UTC)
Include the references to protoype.js and scriptaculous.js:
<script src="prototype.js" type="text/javascript"></script>
<script src="scriptaculous/scriptaculous.js" type="text/javascript"></script>
Make sure both files are where you specify. Here, protoype.js is in the same directory as the example HTML file and scriptaculous.js is in a /scriptaculous subdirectory.
Next include the reference for the Google Maps API:
<script src="http://maps.google.com/maps?file=api&v=2&key={GOOGLE MAPS KEY}" type="text/javascript"></script>
Replace {GOOGLE MAPS KEY} with your Google Map key.
Include or reference the Webmap API library
Include the reference to the Second Life Map API Javascript file:
<script src="http://slurl.com/_scripts/slmapapi.js" type="text/javascript"></script>
If you prefer, download the file locally, and refer to it using a relative path.
Add HTML body and div elements
Next, add the HTML body containing div element to contain your map. The body contains a Javascript onload event handler that calls the loadmap() function you will define in the next step.
<body onload="loadmap()">
 &tl;div id="map-container"></div>
</body>
After the div element is passed to the map constructor, all that is left to do is to center the map and set the zoom.
NOTE: If you want the position attribute of the div element to be absolute, either set it programmatically using Javascript or using the style attribute tag. Setting the position attribute of this element in the CSS stylesheet will not work.
Add Javascript onload event handler function
Add the following Javascript function in the head of your page to instantiate the map and center it.
<script>
function loadmap() {
  mapInstance = new SLMap(document.getElementById('map-container'));
  mapInstance.centerAndZoomAtSLCoord(new XYPoint(1000,1000),3);
}
</script>
Save and test
When you are done, save the file, and then load it into your web browser. Try panning the map by clicking and dragging the mouse cursor; you can also pan by clicking on the arrow icons on the four sides. Also try zooming the view in and out by clicking the "+" and "-" icons.
Complete source code
NOTE: For brevity, the HTML header is omitted from the sample code below (and in all examples). Simply replace the first line comment in the code below with the common header code.
<!-- Insert common HTML header -->
<script>
function loadmap() {
  // creates the map
  mapInstance = new SLMap(document.getElementById('map-container'));
  mapInstance.centerAndZoomAtSLCoord(new XYPoint(997,1002),2);
}
</script>
</head>
<body onload="loadmap()">
<div id="map-container"></div>
</body>
Map with a marker
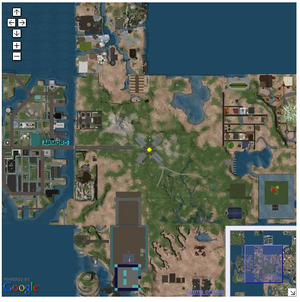
This example shows how to make a map with a marker. The code is the same as the first example, with with addition of some Javascript after the initialization of the map in the page's onload handler.
To use the code below verbatim, you must download the marker image as described in Required image files; you can also use the URL of the wiki image if you prefer.
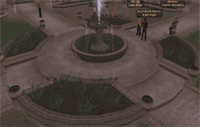
The code first creates the icon for the marker, then places it on the map at (997, 1002) at the welcome area fountain. Because the same icon is specified for every zoom level, it appears the same size regardless of zoom level.
// creates the icons
var yellow_dot_image = new Img("Yellow_marker.gif",9,9);
var yellow_icon = new Icon(yellow_dot_image);
var all_images = [yellow_icon, yellow_icon, yellow_icon, yellow_icon, yellow_icon, yellow_icon];

// creates the marker
var marker = new Marker(all_images, new XYPoint(997,1002));
mapInstance.addMarker(marker);
In this example, clicking on the marker does nothing. Subsequent examples illustrate adding some onClick behavior.
Source code
<!-- Insert common HTML header -->
<script>
function loadmap() {
  // creates the map
  var mapInstance = new SLMap(document.getElementById('map-container'), {disableVoiceInfo: true});
  mapInstance.centerAndZoomAtSLCoord(new XYPoint(997,1002),2);

  // creates the icons
  var yellow_dot_image = new Img("b_map_yellow.gif",9,9);
  var yellow_icon = new Icon(yellow_dot_image);
  var all_images = [yellow_icon, yellow_icon, yellow_icon, yellow_icon, yellow_icon, yellow_icon];

  // creates the marker
  var marker = new Marker(all_images, new XYPoint(997,1002));
  mapInstance.addMarker(marker);
}
</script>
</head>
<body onload="loadmap()">
<p>There should be a yellow marker in the center of this map:
<div id="map-container"></div>
</body>
Map with an initial open window
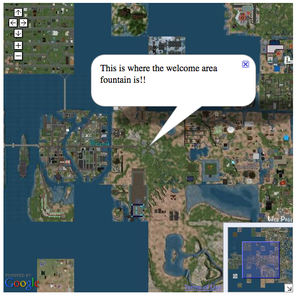
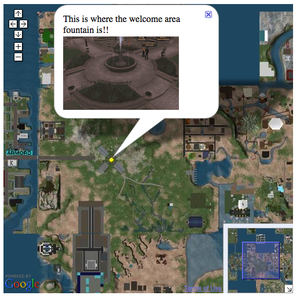
A Webmap window is a caption pointing to a specific point on the map, as shown in the screenshot at right. It looks something like a comic book dialog bubble.
Use the MapWindow object to create a window. For example, to create a window that opens initially when the page loads:
- Instantiate a MapWindow object with the desired caption.
- Call the addMapWindow() method on the SLMap object to add the window to the map.
For example:
// creates a window
var mapWindow = new MapWindow("This is where the welcome area fountain is!!");
mapInstance.addMapWindow(mapWindow, new XYPoint(997,1002));
The code adds an open window to the map positioned again at (997,1002), right above the welcome area fountain. NOTE: after the user closes the window there is no way to bring it back. A subsequent example will show how to enable the user to reopen the window, by using markers with windows.
To make the map initially centered on the fountain, change the call to centerAndZoomAtSLCoord() as follows:
mapInstance.centerAndZoomAtSLCoord(new XYPoint(997,1002),3);
Source code
This example shows how to create a map with a window. The code is the same as the first example, with the addition of some lines of Javascript after the initialization of the map, in the loadmap() function. In addition, the map is centered in a different location in order to make the window fully visible.
<!-- Insert common HTML header -->
<script>
function loadmap() {
  mapInstance = new SLMap(document.getElementById('map-container'));
  mapInstance.centerAndZoomAtSLCoord(new XYPoint(997,1002),3);

  // creates a window
var mapWindow = new MapWindow("This is where the welcome area fountain is!!");
mapInstance.addMapWindow(mapWindow, new XYPoint(997,1002));
}
</script>
</head>
<body onload="loadmap()">
    <h1>Simple Map Example</h1>
<div id="map-container"></div>
</body>
Map with a marker that opens a windows
This example shows how to create a map with a marker which opens a window when clicked. It is a combination of the previous two examples, because the code first creates a marker and a window. The difference comes in adding the marker to the map--this time you provide the window object as well as the marker object in the call to addMarker():
mapInstance.addMarker(marker, mapWindow);
Doing this adds the marker and causes it to open the specified window when the user clicks it. If the user subsequently closes the window, he can open it again by clicking on the marker.
Source code
<!--- Insert HTML header --->
<script>
function loadmap() {
  // creates the map
  var mapInstance = new SLMap(document.getElementById('map-container'));
  mapInstance.centerAndZoomAtSLCoord(new XYPoint(997.5,1001.5),2);

  // creates the icons
  var yellow_dot_image = new Img("Yellow_marker.gif",9,9);
  var yellow_icon = new Icon(yellow_dot_image);
  var all_images = [yellow_icon, yellow_icon, yellow_icon, yellow_icon, yellow_icon, yellow_icon];

  // creates the marker
  var marker = new Marker(all_images, new XYPoint(997,1002));

  // creates a window
  var mapWindow = new MapWindow("This is where the welcome area fountain is!! <br><img src='fountain.gif'>");

  // adds the marker to the map
  mapInstance.addMarker(marker, mapWindow);
}
</script>
</head>
<body onload="loadmap()">
<p>This map shows a yellow marker on the welcome fountain.  When you click the marker,
a window appears with a screenshot of the fountain.</p>
<div id="map-container"></div>
</body>
Accessing map images directly
The Second Life map images are stored on Amazon Simple Storage Service (Amazon S3). You can access the map images directly on the Amazon S3 servers using the following URL format:
http://map.secondlife.com.s3.amazonaws.com/Z/XXXXX/YYYYY/map-Z-X-Y-objects.jpg
Where:
- Z - Zoom level desired:
- One (1) is the most zoomed-in view, showing individual region tiles.
- Eight (8) is the maximum zoom level, showing the entire world.
- X,Y - X and Y coordinates on the Second Life Grid of the region, for example, region Ahern is (997,1002). You must pad the coordinate values to five characters with leading zeros.
Tiles with zoom greater than one are stored at the lower left corner coordinate of the tiles that are included in the image. In other words, you can find the zoom tile containing region /1/X/Y for zoom level Z at /Z/X - (X % Z)/Y - (Y % Z)
http://map.secondlife.com.s3.amazonaws.com/2/00498/00804/map-2-498-804-objects.jpg
For example: if Z = 2, the four region tiles are:
- http://map.secondlife.com.s3.amazonaws.com/1/01000/01000/map-1-1000-1000-objects.jpg
- http://map.secondlife.com.s3.amazonaws.com/1/01001/01000/map-1-1001-1000-objects.jpg
- http://map.secondlife.com.s3.amazonaws.com/1/01000/01001/map-1-1000-1001-objects.jpg
- http://map.secondlife.com.s3.amazonaws.com/1/01001/01001/map-1-1001-1001-objects.jpg
These four region tiles are compressed into the single tile:
http://map.secondlife.com.s3.amazonaws.com/2/01000/01000/map-2-1000-1000-objects.jpg
Other examples
The following shows the map zoomed all the way out, showing the entire Second Life world view: http://map.secondlife.com.s3.amazonaws.com/8/01024/00896/map-8-1024-896-objects.jpg
The following displays a single tile contained in the view above, zoomed all the way in: http://map.secondlife.com.s3.amazonaws.com/1/01027/01019/map-1-1027-1019-objects.jpg
Getting the URL of a sim map from LSL
The following LSL script illustrates how to display a map of the current region to an avatar:
<lsl> ShowMap(key avatar) {
   string url = "http://map.secondlife.com.s3.amazonaws.com/1/";
   vector sim_coord = llGetRegionCorner();
   string x = (string)((integer)(sim_coord.x / 256.0));
   string y = (string)((integer)(sim_coord.y / 256.0));
   string x0 = llStringTrim(llGetSubString(" 00000", 0, 5 - llStringLength(x)), STRING_TRIM_HEAD) + x;
   string y0 = llStringTrim(llGetSubString(" 00000", 0, 5 - llStringLength(y)), STRING_TRIM_HEAD) + y;
   url += x0 + "/" + y0 + "/" + "map-1-" + x + "-" + y + "-objects.jpg";
   llLoadURL(avatar, "View the sim map", url);
} </lsl>
Contributed under GPL v3 license by Henri Beauchamp 09:00, 24 January 2009 (UTC)
