Difference between revisions of "Glow Rendering FAQ"
| Line 10: | Line 10: | ||
===How to Enable=== | ===How to Enable=== | ||
# Bring up the Preferences panel from Edit menu > Preferences... | # Bring up the Preferences panel from Edit menu > Preferences... | ||
# Go into Graphics Detail under Preferences. | # Go into Graphics Detail under Preferences.[[Image:RenderGlow_step1.jpg|graphical representation of the steps. if not viewing with images for some reason, follow the next few steps in text below]] | ||
[[Image:RenderGlow_step1.jpg|graphical representation of the steps. if not viewing with images for some reason, follow the next few steps in text below]] | # Look for a option named 'Enable Vertex Shaders'. If SL detects that your graphics card can support vertex shaders properly, this option will selectable, and should be checked. (Optional, but recommended) - set the Lighting Details parameter to 'Nearby Local Lights' as well for more glows in an inworld scene. | ||
# Look for a option named 'Enable Vertex Shaders'. If SL detects that your graphics card can support vertex shaders properly, this option will selectable, and should be checked. | # Enable the client debug menus if they are not already enabled by pressing ctrl-alt-shift-D (Mac users sustitue Ctrl with Cmd, please) | ||
#[[Image:RenderGlow_Step2.jpg|Here's where that 'Debug Settings' option is in Client menu]] Go into the client Menu and select 'Debug Settings'. | |||
#[[Image:RenderGlow_step3.png|The Debug Settings Panel, with renderglow parameter highlighted]]Type 'Renderglow' into the upper dropdown of the debug settings panel to call up the parameter to enable 'RenderGlow'... and change the Boolean dropdown that appears below the parameter's description to 'True'. | |||
#Put sunglasses on your avatar, start squinting. Serve with ice lemon tea. | |||
--More to come-- | --More to come-- | ||
[[Category:Articles in need of expansion|Graphics Card]] | [[Category:Articles in need of expansion|Graphics Card]] | ||
Revision as of 08:16, 26 April 2007
Introduction
In v1.15, a 'Glow rendering' experimental feature has been added to the client viewer for Second Life. This article describes what it does and how to enable it.
What is Glow Rendering
Glow rendering is a realtime operation whereby another pass is made on a 3d accelerator card's final output to generate a low-resolution map comprising of any items that are lit up via the 'light' parameter that can be set on Prims for local lighting or set to full-bright (i.e. simulating actual lighting), as well as natural phenomena such as the sun and moon. The result is a simulated bloom around light sources of any sort on the grid.
Requirements
Glow Rendering requires a card that can handle vertex shaders in OpenGL. this would include any OpenGL-compatible, hardware accelerated 3D graphics card from the GeForce FX series onwards (or its ATi equivalent). It is also important to note that this feature, when enabled, can cause a modest performance loss, as each frame has to impose additional calculations to add glow to lights and lit surfaces. As it is a experimental feature, not all cards may support it even if they support vertex shaders in hardware, and it may crash the client in some cases.
How to Enable
- Bring up the Preferences panel from Edit menu > Preferences...
- Go into Graphics Detail under Preferences.
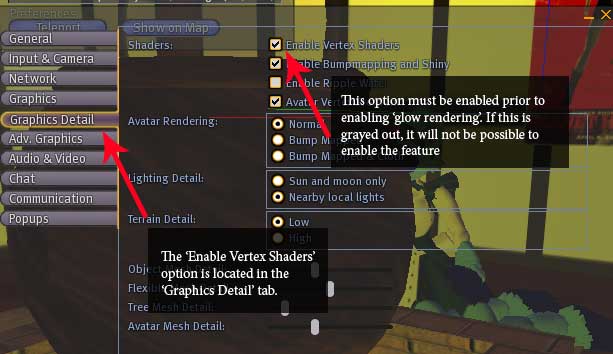
- Look for a option named 'Enable Vertex Shaders'. If SL detects that your graphics card can support vertex shaders properly, this option will selectable, and should be checked. (Optional, but recommended) - set the Lighting Details parameter to 'Nearby Local Lights' as well for more glows in an inworld scene.
- Enable the client debug menus if they are not already enabled by pressing ctrl-alt-shift-D (Mac users sustitue Ctrl with Cmd, please)
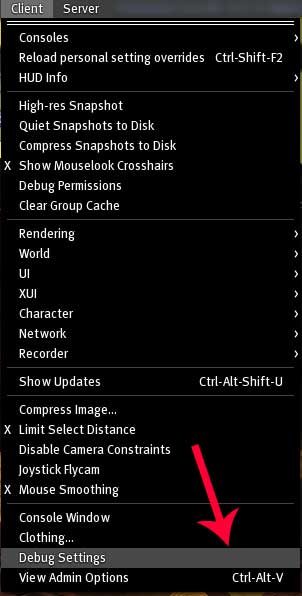 Go into the client Menu and select 'Debug Settings'.
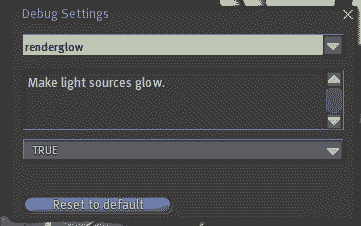 Type 'Renderglow' into the upper dropdown of the debug settings panel to call up the parameter to enable 'RenderGlow'... and change the Boolean dropdown that appears below the parameter's description to 'True'.
- Put sunglasses on your avatar, start squinting. Serve with ice lemon tea.


--More to come--