KB2/Managing your group memberships
- http://wiki.secondlife.com/wiki/How_do_I_join_a_group%3F
- http://wiki.secondlife.com/wiki/How_do_I_change_the_title_above_my_avatar%27s_name%3F
- http://wiki.secondlife.com/wiki/How_do_I_find_a_group%3F
- http://wiki.secondlife.com/wiki/How_do_I_get_group_money%3F
- http://wiki.secondlife.com/wiki/How_do_I_quit_or_leave_a_group%3F
- http://wiki.secondlife.com/wiki/How_do_I_hide_my_group%3F
- http://wiki.secondlife.com/wiki/What_is_a_group_liability%3F_-_Video_Tutorial
- http://wiki.secondlife.com/wiki/How_do_I_invite_someone_to_a_group_I%27m_in%3F
- http://wiki.secondlife.com/wiki/Linden_Lab_Official:How_are_group_dividends_calculated%3F
- http://wiki.secondlife.com/wiki/Who_is_the_owner_of_a_group%3F
- http://wiki.secondlife.com/wiki/Group_Roles
Joining a group
Joining a group differs, depending on whether the group has open or closed enrollment. Open groups are free for anyone to join. Closed groups require an invitation from an existing group officer.
Joining an open group
To join an open group:
- Click the Search button.
- Click the Groups tab.
- Enter the name of the group you wish to join and click the Search button.
- Click on the group entry. If the group is open enrollment, the Join button appears above the Owners and Visible Members listing, along with any cost associated with joining the group.
- Click the Join button to join the group.
Joining a closed group
You cannot join a closed group yourself. An officer of the group needs to perform the following steps:
- Select Edit > Groups from the menus at the top of the Second Life window.
- Select the group and click Info.
- Click the Members > Roles tab.
- In the Members subtab, click Invite New Person.
- Click Open Person Chooser.
- Search for the desired name in the Person Chooser and click Select.
- Select the desired role from the dropdown menu above Send Invitations.
- Click Send Invitations.
Changing your group title
The active group you belong to determines the title in front of your avatar's name. For more information on groups, see What are groups? and How do I join a group?
While you can belong to a maximum of 25 groups at any one time, you can only have one group active at a time. Which group you have active can influence certain events in world, such as whether you can enter group-restricted land, or whether a scripted object recognizes you as a group member. Often, you may want to change active groups in order to change the title that appears in front of your name, just over your avatar's head.
How to change your active group
- Select Edit > Groups from the menus at the top of the Second Life window.
- Click on the name of the group you wish to make active. You'll be using the title that group has given you.
- Click the Activate button.
- When the group name changes to bold, click Close.
Alternately, if you don't want a title right now, click none, click Activate, then click Close.
Of course, if your groups don't have a title you like, you can ask the group founder or an officer to change the group titles. Or, you could create your own group... see How do I create my own group?
How to change your role title within a group
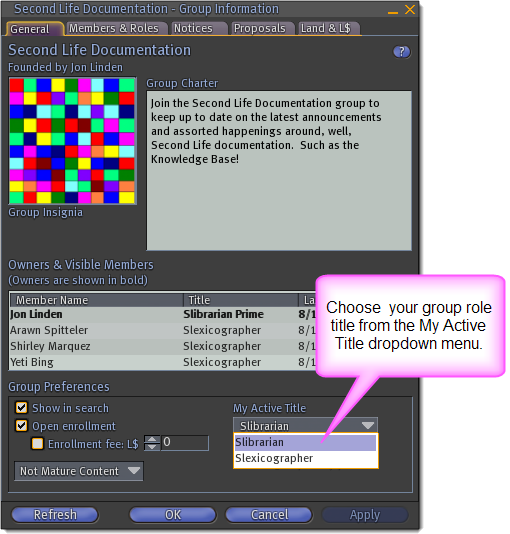
Each group role within a group can have its own unique title. If your belong to more than one role in the same group, you can switch your active title within the group:
- Select Edit > Groups from the menus at the top of the Second Life window.
- Click the name of your active group.
- Click the Info button.
- Near the bottom right of the Group Information window is a dropdown box called My Active Title. Click the box to select your active title from your available titles in that group.
- Click OK to close the Group Information Window.
Finding a group
Second Life's Search window makes searching for groups quick and easy.
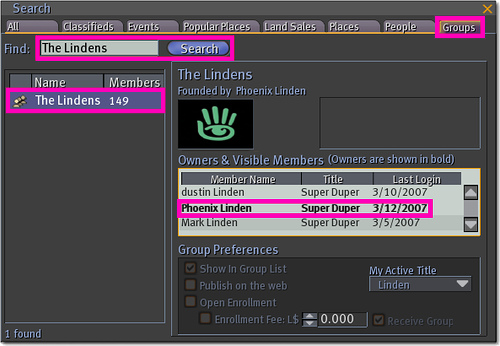
- Click Search at the bottom of the Second Life window.
- Click the Groups tab.
- Type the name of the group you are looking for.
You can click on the group listing for details and join the group.
Receiving group dividends
Group dividends are divided equally amongst all group members who have the Pay group liabilities and receive group dividends ability associated with their role. Likewise, all group liabilities are also spread evenly between group members with this ability.
If nobody in the group has this ability, then group liabilities and dividends are paid to the group's owner (the group's owner always has all abilities).
Exception:
- If there are no enabled accounts in the group that have the Pay group liabilities and receive group dividends ability, then liabilities and dividends will be spread evenly between group members.
| Tip: If you are planning to join a Linden owned group, check to see if that group participates inworld with liabilities and dividends before joining. |
Leaving a group
You can leave a Second Life group at any time, whether the group no longer suits you, you don't like the group's charter anymore, or you just want to reduce the number of groups you have.
Important things to note, though:
- Any land contribution you have given a group (to pay for group-owned land) is removed when you leave the group.
- Leaving a group removes your ability to edit, change, or sell land held by the group.
- Leaving a group makes you ineligible for any pending group dividends.
- After you've left a group, no trace remains on the group's membership list. Group notices and voting proposals that mention your name are not edited automatically, and continue to exist for the usual timespan.
To leave a group:
- Select Edit > Groups from the menus at the top of the Second Life window.
- Click on the name of the group you wish to leave.
- Click Leave.
| Note: If you're the last owner of a group, you are not allowed to leave it without appointing another person to the role of group owner first. |
Hiding your groups
This article explains how to prevent a group's name from appearing in searches, and how to make a group participant's membership in a group invisible.
| Note: In order to change these aspects of a group, you need to be the group's owner or have the appropriate abilities in the Roles and Group Identity categories. |
Keep a group's name from appearing in searches
- Select Edit > Groups from the menus at the top of the Second Life window. The Communicate window opens to the Groups tab.
- Select the desired group's name and click the Info button. The Group Information window opens.
- In the General tab:
- Deselect the Show In Group List checkbox to make sure the group doesn't appear in the Groups tab of the Search window.
- Deselect the Show in Search checkbox to make sure the group doesn't appear in searches performed from the Second Life website.
Make group visibility only for certain roles
You may want to selectively prevent non-members from viewing the names of your group members, by role:
- Select Edit > Groups from the menus at the top of the Second Life window. The Communicate window opens to the Groups tab.
- Select the desired group's name and click the Info button. The Group Information window opens.
- In the Members & Roles tab, click the Roles subtab.
- Select the desired Role Name from the list.
- Deselect the Members are visible checkbox.
Group liability
If a group member has the Pay group liabilities and receive group dividends ability associated with their role, that member automatically pays an equal share of group costs with the other group members with the same ability. In turn, that same group member automatically receives an equal share of L$ that get paid to the group. If nobody in the group has this ability, then group liabilities are paid by and dividends are paid to the group's owner (the group's owner always has all abilities).
Exception:
- If there are no enabled accounts in the group that have the Pay group liabilities and receive group dividends ability, then liabilities and dividends will be spread evenly between group members.
| Tip: If you are planning to join a Linden owned group, check to see if that group participates inworld with liabilities and dividends before joining. |
For example, using the Options tab of the About Land window, group-owned land can be set to display in the Places tab of the Search window, which incurs a L$30/week charge per parcel. This charge is divided among all group members who have the ability Pay group liabilities and receive group dividends (in the Accounting category of group abilities) enabled in at least one of their roles.
Periodic assessment of this liability is the reason some Residents may occasionally log in to discover negative L$ balances on their inworld accounts.
Group liabilities are also explained in this video tutorial:
<videoflash type="vimeo">4243252|640|480</videoflash>
How group dividends are calculated
Group dividends are divided equally amongst all group members who have the Pay group liabilities and receive group dividends ability associated with their role. Likewise, all group liabilities are also spread evenly between group members with this ability.
If nobody in the group has this ability, then group liabilities and dividends are paid to the group's owner (the group's owner always has all abilities).
Exception:
- If there are no enabled accounts in the group that have the Pay group liabilities and receive group dividends ability, then liabilities and dividends will be spread evenly between group members.
| Tip: If you are planning to join a Linden owned group, check to see if that group participates inworld with liabilities and dividends before joining. |
Inviting another Resident to one of your groups
To invite someone to a group to which you belong:
- Right-click the Resident's avatar and select More > Group Invite. The Groups window opens, displaying all the groups to which you have permission to invite people.
- Select the group for which you want the invitation sent and click OK.
OR
- Right-click yourself and choose Groups...
- Choose the group you want to invite someone to, then click Info
- Go to the Members & Roles tab
- Click Invite new Person
- Click Open Person Chooser
- Enter the name of the person you want ot invite, and click Find
- Make sure the proper name is highlighted, then click Select
- Repeat steps 6 and 7 for each person you would like to add to the group.
- Click Send Invitations
Finding the owner of a group
To find out who owns a particular group:
- Click the Search button.
- Click the Groups tab.
- Type in the name of a group.
- Select the desired group from the list of groups.
- Names of group owners appear in bold.
Group roles
Group Roles give group owners a fine degree of control over their members' access to group Abilities. Using group Roles, a group owner may assign different levels of privileges to groups of members. Additionally, each group role can be assigned its own title for members to wear. Each group can contain up to 10 roles, including Owners and Everyone.
By default, all groups start with three Roles:
- Owners: Group owners have full control over their group, and have access to all group Abilities. The Owners role can't be deleted, edited, or hidden because it's always required.
- Officers: Officers have broad, but not unlimited powers within the group. The Officers role can be deleted or edited by group members with the appropriate abilities.
- Everyone: Everyone in the group, regardless of other assigned Roles, falls into the Everyone role. This special role defines baseline abilities for everyone in the group.
Creating New Roles
To create a new group role:
- Go to Edit > Groups
- Highlight the group you want to edit, and press the Info button.
- Go to the Members & Roles tab on the Group Information window.
- Click the Roles tab under the Members & Roles tab.
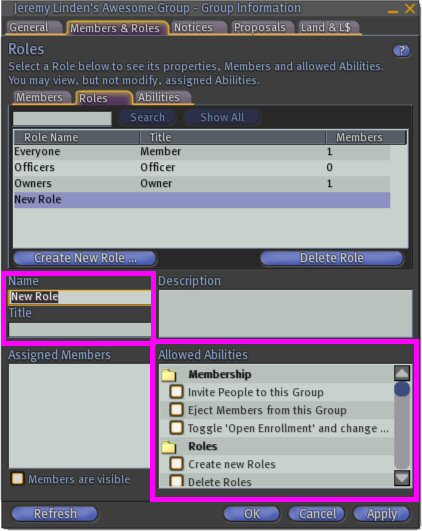
- Press the Create New Role button.
- Enter a Name for the new role.
- Enter a Title (tag) for your new role. When a group role is active, the title appears inworld above your avatar name.
- Assign abilities to the new role under the Allowed Abilities frame.
| Note: Group members with the ability to create new roles can only assign abilities they have within their own active role. |
| Tip: Groups are a limited commodity; if you find yourself close to your limit, you may consider using group roles to create "groups-within-groups" to save space! |
Abilities
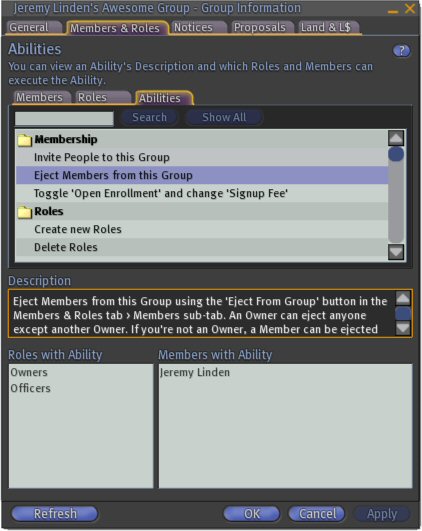
Abilities define a role's level of control over group matters- land, Linden dollars, membership, titles, and more. For a complete listing of group abilities and their descriptions inworld: Go to Edit > Groups
- Highlight the group you want to edit, and press the Info button.
- Go to the Members & Roles tab on the Group Information window.
- Click the Abilities tab under the Members & Roles tab.
| Note: When Create Objects is set only to Group in the About Land Options tab, it is necessary to wear the group title from the same group the land is set or deeded to in order to rez objects. |


