Difference between revisions of "Mesh/Decomposing a mesh for physics shape"
Bea Linden (talk | contribs) |
Mako Nozaki (talk | contribs) m |
||
| Line 1: | Line 1: | ||
{{Multi-lang}} | |||
{{Navbox/Mesh}} | {{Navbox/Mesh}} | ||
__NOTOC__ | __NOTOC__ | ||
Revision as of 20:40, 8 January 2011

This tutorial will go through how to make the physical shape that can be bumped into.
One key thing to understand is that the model that you see, and the model that you bump into, can be defined by different meshes. We want to make a physical shape that is just detailed enough to give the illusion that you are bumping into the shape that you see, because if the physical shape is extremely detailed, the simulator will slow down when the model collides with objects or avatars.
Get a Second Life compatible mesh file
The first step is to get a mesh file that you want to upload to Second Life. Second Life's mesh import is able to read COLLADA (".dae") files. For the purposes of creating a physics shape, you can use pretty much any model that you can successfully import into Second Life, so we'll use the basic duck here.
- Click this link -- https://collada.org/owl/download.php?sess=0&parent=126&expand=1&order=name&curview=0&binary=1&id=698/ -- to download the "duck.dae" COLLADA file.
- Save the file anywhere on your hard drive where you can find it later.
Upload the mesh file to Second Life
Next, take the file that you downloaded to your computer and upload it to Second Life:
- Select Build > Upload > Model....
- Alternatively, open My Inventory, click the + button, and select Upload > Model....
- A file dialog box opens.
- Find and select the
duck.daefile from your computer.- The Upload Model window appears.
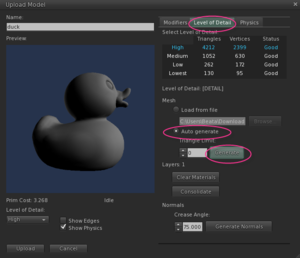
- Enter a name for your model in the Name field.
- Select the Show Physics checkbox.
- In the Level of Detail tab, select the Auto generate radio button, and click Generate.
- The numbers in the Triangles and Vertices column of the table at the top have changed.
- In the Physics tab, select the Use Level of Detail radio button, and select Medium in the dropdown.
- Yellow lines appear on the surface of your model.
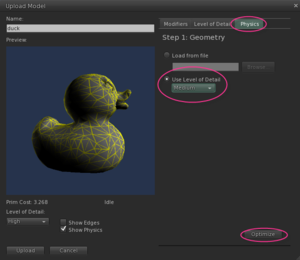
- Click the Optimize button.
- The Step 2: Decompose screen appears.
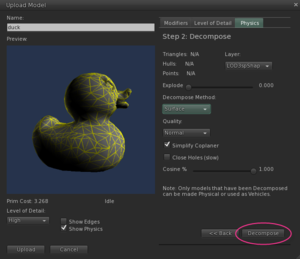
- Click the Decompose button.
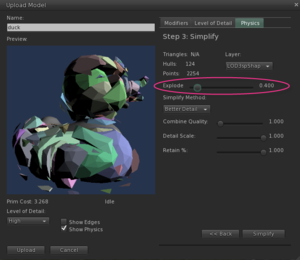
- The Step 3: Simplify screen appears, and after a few seconds, your model is covered with colored triangles.
- Move the Explode slider to see the decomposed shape.
- Note: The Explode slider does not change the decomposed shape, it only moves it away from the Mesh so you can see it clearly.
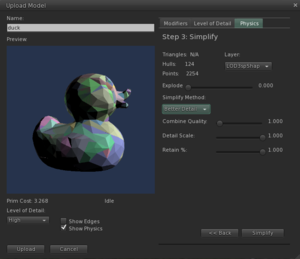
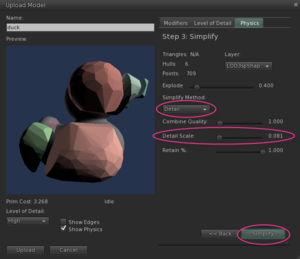
- Set the Detail Scale slider to 0.081.
- Under Simplify Method, select Detail from the dropdown menu.
- Click the Simplify button.
- The decomposed pieces are simplified into a few objects.
- Click the Upload button to upload the mesh with this simplified physics shape.


Add your mesh object to the world

You can now add your model to the world and view its physics decomposition.
- In My Inventory, find LOD3spShape in your Objects folder.
- If you're having trouble or have a large inventory, use your inventory's RECENT tab.
- Drag LOD3spShape from your Objects folder to anywhere on the ground where you have permissions to build.
- A duck model appears on the ground.
- This model is now physics-enabled, meaning that it can interact with other physics items in the world.
- Enable the Develop menu by entering Ctrl+Alt+Q.
- A new Develop menu appears in your main menu bar.
- Select Develop > Render Metadata > Physics Shapes.
- Your object appears with a color overlay which indicates how efficient its physics representation is. Aim to have the physics overlay appear in blue:
- A blue overlay indicates the object's physics are efficient and will produce very little load on the sim.
- A red overlay indicates the object could potentially cause high physics lag on the region.
- Right-click the duck and select Edit.
- Open the Object tab in the edit window.
- Next to Physics Shape Type, select Prim.
- The blue overlay changes to display the more accurate physics shape you created.

This is the end of the mesh tutorial. Visit the Mesh main page for more information.