Difference between revisions of "Streaming Video with IP cameras in Second Life"
| Line 11: | Line 11: | ||
==Basic arquitecture== | ==Basic arquitecture== | ||
[[File:esquema2.png|align=center]] | |||
''Figure 1. Basic arquitecture.'' | |||
In order to video stream, we need focus on two different sides: real world implementation through IP cameras that record the real world and a virtual world which the user interacts with. | In order to video stream, we need focus on two different sides: real world implementation through IP cameras that record the real world and a virtual world which the user interacts with. | ||
| Line 27: | Line 27: | ||
[[File:QuicktimeLoadIURL.png|600px]] | |||
''Figure 2. Open a URL to display video with Quicktime.'' | |||
On ''figure 2'' you can see that, in order to display video streaming, we use 'rtsp protocol'. You only have to put a correct URL on '''File/Open URL File''' to demand the video streaming to the IP camera. We use an Axis IP camera to test it. | On ''figure 2'' you can see that, in order to display video streaming, we use 'rtsp protocol'. You only have to put a correct URL on '''File/Open URL File''' to demand the video streaming to the IP camera. We use an Axis IP camera to test it. | ||
| Line 39: | Line 39: | ||
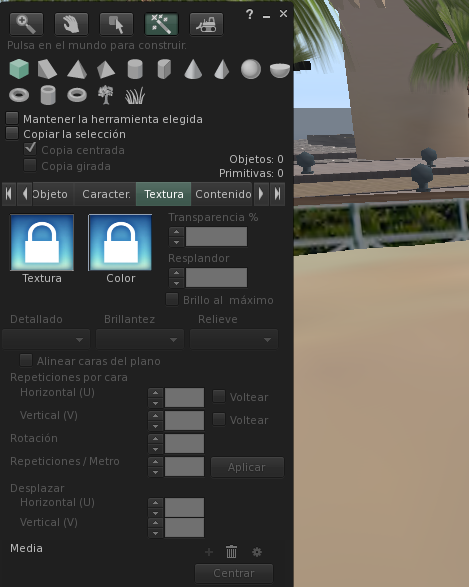
* Inside Second Life viewer, click on your mouse right button and choose Build. It will open a menu that will show what primitive you want to create as shown on figure 3. Choose the cube. | * Inside Second Life viewer, click on your mouse right button and choose Build. It will open a menu that will show what primitive you want to create as shown on figure 3. Choose the cube. | ||
[[File:CreateCube.png]] | |||
''Figure 3. Creating a cube | |||
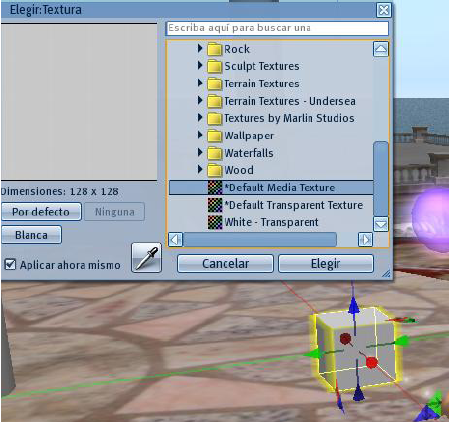
* Now, we want to set a texture to your cube primitive. We will use '' Default Media texture'' on Texture tab. See the figure 4. | * Now, we want to set a texture to your cube primitive. We will use '' Default Media texture'' on Texture tab. See the figure 4. | ||
[[File:CubeTexture.png]] | |||
''Figure 4. Setting the texture'' | |||
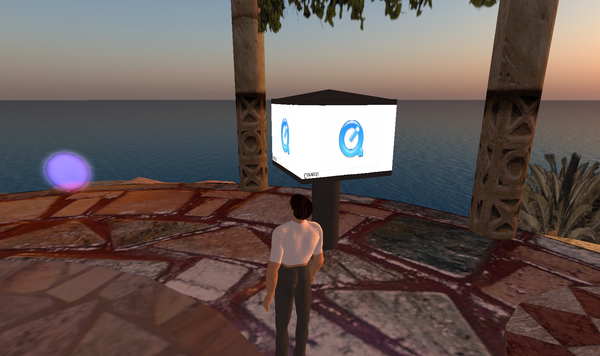
* You can also give a screen appearance using other primitives. In figure 5 you can see a possible result. | * You can also give a screen appearance using other primitives. In figure 5 you can see a possible result. | ||
[[File:ScreenAppaerance.png|600px]] | |||
''Figure 5. Screen Appearance'' | |||
==Setting video streaming on the screen faces== | ==Setting video streaming on the screen faces== | ||
| Line 59: | Line 59: | ||
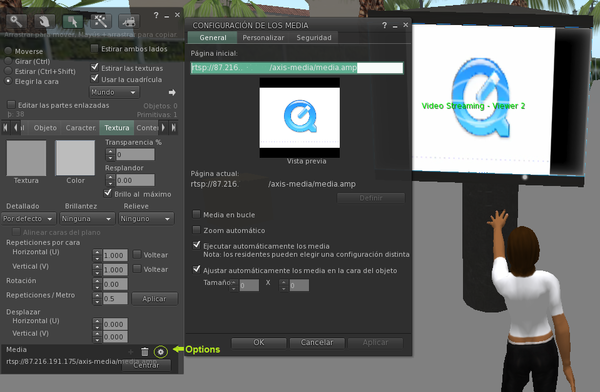
* In ''Texture'', click on the bottom right corner the option button like we can see in figure 6. | * In ''Texture'', click on the bottom right corner the option button like we can see in figure 6. | ||
[[File:faceURL4.png|600px]] | |||
''Figure 6. Selecting a URL'' | |||
* Put a correct URL using rtsp protocol as we made before on Quicktime. | * Put a correct URL using rtsp protocol as we made before on Quicktime. | ||
| Line 67: | Line 67: | ||
[[File:ShowingVideo.png]] | |||
''Figure 6. Selecting a URL'' | |||
=Additional features= | =Additional features= | ||
Revision as of 07:46, 7 February 2011
Streaming Video with IP cameras into Second Life
Getting Started
The following are the basic prerequisites for streaming video with Ip cameras into Second Life:
- Your movie files must be compressed using QuickTime format (.mpeg4 or .mov), and QuickTime must be installed on your computer.
- If the video you're attempting to stream plays in the QuickTime player on your own computer, it should stream into Second Life correctly.
- Be sure that stream's URL exists.
Basic arquitecture
In order to video stream, we need focus on two different sides: real world implementation through IP cameras that record the real world and a virtual world which the user interacts with.
Setting IP camera
The first step will be configure your IP camera with the correct video format. This format should be mpeg4. See the documentation of your IP camera to set up this feature.
Install Quicktime on your computer
It is a priority have installed Quicktime in order to show video on Second Life. You can download it from http://www.apple.com/es/quicktime/download/ When you have Quicktime on your computer, you can make a proof opening an URL of video streaming.
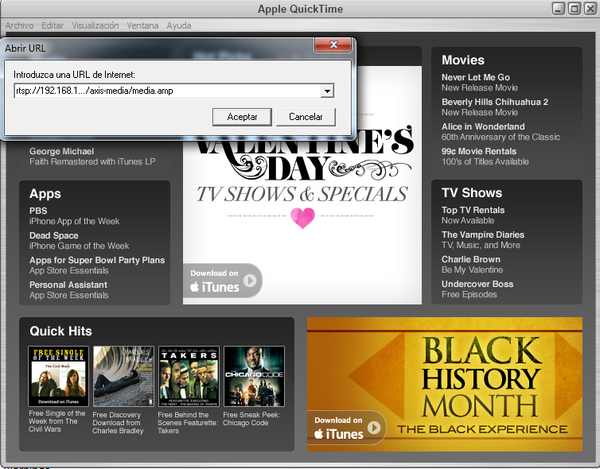 Figure 2. Open a URL to display video with Quicktime.
On figure 2 you can see that, in order to display video streaming, we use 'rtsp protocol'. You only have to put a correct URL on File/Open URL File to demand the video streaming to the IP camera. We use an Axis IP camera to test it.
Create a screen to display video streaming
On this step, we will create a screen in order to show video streaming. Several primitives that Second Life offers have been used to implement a screener, from which the most important is the cube that will display the video stream.
How to create a cube:
- Inside Second Life viewer, click on your mouse right button and choose Build. It will open a menu that will show what primitive you want to create as shown on figure 3. Choose the cube.
- Now, we want to set a texture to your cube primitive. We will use Default Media texture on Texture tab. See the figure 4.
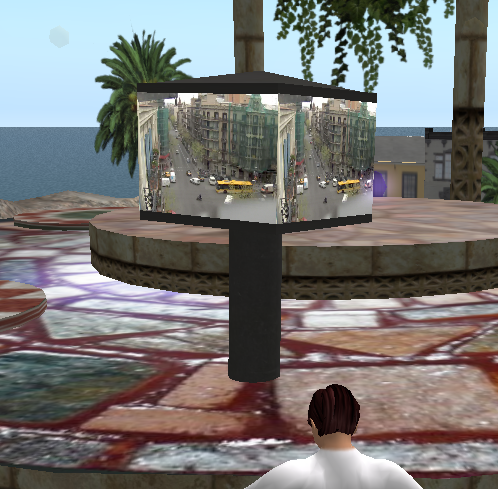
- You can also give a screen appearance using other primitives. In figure 5 you can see a possible result.
Setting video streaming on the screen faces
Viewer 2 allows you to show in all primitive's faces the URL content you want. In our case, we will show video streaming using the protocol rtsp and the URL that provides us the video. With the right button click above the screen and select edit. After, follow these steps:
- In General tab, click on choose a face
- Select, with the mouse left button, a face from our screen where you want the video be displayed.
- In Texture, click on the bottom right corner the option button like we can see in figure 6.
- Put a correct URL using rtsp protocol as we made before on Quicktime.
- Click on Set and apply changes.
- Finally, we can see the IP camera video on our screen design.
Additional features
An additional feature can be offered such as PTZ as long as the IP camera supports it. This can be done by passing arguments using http requests in order to modify video streaming aspects. This is the main idea behind the scripts developed on Second Life, which allows users to execute PTZ features from in-side the game.

