Difference between revisions of "Texture Windows"
| Line 4: | Line 4: | ||
This page is part of the [[User's Manual]]. It covers the texture-related windows in the Second Life viewer. Photos have their own category in inventory, but otherwise behave the same as textures. | This page is part of the [[User's Manual]]. It covers the texture-related windows in the Second Life viewer. Photos have their own category in inventory, but otherwise behave the same as textures. | ||
==== Color Picker ==== | ==== Color Picker ==== | ||
This window lets you add a color tint to an object's textures. | This window lets you add a color tint to an object's textures. Color tints are additive, meaning they can only darken a texture. It applies to all surfaces of an object. It is opened by clicking the '''Color''' box in the '''Tools > Edit > Texture''' window. The built in color picker can be changed with '''Advanced Menu > Debug Settings > usedefaultColorPicker''' item. | ||
There are three color systems: RGB, Hue/Saturation/Luminosity, and the color chart. Three values are required to specify a color because the human eye has three color sensors. Setting with any of the 3 systems will set the values on the other two to corresponding values. | There are three color systems: RGB, Hue/Saturation/Luminosity, and the color chart. Three values are required to specify a color because the human eye has three color sensors. Setting with any of the 3 systems will set the values on the other two to corresponding values. | ||
[[File:V1.23 Color Picker.jpg|thumb|left|396px|'''Color Picker Window''']] | |||
'''Red:, Green:, Blue:''' - This system uses number values from 0 to 255 for each primary color, where 0 represents dark or black, and 255 represents light or white. | '''Red:, Green:, Blue:''' - This system uses number values from 0 to 255 for each primary color, where 0 represents dark or black, and 255 represents light or white. | ||
| Line 31: | Line 31: | ||
'''Cancel''' - Closes the window | '''Cancel''' - Closes the window | ||
'''Select''' - Applies the current color to the object being edited. | '''Select''' - Applies the current color to the object being edited, and closes the window. | ||
<br clear="all"/> | |||
[[File:V1.23 Pick Texture.jpg|thumb|right|370px|'''Pick: Texture Window''']] | |||
==== Pick: Texture ==== | |||
This window lets you select a new texture for an object being edited. It is opened by clicking the '''Texture''' box in the '''Tools > Edit > Texture''' window. Alternately you can drag a texture directly from inventory to a face of the object. | |||
If the '''Select Texture''' button on the upper pane of the Edit tool is active, a target will appear on one face of the object when you click on it, which will then be the side you change. If the button is off, then all sides of the object are changed. | |||
'''Texture Thumbnail''' - The upper left part of the window shows a thumbnail view of the texture. | |||
'''Dimensions''' - Gives the size of the full texture in pixels | |||
'''Defaut''' - Selects the system default textures, which is yellow plywood. | |||
'''Blank''' - Selects a plain white texture. | |||
'''None''' - ? | |||
'''Apply Immediately''' - When checked, your texture choice is applied immediately to the selected object, which is useful if you want to see the results quickly. | |||
'''Eyedropper button''' - When you already have an object selected, clicking this item lets you 'pull' a texture from another object, and then apply it to the first one. You must own the texture for this to work. | |||
'''Search box''' - Entering part of a texture name here will filter your inventory list to matching items. | |||
'''Texture List''' - Shows any folders in your inventory which contain textures. Clicking any texture will add it to the thumbnail window. | |||
'''Cancel''' - Closes the window. | |||
'''Select''' - Applies the selected texture and closes the window. | |||
<br clear="all"/> | <br clear="all"/> | ||
Revision as of 12:48, 10 September 2009
| Help Portal: |
Avatar | Bug Fixes | Communication | Community | Glossary | Land & Sim | Multimedia | Navigation | Object | Video Tutorials | Viewer | Wiki | Misc |
This page is part of the User's Manual. It covers the texture-related windows in the Second Life viewer. Photos have their own category in inventory, but otherwise behave the same as textures.
Color Picker
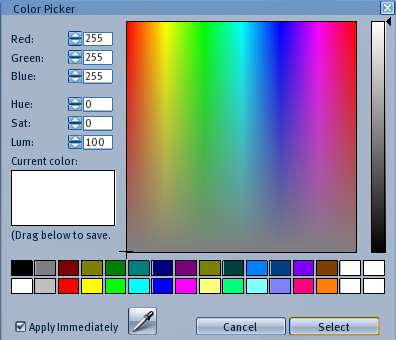
This window lets you add a color tint to an object's textures. Color tints are additive, meaning they can only darken a texture. It applies to all surfaces of an object. It is opened by clicking the Color box in the Tools > Edit > Texture window. The built in color picker can be changed with Advanced Menu > Debug Settings > usedefaultColorPicker item.
There are three color systems: RGB, Hue/Saturation/Luminosity, and the color chart. Three values are required to specify a color because the human eye has three color sensors. Setting with any of the 3 systems will set the values on the other two to corresponding values.
Red:, Green:, Blue: - This system uses number values from 0 to 255 for each primary color, where 0 represents dark or black, and 255 represents light or white.
Hue:, Sat:, Lum: -
Color Chart - The color chart graphically reproduces the Hue/Saturation/Luminosity system. Clicking anywhere in the large color box will set that hue (horizontal axis) and saturation (vertical axis). Clicking the grey strip to the right will set the luminosity.
Sources of color values can be found at 500+ Named Colors page. A tool such as Peacock Color Picker can be used to match a color on an existing item.
Current color: - Shows the current color selected with the above systems. You can click-drag to the preset colors palette below to save the color.
Preset Color Palette - 32 colors can be saved in this area, 28 of which are defined by default.
Apply Immediately - If checked, the current color is applied immediately to the object being edited.
Eye Dropper -
Cancel - Closes the window
Select - Applies the current color to the object being edited, and closes the window.
Pick: Texture
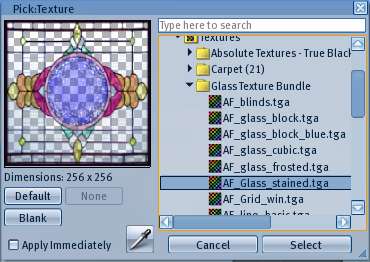
This window lets you select a new texture for an object being edited. It is opened by clicking the Texture box in the Tools > Edit > Texture window. Alternately you can drag a texture directly from inventory to a face of the object.
If the Select Texture button on the upper pane of the Edit tool is active, a target will appear on one face of the object when you click on it, which will then be the side you change. If the button is off, then all sides of the object are changed.
Texture Thumbnail - The upper left part of the window shows a thumbnail view of the texture.
Dimensions - Gives the size of the full texture in pixels
Defaut - Selects the system default textures, which is yellow plywood.
Blank - Selects a plain white texture.
None - ?
Apply Immediately - When checked, your texture choice is applied immediately to the selected object, which is useful if you want to see the results quickly.
Eyedropper button - When you already have an object selected, clicking this item lets you 'pull' a texture from another object, and then apply it to the first one. You must own the texture for this to work.
Search box - Entering part of a texture name here will filter your inventory list to matching items.
Texture List - Shows any folders in your inventory which contain textures. Clicking any texture will add it to the thumbnail window.
Cancel - Closes the window.
Select - Applies the selected texture and closes the window.
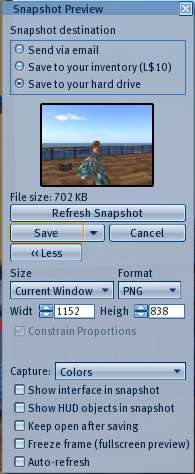
Snapshot Preview
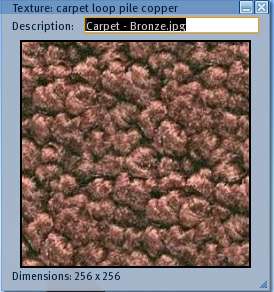
Texture
