Difference between revisions of "User:Opensource Obscure/Panel Navigation Bar 2.1"
m (details) |
|||
| Line 27: | Line 27: | ||
''PLEASE CONTACT OPENSOURCE OBSCURE IF THESE INSTRUCTIONS DON'T WORK FOR YOU OR IF SOMETHING IS ..OBSCURE'' | ''PLEASE CONTACT OPENSOURCE OBSCURE IF THESE INSTRUCTIONS DON'T WORK FOR YOU OR IF SOMETHING IS ..OBSCURE'' | ||
== StarLight + Sky button == | |||
You can also add the Sky button if you are using the [https://wiki.secondlife.com/wiki/Viewer_Skins/Starlight StarLight skin] for Viewer 2.1. The process is similar to what is outlined above. | |||
* Make a backup copy of the "panel_navigation_bar.xml" file found in the StarLight folder (StarLight-->xui-->en-->skins) | |||
* Find the line in that file that starts with "<search_combo_box" | |||
* Two lines above that change width="180" to width="144" | |||
* Find the line "<!-- About Land Button here -->" | |||
* Above that line, add a new line with the following code | |||
<button follows="left|top" height="23" layout="topleft" left_pad="7" name="Windlight" label="Sky" tool_tip="Open Sky Settings" top_delta="0" width="30"> <button.init_callback function="Button.SetFloaterToggle" parameter="env_windlight" /> </button> | |||
* Save and quit | |||
== Italiano == | == Italiano == | ||
Revision as of 17:57, 30 July 2010
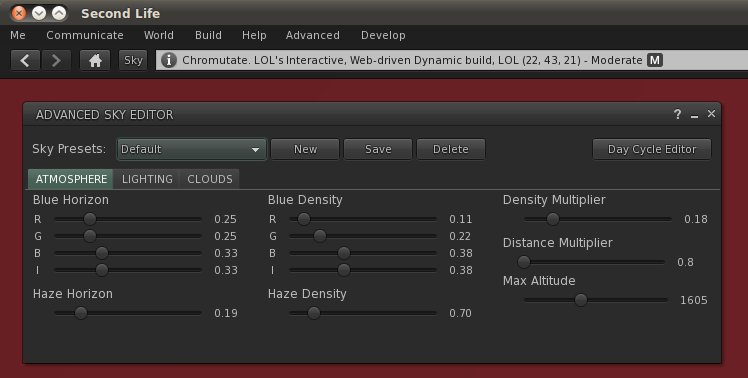
The following instructions will let you add a Sky button to the Location Bar.
When you press the Sky button, the Advanced Sky Editor window opens and you can easily change the Sky Presets by using the drop-down menu in the upper-left corner of the window.
See the WindLight_settings page for many additional presets.
Add a Sky button to your viewer - the easy way
- Open the skins/default/xui/en/ folder inside your Second Life installation folder. Make a backup copy of the panel_navigation_bar.xml file.
- Right click this link and save the file to the skins/default/xui/en/ folder, overwriting the original panel_navigation_bar.xml file.
You can usually do the last step in a single action: in the Save as... window of your browser, select the original panel_navigation_bar.xml file, then press OK and confirm to overwrite it.
By hand
It may take more time, but this way you can see what the change is about.
- Make a backup copy, then edit this file: skins/default/xui/en/panel_navigation_bar.xml
- Use the Search/Find feature of your text editor and search this string: *TODO
- In the line above, change 266 to 230
- A dozen of lines above, look for this string: <location_input
- Above that line, add a new line with the following code
<button follows="left|top" height="23" layout="topleft" left_pad="7" name="Windlight" label="Sky" tool_tip="Open Sky Settings" top_delta="0" width="30"> <button.init_callback function="Button.SetFloaterToggle" parameter="env_windlight" /> </button>
- Save and quit
PLEASE CONTACT OPENSOURCE OBSCURE IF THESE INSTRUCTIONS DON'T WORK FOR YOU OR IF SOMETHING IS ..OBSCURE
StarLight + Sky button
You can also add the Sky button if you are using the StarLight skin for Viewer 2.1. The process is similar to what is outlined above.
- Make a backup copy of the "panel_navigation_bar.xml" file found in the StarLight folder (StarLight-->xui-->en-->skins)
- Find the line in that file that starts with "<search_combo_box"
- Two lines above that change width="180" to width="144"
- Find the line ""
- Above that line, add a new line with the following code
<button follows="left|top" height="23" layout="topleft" left_pad="7" name="Windlight" label="Sky" tool_tip="Open Sky Settings" top_delta="0" width="30"> <button.init_callback function="Button.SetFloaterToggle" parameter="env_windlight" /> </button>
- Save and quit
Italiano
Apri la cartella skins/default/xui/en/ dentro la cartella di Second Life. Fai una copia del file panel_navigation_bar.xml.
Clicca qui e scegli Salva Link come... - salva il file nella cartella skins/default/xui/en/, dandogli nome panel_navigation_bar.xml e sovrascrivendo il file originale.

