|
|
| Line 1: |
Line 1: |
| <noinclude>{{Pathfinding alpha}}</noinclude>
| | {{Pathfinding Nav}} |
| __TOC__ | | __TOC__ |
| {{KBnote|The Viewer tools described here are not yet available in a public Second Life Viewer build, but will be soon. }} | | {{KBnote|The Viewer tools described here are not yet available in a public Second Life Viewer build, but will be soon. }} |
Revision as of 11:44, 2 March 2012
 |
Note: The Viewer tools described here are not yet available in a public Second Life Viewer build, but will be soon. |
Introduction
For pathfinding, four new floaters allow users to more efficiently create, visualize, test, and debug pathfinding-enabled characters. These tools are not required to create pathfinding behaviors but are particularly useful to builders and experience creators in Second Life.
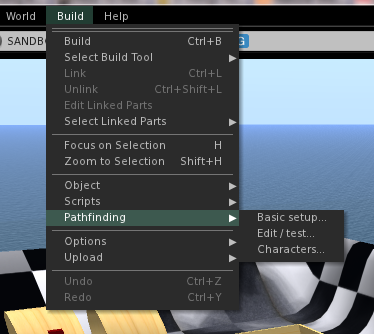
These tools may all be accessed through the Build->Pathfinding menu in the Project Viewer - Pathfinding.
Basic Pathfinding Setup Floater
Overview
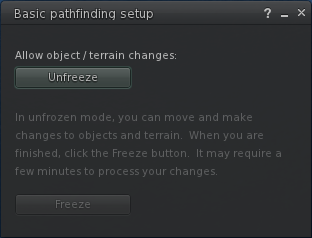
The intent of Basic Pathfinding Setup floater is primarily for basic SL user. This floater will allow users to quickly toggle between FROZEN and UNFROZEN mode allowing basic users to position pathfinding-enabled objects into the desired location within the region.
Controls
| Unfreeze
|
|
Click to switch from the default FROZEN state to the UNFROZEN state. In the UNFROZEN, you can move permanent objects and alter terrain.
|
| Freeze
|
|
Click to switch back to FROZEN mode after making desired changes to permanent objects and/or terrain.
FUTURE: Upcoming changes to the simulator will also re-generate the navmesh when a user switches back to the FROZEN state.
|
Example Usage
A basic Linden user purchases a pathfinding-enabled house. Because the pathfinding-enabled house will contain objects that are marked as permanent, the user will be unable to rez and position the house into the region in the FROZEN state.
Thus, when a pathfinding-enabled house is to be rezzed on the region, the user will use the Basic Pathfinding Setup floater to switch in the UNFROZEN state. The user may then rez and position the house as desired. After the house meets the user's expectation, the Freeze button on the Basic Pathfinding Setup floater will toggle the user back into the FROZEN state. Additionally, the switch back to FROZEN will eventually (FUTURE FUNCTIONALITY) re-generate the navmesh.
Pathfinding Edit/Test Floater
Overview
The intent of the Pathfinding Edit/Test floater is for advanced users who are building pathfinding-enabled objects and characters.
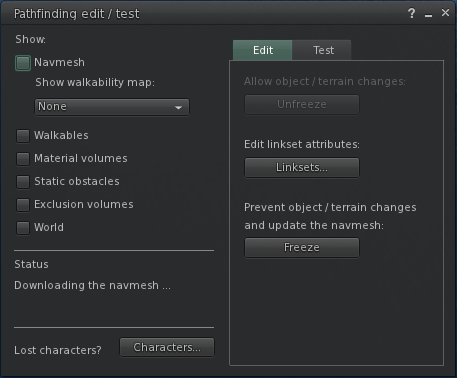
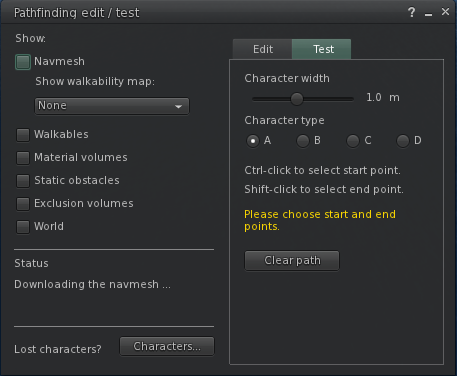
This floater consists of 3 control areas.
- Visualization Controls (left-side of the floater)
- Edit Tab Controls
- Test Tab Controls
The following image is a screenshot of the Pathfinding Edit/Test floater with the Edit tab displayed.
The following image is a screenshot of the Pathfinding Edit/Test floater with the Test tab displayed.
Controls
| Viewer Status
|
|
Reports the status of the pathfinding navmesh including the download process of retrieving the navmesh data from the simulator.
|
| Simulator Status
|
|
Reports the status of the region's navmesh on the simulator including when the navmesh has pending changes, is building, or is up-to-date.
|
View tab
Show
| World
|
|
Select to display the normal world view of the region's objects.
|
| Movables Only
|
|
Select to display only the region's objects that are not marked as affecting the navmesh (Walkable, Static Obstacle, Material Volume, or Exclusion Volume). This is useful to determine which objects on the region are still movable and thus contributing to increase pathfinding time on the simulator. Note: this checkbox is only enabled when World is also selected.
|
| Navmesh
|
|
Toggles the display of the navmesh within the Viewer.
|
| Show Walkability Map
|
|
If the navmesh is displayed, the drop-down enables you to view the navmesh as a heatmap. This mode enables you to view the walkability values baked into the navmesh in the style of a heatmap illustrating the respective values across the navmesh.
|
| Walkables
|
|
Select to display the walkables used when the navmesh was generated. Use this option to visualize how objects of type walkable affected the navmesh generation.
|
| Material Volumes
|
|
Select to display of material volumes used when the navmesh was generated. Use this option to visualize how objects of type material volume affected the navmesh generation.
|
| Static Obstacles
|
|
Select to display static obstacles used when the navmesh was generated. Use this option to visualize how objects of type static obstacle affected the navmesh generation.
|
| Exclusion Volumes
|
|
Select to display exclusion volumes used when the navmesh was generated. Use this option to visualize how objects of type exclusion volume affected the navmesh generation.
|
| Water Plane
|
|
Select to display a simple plane representation of the water. Use this option when the World is hidden to visualize where the water-line is in the world.
|
| With X-ray Vision
|
|
Select to alter the rendering into x-ray mode allowing for partial visibility through other objects. Use this option to get a better visualization of the world in complex situations.
|
Test tab
To specify the starting point of the test character path, hold down the <CTRL> key and click the left mouse button in the Viewer window.
To specify the ending point of the test character path, hold down the <SHIFT> key and click the left mouse button in the Viewer window.
| Character Width
|
|
Use the slider to specify the width of the test character, ranging from 0.1 meter to 2 meters.
|
| Character Type
|
|
Specify the character type of the test character.
|
| Clear Path
|
|
Click to clear a path generated and displayed in the Viewer.
|
Example Usage
- The advanced user will use the Visualization controls to visualize how the navmesh and related permanent objects have been generated. By seeing this visualization of how the physics engine interprets the navigation information, the advanced user can understand how to better custom the pathfinding-enabled objects to obtain the desired behaviors of characters.
- The advanced user will use the Edit Tab to switch to UNFROZEN mode, then to make the desired changes to pathfinding-enabled objects, and then to switch back to FROZEN mode. FUTURE FUNCTIONALITY In the future, switching back to FROZEN mode will prompt the server to re-generate the navmesh.
- The advanced user will use the Test Tab to visualize how a test character would choose the path between selected start and end points.
Pathfinding Linksets Floater
Overview
The intent of the Pathfinding Linksets floater is to give advanced users and builders the ability to customize an area to achieve interesting effects with pathfinding-enabled characters.
The floater displays information for all linksets within the current region for which the user has the ability to alter. The table reports useful information including
- Linkset Name
- Description
- Land Impact
- Distance from the user's avatar
- Linkset Use
- Potential values
- Walkable
- Static Obstacle
- Movable Obstacle
- Material Volume
- Exclusion Volume
- Movable Phantom
- Walkability Coefficients
- Character Type A
- Character Type B
- Character Type C
- Character Type D
Additionally, selecting any linksets within the floater will also select the object(s) within the Viewer.
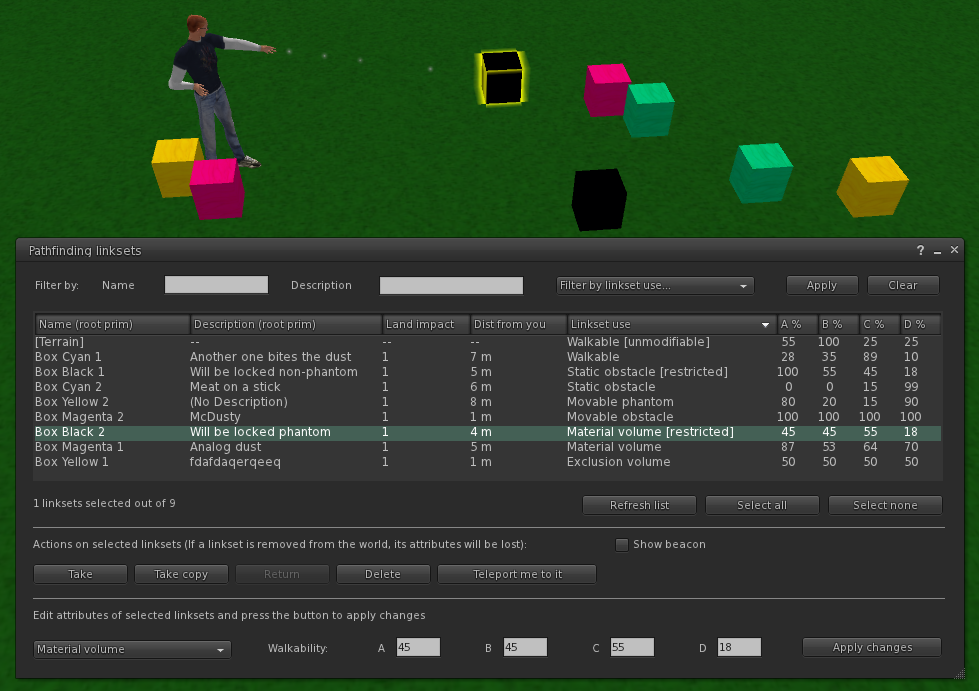
Controls
Filter by:
| Filter by Name
|
|
Enter text by which to filter the linkset list based on Name attribute.
|
| Filter by Description
|
|
Enter text by which to filter the linkset based on the Description attribute.
|
| Filter by linkset use...
|
|
Click to display only the linksets that match selected use.
|
| Apply
|
|
Click to apply the filters to the linkset list.
|
| Clear
|
|
Click to clear the filters and return the linkset list back to the original un-filtered contents.
|
| Refresh list
|
|
Click to refresh the linkset list from the server. Use after you add or delete a linkset inworld.
|
| Select all
|
|
Click to select all linksets in the list.
|
| Select none
|
|
Click to deselect all selected linksets in the list.
|
| Show Beacon
|
|
Select to display a beacon indicating the inworld location of each selected linkset. Use to locate hard-to-find or invisible linksets in the region.
|
| Take
|
|
Click to take the selected linkset(s) into your inventory.
|
| Take Copy
|
|
Click to take a copy of the selected linkset(s) into your inventory.
|
| Teleport Me To It
|
|
Teleports you to the selected linkset. Useful to find faraway linksets. Note this button is only enabled when you have selected one linkset.
|
| Return
|
|
Click to returns the selected linkset(s) to the owner's inventory.
|
| Delete
|
|
Click to delete the selected linkset(s) from the region.
|
| Choose Linkset Use
|
|
Change the linkset use attribute of the selected linkset(s).
|
| Walkability Coefficients
|
|
Enter individual walkability coefficients for each character type (A, B, C, D).
Walkability coefficients range from 0% to 100% to determine the influence the effect the linkset has on a character's speed while the character is traversing across the linkset object.
For example, a linkset with Walkability Coefficient of 50% for character type A will cause characters of type A to reduce their speed by half while the character is traversing the object.
|
| Apply Changes
|
|
Click to apply changes to the selected linkset(s) use type and/or walkability coefficients.
|
Notes
- For linksets with use fields marked as "[restricted]", only certain linkset use modes are available. This restriction is the result of the object not having modifiable permission enabled for the user.
- For linksets with use fields marked as "[concave]", the linkset use modes for Material Volume and Exclusion Volume are not available. This restriction is the result of the shape object not being convex. All pathfinding volumes must be convex.
- The "[Terrain]" linkset is available to be viewed and edited by the estate managers only. Additionally, while the walkability coefficients for the "[Terrain]" linkset are modifiable by estate managers, the Linkset Use field of "[Terrain]" linkset is not modifiable by anyone and will always be "Walkable".
Example Usage
The advanced users and builders will use the Pathfinding Linksets floater to customize areas to create interesting effects for pathfinding-enabled characters.
For instance, imagine the scenario of a builder constructing a single room in a pathfinding-enabled house. For the single room, the builder would use the following types as follows:
| Linkset Use |
Description
|
| Walkable |
The floor linkset would be set to be Walkable to allow characters to move across the floor.
|
| Static Obstacle |
A desk linkset in the room would be set to be Static Obstacle to block characters from walking through or across the object.
NOTE Any object that should block character movement and that does not move should be marked as Static Obstacle to improve performance of pathfinding characters.
|
| Movable Obstacle |
A door linkset in the room would be set to be Movable Obstacle. This will still block characters but, in contrast to Static Obstacles, Movable Obstacles will allow the linkset itself to move. In the case of the door, this will allow the door to open and close, but will still prevent characters from walking through the door.
|
| Material Volume |
Material Volumes are phantom objects that can be used to affect the walkability coefficients of intersecting objects. Imagine that the builder applied a texture to the floor. Also, imagine that the floor texture includes small throw rug in the middle of the room. (The builder did not want to create a separate object for the rug, so is using a texture on the floor to give the appearance of a rug). The builder can then create a Material Volume object intersecting the floor at the location of the rug. Then, by setting a lower walkability coefficient for the Material Volume, the builder will create the affect of slowing down characters as the characters traverse across the painted rug area.
|
| Exclusion Volume |
Exclusion Volumes are phantom objects that can be used to create areas where characters are prevented from moving. For instance, the builder can use an Exclusion Volume to create a section of the room where avatars would be able to move, but characters would be blocked from following.
|
| Movable Phantom |
Movable Phantoms are phantom objects that have no affect on pathfinding-enabled characters.
|
In addition to linkset use attributes, builders can achieve additional effects by modifying the walkability coefficients for linksets. The walkability coefficients are values, ranging from 0% to 100%, that affect a characters speed. A walkability coefficient of 50% will reduce a characters by half while the character is traversing across the linkset.
Pathfinding Characters Floater
Overview
The intent of Pathfinding Characters floater is primarily for users to locate characters moving throughout a region and to identify the CPU cost of characters affecting the performance of a region.
The floater displays information for all characters within the current region for which the user has the ability to manipulate. The table reports useful information including
- Character Name
- Description
- Owner
- CPU Time
- Altitude
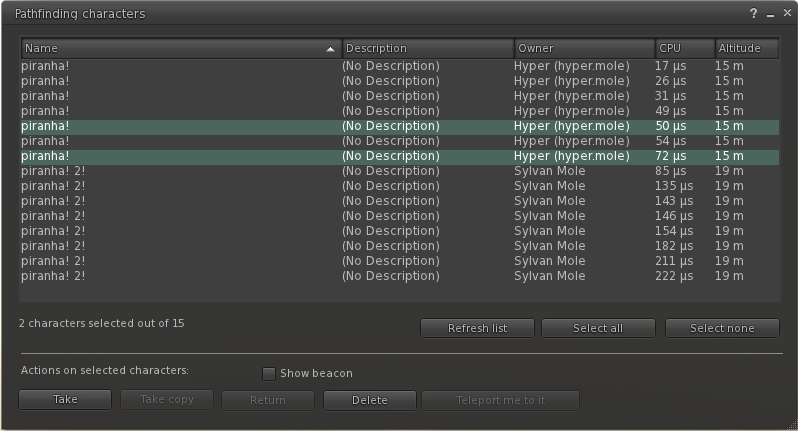
Controls
| Refresh List
|
|
Click to refresh the character list from the server. Typically used after a character is added or deleted in-world.
|
| Select All
|
|
Click to select all characters in the list.
|
| Select None
|
|
Click to deselect all selected characters in the list.
|
| Show Beacon
|
|
Select to display a beacon indicating the in-world location of each selected character. Use this option to locate hard-to-find or invisible characters in the region.
|
| Show Physics Capsule
|
|
Select to display the physics capsule representation of the currently selected character. Use this option to illustrate how the pathfinding physics engine sees the character shape for collisions. Note: this checkbox is only enabled when you select one character.
|
| Take
|
|
Click to take the selected character(s) into the user's inventory.
|
| Take Copy
|
|
Click to take a copy of the selected character(s) into the user's inventory.
|
| Teleport Me To It
|
|
Click to teleport to the selected character. Use this function to rapidly find faraway characters. Note: this button is only enabled when you select one character.
|
| Return
|
|
Click to return the selected character(s) to the owner's inventory.
|
| Delete
|
|
Click to delete the selected character(s) from the region.
|
Example Usage
- If a region owner has created a pathfinding-enabled character but is unable to find the character within the region, the Characters floater can be used to locate and select the character.
- Additionally, the Pathfinding Characters floater reports the CPU time cost for each character within the region. This functionality can be used by advanced users to identify which characters are impacting performance the most.


