Difference between revisions of "User:Rolig Loon/Local Textures"
Rolig Loon (talk | contribs) |
Rolig Loon (talk | contribs) |
||
| Line 1: | Line 1: | ||
'''Local Textures''' were introduced as a convenience for creators who want to view trial versions of their textures in world without having to pay L$10 to upload their work permanently. A Local Texture resides on the user's own computer. It is only visible on the user's own screen. Once it is applied, the texture remains visible in world until the user logs out. If the user saves an updated version of the texture on his computer, the update appears immediately in world, thus avoiding the need to upload a new copy. <br/><br/> | '''Local Textures''' were introduced as a convenience for creators who want to view trial versions of their textures in world without having to pay L$10 to upload their work permanently. A Local Texture resides on the user's own computer. It is only visible on the user's own screen. Once it is applied, the texture remains visible in world until the user logs out. If the user saves an updated version of the texture on his computer, the update appears immediately in world, thus avoiding the need to upload a new copy. <br/><br/> | ||
== Applying a Local Texture to Any Object == | |||
1. Select the object with the Build/Edit tool<br /> | 1. Select the object with the Build/Edit tool<br /> | ||
Revision as of 15:32, 28 August 2013
Local Textures were introduced as a convenience for creators who want to view trial versions of their textures in world without having to pay L$10 to upload their work permanently. A Local Texture resides on the user's own computer. It is only visible on the user's own screen. Once it is applied, the texture remains visible in world until the user logs out. If the user saves an updated version of the texture on his computer, the update appears immediately in world, thus avoiding the need to upload a new copy.
Applying a Local Texture to Any Object
1. Select the object with the Build/Edit tool
2. Open the Textures tab
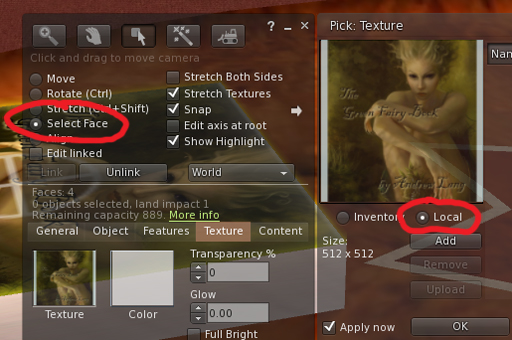
3. Left click the Texture picker window
4. Select the Local button under the window, and click the Select Face button if desired.
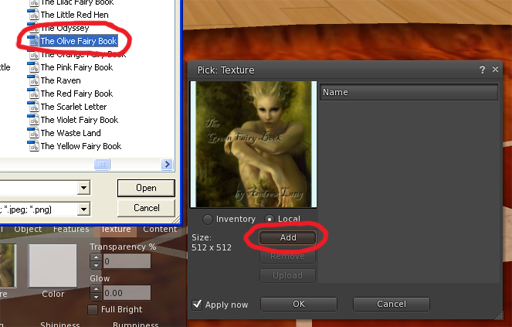
5. Click ADD to open a navigation window and locate the texture on your computer.
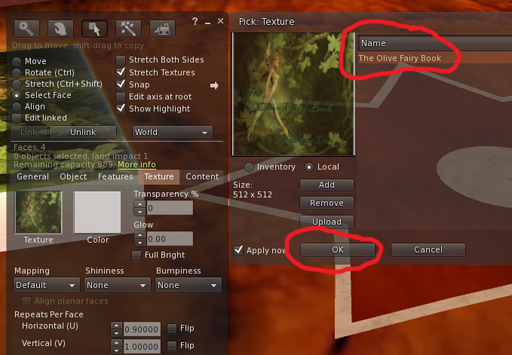
6. Highlight the texture and click Open to close the navigation window. You may add several textures in this way. Each will appear in a list to one side of the Texture Picker window.
7. Select a texture from the list by clicking to highlight it. Notice that your selected texture now appears in the Texture Picker window, replacing whatever texture was there before. Click OK to apply the texture to your object/face and close the tool.
Finding the UUID of a Local Texture
A Local Texture, like any texture in Second Life, has a unique UUID. You can get the UUID of your texture with a LSL script that asks for llGetTexture, like the sample script below. Once you have the UUID, you can use it in another LSL script to apply the texture to other objects. This may be useful, for example, if you are texturing a no-mod object that contains a texture-change script.
To find the UUID of your Local Texture, rez a simple plywood cube, apply the texture to its top face (face 0), and then drop this script into the cube. When you touch the cube, it will say the UUID of your Local Texture in chat.
<lsl>default
{
   touch_start(integer num)
   {
       llSay(0, llGetTexture(0));
   }
}</lsl>
Remember that the UUID, like the Local Texture itself, will be invalid when you log out of Second Life.