Difference between revisions of "Marketplace/Selling"
| Line 85: | Line 85: | ||
== [[Marketplace/Edit_Item_Listing|What do all the fields mean on the Edit Item Listing page?]] == | == [[Marketplace/Edit_Item_Listing|What do all the fields mean on the Edit Item Listing page?]] == | ||
^ Click to | ^ Click the question to get your answers. | ||
== How do I edit my store info? == | == How do I edit my store info? == | ||
Revision as of 11:41, 13 September 2010
How do I start selling stuff on the Marketplace?
Before you get started
| Tip: Are you a brand-new merchant? This section is for you! |
You can dive right in and create a store in just a couple of steps; however, if you're brand new to selling in Second Life, there there are a few things you should know and some preparations you'll want to make.
- Read the Listing Guidelines to be sure your products and listings will meet Linden Lab requirements.
- Get your products ready inworld. Currently, that includes putting them in a "Magic Box". Magic Boxes will eventually be obsolete, at which point products will need to be moved from the Magic Box to a to-be-determined special folder in your inventory.
- Have your store information and graphics handy (logo, banner, store policies, inworld and out-of-world links, etc.) and make sure they meet the requirements defined below.
Create a store
First, you'll need to create a web storefront. This may be in addition to an inworld store you already have setup (and there are ways to connect the two).
- On any Marketplace page, click My Marketplace in the upper-right and click Create a Store.
- If you've never done this before, you'll be asked to agree to the Marketplace Terms of Service. Read it carefully so you're aware of what you're agreeing to, then scroll down to the bottom and click Accept.
How do I add a new item to my Marketplace listings?
| Important: If the following sounds more confusing than it needs to be, you're right. Due to various complications with using Magic Boxes, they'll will eventually be obsolete and replaced by the Marketplace directly reading your inventory for item listings. Stay tuned for details. |
You use a special object called a "Magic Box" that connects to the Marketplace website. Basically, you drag objects into the box so the Marketplace recognizes them. Then, you can enable their listings and start selling. You can have multiple Magic Boxes, but for the sake of simplicity, start with one.
Here's how you add a new item:
- Login to the Marketplace website and get a Magic Box.
- In the Second Life Viewer, go to a land parcel you own or can reliably rez objects on. The Magic Box must stay inworld or your items can't be sold.
- Open the sidebar, click the My Inventory button (the suitcase icon), and rez the Magic Box.
- Right-click the Magic Box and choose Edit.
- In the build tools, click the Contents tab.
- Drag an object from your inventory into the Contents area. You should see it appear.
- On the Marketplace, choose My Marketplace > Merchant home (upper-right).
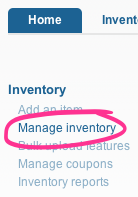
- Click Manage Inventory' (left-hand side).
- Click the Sync Marketplace with Magic Boxes button.
- Edit the new listing to complete at least the required fields. What do all those fields mean?
Torley is going to make a video to show this, since the steps involve lots of visual changes in sequence.
How do I remove an item from my Marketplace listings?
As of 2010-09-13, there doesn't appear to be a way to completely remove an existing item from your Marketplace listings. Merchants are currently limited to unlisting an item. Removing the object from your inworld Magic Box only changes the item status to Unavailable.
Until Magic Boxes are obsolete as mentioned above, to unlist an item:
- Login to the Marketplace and choose My Marketplace > My Store (upper-right).
- Click Manage inventory.
- Next to the item you want to unlist, click Unlist. See also "How do I update the listing of an item I'm selling".
How do I update the listing of an item I'm selling?
- In the upper-right, click My Marketplace > My Store.
- On the left-hand side, click Manage inventory.
- Here, you see all the items you're selling. Towards the right, click Edit next to the item you want to update.
- You can also Preview how an item listing looks to potential customers, or click Unlist/List to hide/show an item (this can be changed whenever you want).
| Tip: Get more help with managing your Marketplace inventory, including bulk-editing items. |
Migration help for XStreetSL merchants
This section is for Merchants who currently have products on the old XStreetSL, and provides help for managing product updates during the transition to the new Second Life Marketplace.
Linden Lab is on course for retiring XStreetSL and launching the Marketplace. During this transition, one of the best sources of information and how-tos are the Commerce Team's blog posts. The following sections refer to a few specific posts on migration that contain current and critical information for merchants.
Transition timeline
As the transition progresses, you'll notice features gradually being disabled in XStreetSL, while new features (and bug fixes) are being added to the Marketplace. According to Linden Lab blog posts, XStreetSL purchasing should be disabled by October 6th, 2010, and all XStreetSL functionality will be fully retired in December 2010.
A detailed listing of the transition plans and known dates can be found in Grant Linden's blog post "Second Life Marketplace is coming soon - Transition Plans".
Listing migration
The final migration for listing content is scheduled to occur on September 16th, 2010. All merchants need to check their migration settings and product information so that their products are properly migrated to the Marketplace.
Of particular importance to merchants is the migration of permission settings. Grant Linden has provided a comprehensive listing of what will and will not successfully migrate. For this and other recommendations for successful migration, see Grant Linden's "Update on the next SL Beta Marketplace listing migration - last migration for listing details".
Successfully updating a product during the transition
Until the transition to the SL Marketplace is complete, there are extra steps you'll need to take to ensure your products are updated both in XStreetSL and the SL Marketplace. Grant Linden explains how in "How to update a product during the Marketplace Transition".
What do all the fields mean on the Edit Item Listing page?
^ Click the question to get your answers.
How do I edit my store info?
Your store — and you can have one store per Second Life account — has its own "profile" that can be customized. You should take advantage of this to promote your brand:
- Click My Marketplace in the upper-right and click My Store.
- On the left-hand side, click Edit Store Information.
Here's what the fields mean:
- Store Name - This defaults to your Resident name but you can change it to something else, like the inworld brand that you're already using.
- Profile - Whatever you want to tell potential customers about you, like: who you are, what you sell, and why you do it. Up to 2,100 characters. Weird number, I know.
- Examples: "We've been selling in Second Life for seven years and these are some testimonials from thousands of delighted customers!", "We believe every avatar should be able to have an incredibly beautiful home", or "Our company's goal is to amplify your awesome."
- Policies - Do you accept refunds? How do you prefer to be contacted via email or IM or have you hired support staff that your customers should contact? Make sure to state this here so customers' expectations are clear. Up to 450 characters.
- Link to Blog - Or another website about your store. Many sellers use blogs to announce product updates. Some even group together and form community blogs, like iheartsl.
- Link to Store - If you have an inworld store, insert its SLurl here please!
- Store Image - Click Browse to choose a JPG, PNG, or GIF image from your hard drive. A well-compressed JPG generally works best. This isn't usually a picture of your inworld store, but your brand's logo. This small image must be exactly 45x45 pixels, so make sure what you upload is legible. Your image must meet these exact dimensions before you upload it. There are web tools like Picnik and that can help.
- Store Banner Image - Again, click Browse to choose a JPG, PNG, or GIF image from your hard drive. Must be exactly 700x100 pixels.
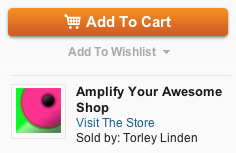
Your Store Name and Store Image appear on the right-hand side of all your item pages, like this:
| Tip: What?! If you've gotten this far and you haven't checked out our Seller's Guide yet, you totally should! |
How do I view my store?
So you've listed at least one item and setup your store info... you are awesome. Bask in the glow, then preview your store for all to behold (that almost rhymes):
- Go back to My Marketplace > My Store (which you should be familiar with now... wash, rinse, repeat).
- On the left-hand side, click View my Store. This is how your customers see it — but it also helps to browse the Marketplace as an alt to really walk in your customers' shoes.


