Difference between revisions of "Next-owner permissions FAQ"
Wiki Scribe (talk | contribs) m (Robot: kicking Template:Multi-lang) |
|||
| Line 67: | Line 67: | ||
[[Category:FAQs]] | [[Category:FAQs]] | ||
[[Category:Working with Textures]] | [[Category:Working with Textures]] | ||
[[Category:Knowledge Base]] | [[Category:Knowledge Base]] | ||
Revision as of 08:29, 25 October 2009
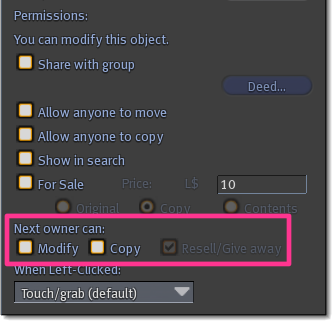
Permissions let you control what other people can do with things you create. The basic permissions include: Copy (whether someone can make copies of your work), Modify (whether someone can change your work), and Resell/Give away (also known as "Transfer"). If the object is inworld (rezzed), right-click it and choose Edit, then click the General tab. If the object is in your inventory, right-click it and choose Properties.
The settings you can change are listed under Next owner can:
- Modify - Checking this lets the next owner modify your creation. Unchecking it denies modifications. One exception to this falls under "fair use": an object can always be removed from the contents of another object, even if the container object is no-modify.
- Copy - Checking this lets the next owner copy your creation. If they drag the object from inventory to inworld, they retain a copy in inventory. Unchecking it denies any copies; if they drag the object inworld, it leaves their inventory until taken back into inventory.
- Resell/Give away: Checking this lets the next owner transfer your creation to someone else. If the object is also copy-enabled, they can sell copies. If the object doesn't permit copies, they can only sell the original. Unchecking Resell/Give away means the next owner can't give the object to anyone else. If the object is set to Copy but not Resell/Give away, they can make as many copies as they want for their own uses, but can never give a copy away or sell it.
| Important: Permissions changes to an object in your inventory are not fully applied to contents until that object is rezzed. This can be problematic if you intended to make an object entirely no-copy but gave it away without confirming the contents were restricted. As a safety precaution, make sure to rez and retake objects before distributing them. |
Other relevant permissions are:
- Share with group - If an object is set to a group, this allows other members of the same group to edit it, dependent on restrictive permissions. This can make collaborative building easier since for example, group members can move shared objects. As with permissions in general, be careful of who else has access to your objects, and don't enable this if it's not needed. See also "How do I manage objects on group-owned land?".
- Allow anyone to move - If this option is checked, anyone can move your object. This is rarely used because most people don't want complete strangers either unintentionally or maliciously destroying their building projects.
- Allow anyone to copy - Anyone can take a copy of the object by right-clicking it, then choosing More > Take Copy from the pie menu. However, this feature can be confusing to use because the object and all of its contents must be fully-permissive and also have Allow anyone to copy checked. As a result, most people opt to use an easier alternative: set the object for sale as a free (L$0) copy instead.
| Tip: An object or contents item that is modifiable, copyable, and transferrable is "fully-permissive", or in Second Life lingo, "full perms" for short. |
Bulk-setting permissions
Second Life® Viewer 1.23 introduced a couple useful tools to save time by bulk-setting permissions. That means permissions can be applied across multiple items instead of one at a time.
Setting default permissions when uploading
The first way to bulk-set permissions is when you're uploading images (textures), sounds, or animations:
- Go to File > Upload > Set Default Permissions.
- A window appears allowing you to specify Next owner can permissions. Check the ones you want to enable. For example, if you want to upload a bunch of textures that other people can copy but not transfer, check Copy but make sure Resell/Give away is unchecked.
- Then, use File > Upload > Bulk (L$10 per file). Your default permissions also apply to single uploaded items.
- Select multiple files by holding down the Shift or Ctrl key, then confirm upload.
- After the uploads are complete, open your inventory. You can right-click each item and choose Properties to verify permissions have been set correctly.
This video gives you a tour on how to do this:
<videoflash type="vimeo">5400001|640|480</videoflash>
Setting bulk permissions in an object's contents
The second way to bulk-set permissions is when the items are in an object's contents:
- Right-click an object with contents you want to change.
- Click the Content tab.
- Click Permissions button.
- Check or uncheck content (item) types whose permissions you want to change. You can also click Check All or Uncheck All to select or deselect them globally. By the way, "Textures" and "Snapshots" are essentially the same thing and both are represented under Textures. (Click Help in the "Bulk change content permissions" window for more technical background and caveats.)
- Similar to setting default permissions when uploading, there's a Next owner can section here. Check the ones you want to enable or disable. Doing this is dependent on an item's already-restricted permissions: you can't make a no-copy object copyable.
- When you're satisfied with your settings, click Apply and wait a few seconds. The permissions are applied.
| Tip: If you forgot to apply permissions when uploading, a workaround is: rez a cube, then drag those items from inventory into the cube's contents and set permissions in there. |
This video shows you how it works:
<videoflash type="vimeo">5399986|640|480</videoflash>

