Marketplace/Selling
How do I start selling stuff on the Marketplace?
Create a store
First, you'll need to create a web storefront. This may be in addition to an inworld store you already have setup (and there are ways to connect the two).
- On any Marketplace page, click My Marketplace in the upper-right and click Create a Store.
- If you've never done this before, you'll be asked to agree to the Marketplace Terms of Service. Read it carefully so you're aware of what you're agreeing to, then scroll down to the bottom and click Accept.
More help to come as this feature is fleshed out.
How do I update the listing of an item I'm selling?
- In the upper-right, click My Marketplace > My Store.
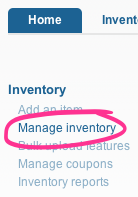
- On left-hand side, click Manage inventory.
- Here, you see all the items you're selling. Towards the right, click Edit next to the item you want to update.
- You can also Preview how an item listing looks to potential customers, or click Unlist/List to hide/show an item (this can be changed whenever you want).
Help on bulk-editing item listings coming soon!
| Tip: For hot tips on how to make the most of the item fields, check out our Seller's Guide! |
On the Edit Item Listing page, here's what all the fields mean:
- SKU - This stands for "Stock-Keeping Unit" and is a unique identifier for each item. If you're already using a metrics-tracking system with SKUs, you can use the same SKU here for convenience. SKU is also used when using the Related Items field below.
- Item Status - Can be Active or Inactive. The same thing as Unlist/List on the Manage inventory page.
- Permissions - What the customer can do with the object. Note that setting this does not change your original item's permissions — you need to set those beforehand and check the same boxes here. Make sure to be accurate, as permissions are a big part of a buying decision.
- If your item has permissions subtleties, make sure to note them in the Extended description below. For example, a robot toy may be modifiable in that you can change the robot's colors, but the script inside the robot are no-modify.
- International tabs - If you've localized your item for additional languages, click a language tab to enter that information.
- SL object name - Corresponds to what the object is named in your inworld Magic Box. This can't be changed from this web interface — you must edit the object in your Magic Box.
- Item name - You can leave this the same as the SL object name, or expand it to be more descriptive for additional visibility. This field is searchable and can be up to 120 characters.
| Tip: Item names appear in the page's URL, which then shows up in search engine results. A well-chosen name will help you become more discoverable via higher search rankings, so be careful of using decorative Unicode and other wasted space that doesn't contribute. Learn more about search engine optimization. |
- Product features - Call out up to five specific highlights to inform why someone would want to buy your stuff.
- Extended description - Details about your product in plain text (the old Xstreet BBcode isn't supported). This commonly includes expanded info about the Product features, Permissions, and other fields. You can also link to a video tutorial or other rich documentation. Many merchants use it to provide customer service info, although Edit Store Information is probably a better place for that. Also, product manuals should be provided as a Downloadable PDF as mentioned below. This field is not searchable and can be up to 5,000 characters.
- Keywords - Specific terms you expect this item to be found with when customers search. This field is searchable from Marketplace search and can be up to 200 characters, including commas and spaces.
- Category - Click Change category to get category suggestions. In the popup, search categories, then click the category that fits best from the list.
- Item price - In L$. If this item is a freebie, enter
0. - Prim count - The number of prims this objects is. Subtleties can be explained in the Extended description. For example, if you're selling a set of furniture where the chair is 20 prims and the table is 30, be sure to state that so the buyer is well-informed.
- SLurl - This is usually a link to your inworld storefront, or at least, a place the object can be viewed in three dimensions inworld, which helps with buying decisions. Whenever possible, enter a specific link to the exact location instead of a generic one to the front of your store. Learn more about SLurls.
- Available quantity - This is usually Unlimited unless you're selling something like limited-edition art. In which case, select the right radio button and enter an amount. Limited items are often sold as no-copy so the buyer can't duplicate it.
- It's bad form to sell something in limited quantities then change the amount later because it damages the perceived value and rarity of an item, so think carefully before setting a number.
- Images - While this field isn't required, it's one of the most important to communicate what you're selling, so include at least one image. Click Upload an image to get info and choose a JPG, PNG, TGA, or GIF image from your hard drive. You can have up to 8 images for an item.
- For highest quality, upload images that are exactly 700x525. You can upload bigger images but they'll be resized to fit within these dimensions, and may appear hard to read.
- You can use the same textures from your inworld store by saving them to disk and uploading them to the Marketplace. The minimum dimensions are 512x512 pixels, which is a common size for inworld product panels.
- Downloadable PDF - Click Browse to choose a PDF from your hard drive. PDFs can be more beautiful and readable than inworld notecards.
- You can include extended content in a PDF, like additional high-res images and Flash movies.
- There isn't a limit to the size of the PDF file, but you should use your buyers' time and bandwidth wisely.
- If you don't own Adobe software on Windows, you can use Microsoft Word or OpenOffice to create PDF files. On a Mac, almost every application can "print" to a PDF file.
- Related Items - Click Add related item to search your existing products for items you want to appear under this one. Related items are commonly variations (such as different colors of the same basic thing) or complementary (under a coat listing, you could have an umbrella as a related item). You can have up to 8 related items.
- Demo Item - Want customers to be able to try before they buy? Demos tend to be clearly limited versions of the real thing you've modified in advance: for example, a skin with a "DEMO" tattoo on it. Click Add demo item to choose one. Demo items themselves can be unlisted.
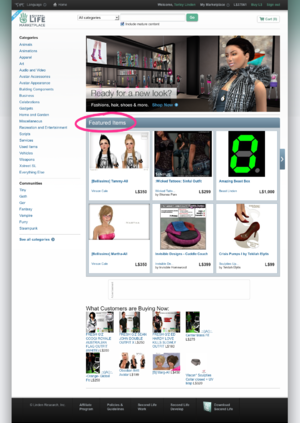
- Listing Enhancements - Promote your item by advertising a "Featured Item" listing on a highly visible page. You can:
- Feature this item on the home page - http://marketplace.secondlife.com
- Feature this item on a category landing page - For example, Avatar Accessories.
- Feature this item on the checkout receipt page - After a shopper completes the purchase process, they see this page. See example.
- Feature this item on the L$0 cart checkout ads page - When a shopper is checking out with a L$0 balance (freebies), they see this landing page. See example.
- Each feature ad can be purchased for 7, 15, or 30 days. Cost depends on the overall exposure of the page, as shown in this table. Buying more days at once is cheaper per day. For example, a home page listing is L$96/day for 30 days, compared to L$128/day for 7 days.
- Feature this item on the home page - http://marketplace.secondlife.com
| 30 days | 15 days | 7 days | # of ads on page | |
|---|---|---|---|---|
| home page | L$2,899 | L$1,699 | L$899 | 6 |
| category landing page | L$999 | L$599 | L$399 | 3 |
| checkout receipt page | L$2,399 | L$1,499 | L$799 | 6 |
| L$0 cart checkout ads page | L$899 | L$899 | L$299 | 12 |
- Revenue Distributions - Click Add Distribution to specify a co-creator and enter a percentage to split profits with. It auto-calculates the reminder, so if you enter "
15" (don't enter a % in the actual field), you receive 85% per item sold, and your co-creator receives 15%. Learn more about how this works differently than the old Xstreet.- You can add multiple co-creators.
- A co-creator must have logged into the Marketplace previously or you'll get an "Collaborator user not found" error.
How do I edit my store info?
Your store — and you can have one store per Second Life account — has its own "profile" that can be customized. You should take advantage of this to promote your brand:
- Click My Marketplace in the upper-right and click My Store.
- On the left-hand side, click Edit Store Information.
Here's what the fields mean:
- Store Name - This defaults to your Resident name but you can change it to something else, like the inworld brand that you're already using.
- Profile - Whatever you want to tell potential customers about you, like: who you are, what you sell, and why you do it. Up to 2,100 characters. Weird number, I know.
- Examples: "We've been selling in Second Life for seven years and these are some testimonials from thousands of delighted customers!", "We believe every avatar should be able to have an incredibly beautiful home", or "Our company's goal is to amplify your awesome."
- Policies - Do you accept refunds? How do you prefer to be contacted via email or IM or have you hired support staff that your customers should contact? Make sure to state this here so customers' expectations are clear. Up to 450 characters.
- Link to Blog - Or another website about your store. Many sellers use blogs to announce product updates. Some even group together and form community blogs, like iheartsl.
- Link to Store - If you have an inworld store, insert its SLurl here please!
- Store Image - Click Browse to choose a JPG, PNG, or GIF image from your hard drive. A well-compressed JPG generally works best. This isn't usually a picture of your inworld store, but your brand's logo. This small image must be exactly 45x45 pixels, so make sure what you upload is legible. Your image must meet these exact dimensions before you upload it. There are web tools like Picnik and that can help.
- Store Banner Image - Again, click Browse to choose a JPG, PNG, or GIF image from your hard drive. Must be exactly 700x100 pixels.
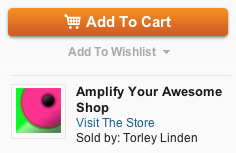
Your Store Name and Store Image appear on the right-hand side of all your item pages, like this:
| Tip: What?! If you've gotten this far and you haven't checked out our Seller's Guide yet, you totally should! |
How do I view my store?
So you've listed at least one item and setup your store info... you are awesome. Bask in the glow, then preview your store for all to behold (that almost rhymes):
- Go back to My Marketplace > My Store (which you should be familiar with now... wash, rinse, repeat).
- On the left-hand side, click View my Store. This is how your customers see it — but it also helps to browse the Marketplace as an alt to really walk in your customers' shoes.


