Sculpted Prims: Creator's Guide
A.K.A. the complete Noob's Guide
Overview
- How do I make a sculpted prim?
- First, you will probably use some tool outside of Second Life, a 3d modeling tool.
- In the modeling tool, you create the object, a banana, a cactus, whatever.
- You then convert the model into a sculpt map. This is one of those strange rainbow images. The shape of the object is encoded into that picture using magic.
- The sculpt map is the shape. You still need a texture to apply to the outside (colors, labels, labia, whatever).
- Upload the two textures to SL, rez a prim, apply the textures, resize, and there you are.
Details
3d Modeling
- Modeling tools - Teaching 3d modeling is outside the scope of this guide.
See the 3d software guide for more information on various tools.
- Sculpt Generation Programs - Some of Second Life's programmer types are creating automatic ways generate a sculpted prim. Programs of this sort have their own section in the 3d software guide.
- Paint Programs - While it is not an intuitive process, you can manipulate sculpt textures in programs like Photoshop, The GIMP or PaintShop Pro. While it's no substitute for a 3d modeler, there are still some useful applications. See Sculpt Textures in Paint Programs.
Exporting
- The Methoods
Will vary by program but generaly fall into these categories:
- Scripts/Plugins
- Materials
- Projection
- The Exporters
Short list of programs with links to the export insturctions (or see Sculpted Prims: 3d Software Guide)
Texturing
- UVW Mapping
Save a seperate copy of your model, apply a spherical map, export template
- 3d Painting
Programs like zBrush, Deep Paint
- 2d Painting
How to setup a template for Photoshop
Load an .obj into a 3d viewer and apply the template as a texture and observe where the guides on the template appear
Add more guide lines if you want, paint, save, load texture, check, fix, paint, repeat.
Bringing your Sculpty into Second Life
- Upload
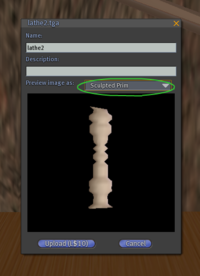
Select File --> Upload Image as you would for any other texture. This will bring up the file chooser and the usual upload dialog. Here I'm demonstrating with a quick shape I made in Rokuro.
Notice that in the "Preview image as" dropdown box there's a new option: "Sculpted Prim". This is your last chance to be sure everything is ok before you spend L$ on the upload, so use it! If you're satisfied, hit the Upload button and wait for the upload to complete.
- Apply to your object
In the "Create" tab of the build tools window, select any shape and rez it (as of this writing there is no one-click button to make a sculpted prim).
Click the "Advanced" button if you haven't allready and go to the "object" tab. Click on the "Building Block Type" dropdown and select "Sculpted".
Your prim will turn into a sculpted prim and load the default sculpt texture, an apple. Click on the image of the sculpt map to open the Texture Picker and select your uploaded sculpt texture.
Notice that many of the usual prim torture methoods are not avalible; no cutting, twisting, hollow, etc. These may become possible in a later version but for now we have to live without. You can scale, rotate and duplicate your sculpt prim in all the normal ways however.
Apply your textures, et volia'!


