Viewer Skins/Starlight
| Important! | |
|
Use caution when installing these skins, as modifications to your installed software files are not officially supported by Second Life support |
| By: | Hitomi Tiponi |
|---|---|
| Viewer Version: | 2.0 - 3.2 |
| Information: | Starlight 2.0.1 - 3.2.0769 |
| Source: | Various |
| Image: |
About
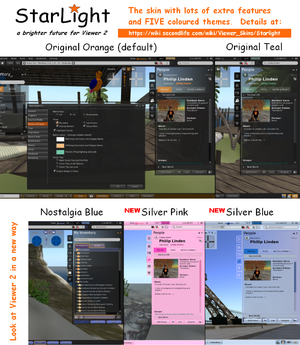
StarLight is designed to provide a colourful, versatile and practical alternative to the default skin for Viewer 3. Hopefully it will improve the usability, and promote increased usage of the viewer - all Full and Beta versions of Viewer 3 have a StarLight version produced to work with them.
StarLight consists of a number of previously published viewer tweaks - produced by various residents (see credits in the downloaded 'Read Me' file or in the 'StarLight Skin' tab of the viewer 'About' floater), together with a continual addition of new ones. In addition there is a slight re-skinning to give the interface a lighter feel and several colour variants (called 'Themes'). It should hopefully benefit those people who have no wish to edit the XML code themselves, yet wish to benefit from a number of tweaks made by other residents, without using a third-party viewer.
Over 15,000 downloads so far!
Major Features at a Glance
- Colourful - Five different coloured themes plus two that you can customise yourself
- Versatile - Masses of extra preferences, toolbar options and an extra 'Film' menu
- Practical - Changes to various floaters/panels to make it easier to see and enjoy the world
For fuller details see the 'Major Changes to the Standard Skin' section
Downloads
It is VERY important that you always use the version of StarLight for the appropriate viewer release. Always use the appropriate version from the table below of all supported versions.
ALWAYS DOWNLOAD THE CORRECT VERSION OF STARLIGHT IF YOU SWITCH VERSIONS OF THE VIEWER
StarLight is normally updated here within a couple of hours of Linden Labs issuing a new version of the Viewer (and sometimes before a new version is officially released)
| StarLight Release (all OS's) | StarLight Easy Installer for Windows (NEW) | Designed for Viewer 3 Release | Date Added | New Features / Notes |
|---|---|---|---|---|
| StarLight 3.2.0760 | StarLight 3.2.0760 | Viewer 3.2.6* (3.2.6.248086) | January 24th 2012 | Further changes to the CUI to enable changing the colour of the panels.
Plus several small bug fixes especially affecting the lighter skins in general. Flashing buttons can now be turned off if required (to reflect new LL settings). |
| StarLight 3.2.0769 | StarLight 3.2.0769 | Viewer Beta 3.2.8 (3.2.8.228668) | February 2nd 2012 | Various small changes and bug fixes |
* Main Viewer downloaded from the Linden Lab web-site is in bold - to see which version you have look in "Help->About Second Life" in your Viewer
| |||||||||
Beta Versions of StarLight
Occasionally new releases of Starlight are added here to test or see the reactions to new features.
| StarLight Beta Release (click to download) | StarLight Beta easy Installer | Designed for Viewer 3 Release | Date Added | New Features / Notes |
|---|---|---|---|---|
| none currently available |
StarLight for TPVs
Versions of StarLight are also available for:
- Catznip - versions of all StarLight themes, except Mono Teal, integrated with the viewer by Kitty Barnett
- Firestorm - modified versions of StarLight are included with the latest Firestorm Viewer
Discussions, information, support and questions
To discuss StarLight and get news of changes/versions/bugs etc. please visit the Viewer xml and Skinning Forum.
Problems, issues and new feature requests can also be entered on the StarLight JIRA (which is kindly hosted by the Firestorm team).
StarLight is assembled by Hitomi Tiponi - she may be contacted through the aforementioned forum or in-world.
Major Changes to the Standard Skin
Colouful Changes
Six preset coloured "themes"
- Original Orange - A dark theme with a touch of orange to brighten things up.
- Nostalgia Blue - A theme with buttons and other layout changes to remind you of Viewer 1.
- Silver Blue - A 'dark on light' theme that lifts the gloom from the Viewer interface with cool blue.
- Silver Pink - This 'dark on light' theme is very popular and gives your world a hint of candy-floss.
- Mono Teal - A classy high-definition theme with black text on a light grey/white background and 'teal green' buttons
- Original Teal - LL's original colour scheme for those that love the simple 'teal green' on black look, but with slightly improved contrast.
Two new customisable coloured "themes"
The StarLight Colourful User Interface (CUI) enables full control of many of the colours of the interface - see the CUI Guide for instructions and examples.
- Custom Dark - Ideal for using with a backdrop of a black, navy blue, dark red etc.
- Custom Light - For a brighter, vibrant look this option is ideal for integrating black text with a lighter theme.
Versatile Changes
- Draw Distance slider added to Top Bar (between 32 and 992 metres)
- Comprehensive Shadows, Rendering, Depth of Field and Local Lights settings in "Graphics"
- Revised Preferences panels - with LOTS of extra options to control graphics, chat and many, many other features
- More buttons available in the toolbar 'toybox' to drop on the UI toolbars
- Film menu, for photography and machinima fans NEW!
Practical Changes
- Camera control made smaller than the standard version (similar to the Kirstens Viewer approach but smaller)
- Ability to slide across the World Map to fill it's floater, also with ability to shrink the floater more than at present (useful when driving/sailing)
- Removable Favorites Bar in 3.2 onwards NEW!
- More profile information available in the avatar inspector
- Much smaller Environment Settings Floater NEW!
- Better formatting of tabbed IM window (tabs larger and no icons in them)
- Undocked windows are resizeable to a smaller size than Viewer 3 allows
- Tweaks to the skinning and usability (more transparent panels, resizing columns, increasing glow, realigning text etc.)
Installation Instructions (all OS's)
INSTRUCTIONS FOR WINDOWS AND LINUX USERS
- Log out of Second Life Viewer 3, if you are using it.
- Go to the directory you use for Viewer 3.
- Copy across the contents of the 'skins' and 'app_settings' folders into the Viewer 3 folder at the same level as the existing folders with the same name, making sure you accept any overwriting of existing files.
- NOTE: This will NOT delete the existing 'skins' folder - it is essential that the only change to the existing 'skins' folder is the change to these two files as well as the addition of the new StarLight skins.
- To uninstall rename the 'panel_login_backup.xml' file to 'panel_login.xml' in the /skins/default/xui/en sub-folder, and 'commands_backup.xml' file to 'commands.xml' in the /app_settings sub-folder.
INSTRUCTIONS FOR MAC USERS
- Find the Second Life Viewer 3 application in you Applications folder.
- Right click on the Second Life Viewer 3 application icon. You will get a menu.
- Choose "Show Package Contents" from that menu.
- Open the "Resources" folder and scroll down until you see the "skins" and "app_settings" sub-folders of StarLight.
- Make sure you are not actually running Second Life Viewer 3 as you do this.
- Copy the files from the folders in StarLight into the Second Life Viewer 3 application folder - this will add in the new skin elements and will overwrite some files.
- To uninstall rename the 'panel_login_backup.xml' file to 'panel_login.xml' in the /skins/default/xui/en sub-folder, and 'commands_backup.xml' file to 'commands.xml' in the /app_settings sub-folder.
Installation Instructions using easy Windows Installer
Simply download and run the associated file and follow the simple instructions. Ensure that when asked you select the appropriate directory to download StarLight into (this is the one into which you installed the Second Life Viewer) - the installer makes a guess at this but may not be correct.
Activating a New Skin
- Start your Second Life client, but do NOT log in.
- In the log-in screen, select the skin from the drop-down list - it is next to the "Login" button"
- Restart your Second Life client and log in. The new skin should now be active.

