PBR Materials
Physically Based Rendering [Work in Progress]
What is it and Why is it used?
The term “Physically Based Rendering” or “PBR” is a technical term that may need some defining for most people since its use is unique to composing images in computer software. The term itself is an abbreviation for a collection of mathematics that attempts to accurately represent the ways that light reflects off of objects in the real world. In the real world, it is the behavior of light on a piece of metal that allows us, the observer, to recognize “that object is made of metal” without actually reaching out and touching it. The way a metal reflects light differs from that of a polished plastic or some other material, and these differences have been quantified by science. By mimicking real-world physics principles in the virtual world it allows for the creation of more immersive recognizable realistic spaces, but also it helps us relate to fantastical worlds a little better too. While we may not be familiar with what a newly imagined creation is, a metal's inherent metal-ness and aged wood's inherent wood-ness remain constant, making it easier to intuitively understand what we are interacting with in a virtual environment.
Because tying the mathematics to simulate materials in virtual spaces to how they behave in the real-world makes things more immediately recognizable, PBR has become the foundation for creating imagined worlds over the last decade. The metallic shine of exoskeletal armor in superhero movies is driven by PBR mathematics, as is the plastic sheen of toys or the glint of frozen ice in animated classics. Now we are moving to bring this standardized quality to your home in Second Life.
Bringing PBR to Second Life means updating the basic mathematics of how light is represented in the world of Second Life. This includes the sun, the sky, lights, and the camera. Changes to these systems will slowly be developed and rolled out over time, but the goal is to change these things while minimally changing how everything that presently exists in Second Life that was designed before PBR looks and feels. While the preservation of creative intent and the aesthetic appeal of items users have enjoyed for over two decades of Second Life is always a priority, Second Life is an ever-evolving platform, and to continue to do so, some changes are inevitable.
Lastly, while we are attempting to mimic real-world reflections and material properties, Second Life has to run on a wide variety of devices, so some shortcuts have to be made. Reflections are not mirror-perfect, as has often been a long-standing hope and request from Residents. While the addition of a reflection system does bring dreams of distortion-free mirrors for our avatars in Second Life closer to reality, unfortunately, due to the calculation requirements of doing perfect reflections, mirrors are sadly still, for the moment, not practical.
What does this mean for Residents?
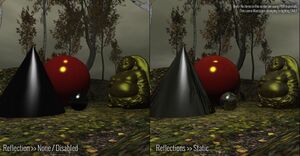
Statue >> Glossiness 74 // Environment 170
Large Red Sphere >> 255 Glossiness // 0 Environment
Cone >> Medium Shiny
Small Sphere >> High Shiny
Changes to Existing Content:
The largest change by far is the addition of an environmental reflection system to Second Life. For most existing items, this change shouldn’t have a drastic, immediately observable impact. A few things in your inventory that you already own may appear more reflective with the new graphics configuration, and those reflections should feel more realistic and immersive with your current environment. As a general rule, the “shinier” an object was before, the more environment reflections it will pick up, and the more visual difference there will be. You can remove these extra reflections by simply changing to “Reflection: Disabled” in your Advanced Graphics Settings.\
Removal of Advanced Lighting Model ( ALM ) Graphics Option:
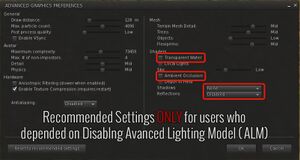
There have been changes to the [Advanced Settings] Graphics Options as well, the most notable of which is the removal of the “Atmospheric Shaders” and “Advanced Lighting Model” options. For those users who depended heavily upon these options to navigate Second Life on computers without dedicated graphics cards, we recommend they instead set Shadows: None, Reflections: Disabled while disabling “Transparent Water” and “Ambient Occlusion”, as the resources that are used to calculate reflections and shadows are the primary cause of poor viewer performance on devices with limited graphics capabilities.
What does this mean for Creators?
Importing PBR Materials from External Software:
For creators who work with external tools such as Blender, Adobe Substance Painter, Cinema4D, 3D-Coat, or have used Unity or Unreal Engine, the use of PBR-based texture sets should already be familiar. In fact, experienced creators have been using tools that use PBR mathematics to create content for Second Life and then have been forced to sacrifice visual quality to convert that information into Second Life’s existing Blinn/Phong materials system. Second Life is adopting the “Metallic / Roughness” PBR model, and in its ongoing commitment to using Open Source standards whenever it is practical to do so, the GLTF 2.0 file format has been chosen as the upload format for PBR Material assets. One of the primary goals of implementing PBR Materials is to have more continuity from content creation applications towards Second Life, and have more consistent content behavior, once it’s ready to be placed in the world.
Using Imported Materials in Second Life
For people who build exclusively within Second Life, the addition of PBR also means that there will be a new inventory object type called a “Material”. These Material objects are also purchasable on Marketplace and exchangeable like any other texture in Second Life.
PBR materials come as a bundle of textures and primitive parameters, such as face tint and specular color. These all travel as a single unit and are applied all at once. If you wish to change tint, transparency or other similar parameters that used to be readily available, you’ll need to modify the Material object itself.
Applying existing materials works similarly to existing textures; you have two means of doing so:
Drag and Drop:
Simply drag and drop onto the face of a prim or a mesh. For example, if you have a tiled floor material, and you place it on a prim cube, that cube face will now look like a tile floor and reflect light like a tiled floor would as well; as if the flat face of the cube had all the bumps of a tiled surface.
Switch to PBR and select from Inventory:
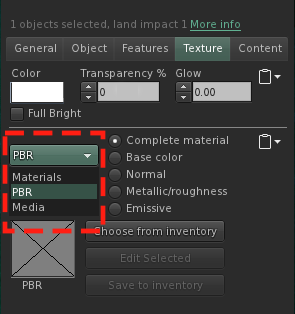
Alternatively, select a face on the prim or mesh you want to apply your material to and choose the “Material” drop-down and change it to “PBR”, then select “Choose an item from your inventory” and apply.
PBR Stand-In Textures and Outdated Viewers:
It is worth mentioning that during the adoption period of a new system, a substantial portion of Second Life Residents view the world through third party viewers and mobile viewer solutions that will not have updated to be able to see the new content. Anyone viewing a PBR Material on a viewer that cannot display it will see the “underlying” non-PBR texture. By default, this is a pine box or a completely blank texture. Those who wish their content to be viewable by as many people as possible, might consider creating a Diffuse texture ( with baked lighting, the kind that is easily generated with tools like Substance Painter's “Baked Lighting Filter” ) and applying it as a regular texture to the object they’re placing the PBR material on, prior to applying the PBR material. While this is an extra step in content creation, and complicates things somewhat, if you wish for your content to be appreciated by all, it’s worth considering adding this extra step to your workflow. People designing PBR materials for distribution and sale might also consider offering a “Diffuse Only fallback” texture to accompany the PBR material specifically for people who cannot see the PBR content.
Understanding and Assisting the New Reflections System
Those creators that work at house-scale, or produce items that can be walked through, can gain additional control over the lighting in their creations by taking the time to fully understand the new toolkit that influences environmental reflections. There is a new type of volume that can be created and appended to object linksets specifically for scenes with these kinds of spaces. These volumes define a custom area where reflections are calculated, overriding the default solution. So-called “Reflection Probes” should be placed in a manner such that the fewest number of probes fills the largest amount of space possible with minimal overlap. One probe per room is a good reference point for a general living space like a house. If multiple probes exist in a given area they can cause visual artifacts and negatively impact performance (also known as viewer lag). Do not affix reflection probes to small creations such as furniture or decor. Small items such as tables, chairs, musical instruments, candle sticks etc should use the reflection sample volume in the space in which they are placed. They should not have one appended. It is strongly recommended that any object that contains a reflection sample probe be left as “modify”, so the positioning of the probe can be adjusted or even removed by the owner of the object should they wish.
When is it Recommended to Create a Reflection Probe?
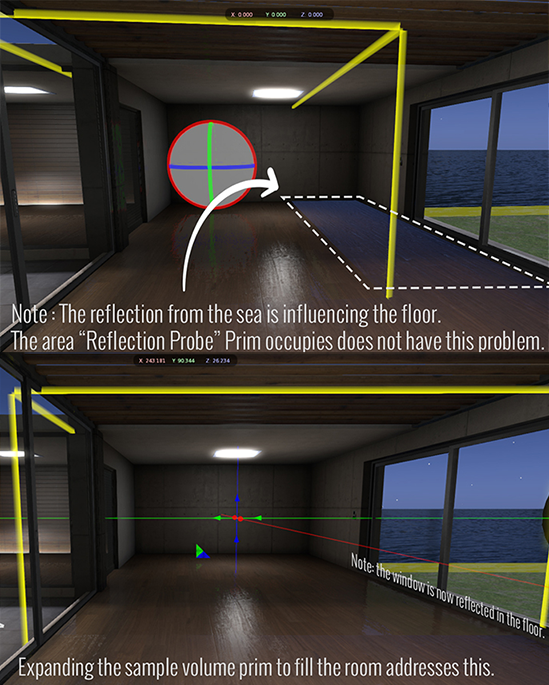
Manually placed probes are good for cleaning up undesirable noise and lighting from automatically placed probes that may be visually disruptive or confusing. If you look in the image below, on the left hand side of it, you can see a blue tinge on the floor, which is the reflected blue light from the ocean. The probe filling half the room blocks this and when it is extended to completely fill the room and just slightly beyond the thickness of the walls, (right hand image) the problem is solved. The probe does not need to be a part of the link-set for the rest of the room in order to function; however, once you have them placed it’s possible to add them into link-sets like any other prim.
Constructing a Reflection Sample Volume ( AKA Reflection Probe )
It is recommended to start with a basic prim. For the sake of “readability, it is also recommended that you use the prim type of the sample volume you wish to create. IE: A box prim for a box probe and a sphere prim for a sphere probe. Make the prim transparent by setting transparency to 100% using the build menu. The use of transparent textures/materials is not recommended. Naming your probes is also recommended, so other people ( or yourself later on ) will remember why there’s a large transparent prim in the middle of your build.
Using the Build Menu ( Ctrl + 3 ), navigate to the “Features Sub-Tab. At the bottom, below settings for Prim Point Light, you will find a set of buttons that look like this :
- Reflection Probe: Enabling this creates a Reflection Sampling Volume within the bounding box of the prim.
- Box / Sphere Drop-down: Choose whether you want this sampler to project reflections within a box shaped volume or a spherical one.
- Dynamic: Forces the reflection sampler to update this one more frequently. Also adds the ability to capture avatars in the reflection.
- Ambiance: Affects how much objects within the volume are lit as if they have bounced light hitting them from faked indirect illumination.
- Near Clip: Sometimes, there will be a large obstruction in the center of the volume you wish to use as a reflection probe. For example, suppose that there is a large architectural supporting structure in the middle of the room, such as a column; if the probe gets placed internally inside this, it will reflect the internal surface of the column instead of the room in which it is placed. Increasing Near Clip will make the sampling volume exclude objects N meters from the center so they don’t get included in the reflection.
Adjusting Reflection Sample Volumes
Sample volumes do not react to prim parameter changes. Options such as “Hollow” or “Taper” or “Shear” do not change how the sampling area behaves. It may, however, be helpful to visualize “Near Clip” as the hollowing out of your reflection sample volume, but the hollow and near-clip are not in any way linked and doing so is purely a convenience. Reflection probe sample volumes only respond to changes in scale and position; however, different probe volumes behave differently when resized.
- Box Probes: These are affected by position and non-uniform scale.
Example: If I create a box reflection probe and scale it to 10m,30m,10m size, the full volume will be affected by the probe.
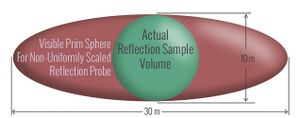
- Sphere Probes: These are affected by position and uniform scale only, otherwise the smallest dimension is used.
Example: If I create a spherical probe and scale it to 10m,30m, and 10m size , the probe will sample a 10 meter diameter spherical volume at the center of the probe. However, a 30m,30m,30m sphere will create a sampling volume of a 30 meter diameter sphere.
PBR Material Composition:
PBR-defined values are measured by optical sensors and other capture tools and recorded in databases. These parameters are then put into commercial software to be used by content creators. Using software designed to create PBR content is always recommended; however, understanding how PBR materials are assembled can assist with editing and compiling them. Having a direct understanding of what each individual color channel contributes is essential for editing PBR textures without relying upon some of the more advanced toolkits available.
All PBR Values are listed from 0 to 1.0, though in an actual image, the values range from 0 - 255. PBR Materials are composed of a set of four specifically designed textures; they are as follows:
Base Color [ RGB ] + Transparency [ A ] :
[RBG]: This is the unlit color of the surface. This differs from the “Diffuse” texture that Second Life uses. Diffuse textures often include faked reflection and specular information as well as added Ambient Occlusion shadows. Base Color textures do not get any of this added information. For metals ( as defined by the metalness value ), Base Color also determines specular reflection color, whereas, in non-PBR systems, this is defined by the Specular Color texture. In certain PBR texturing applications, Base Color is sometimes also referred to as “Albedo”. [ A ]: Transparency dictates the transparency of the entire material overall.
Occlusion [R] / Roughness [G] / Metalness [B] :
This texture is composed of 3 unrelated grayscale images stored in 3 different color channels of an RGB texture. [R]: Ambient Occlusion shadow data used to be added as a multiply mask onto Diffuse textures, but for PBR textures, it gets its own channel in the O/R/M map. [G]: Roughness data ranges from 0 to 1.0, but the actual range of physical surfaces ranges from approximately 0.05 to 0.985. No surface is perfectly smooth or completely rough. The rougher a surface is the less mirror-like it behaves. [B]: Metalness values are mostly black or white. Either the material is a conductive metal like copper, or it’s a non-metal like fabric. 0.0 is Non-Metallic, 1.0 is Metallic. There are almost no materials with gray metalness values.
Emissive [ RGB ]:
This determines the amount and the color of glow that your material generates if you choose to enable it. Glow is ( and always has been ) a source of visual lag, so be mindful of using this channel only where and when you need to. Leaving the Emissive slot empty is recommended when it’s unused.
Normal [ RGB ] :
The normal maps generated by your baking application / normal map generation toolkit should be compatible with Second Life in most cases. The most common pitfall is using normal maps generated with “inverted” Green channels, such as those that are used for Direct3D and Unreal Engine. Normal texture data redirects light in a different direction based on the vectors indicated by the color, so if the green channel is backward, it’ll seem to be “pointing the wrong way”. To phrase the problem a different way, all the things that should be bumps look like dents, and vice versa. If this occurs, double check that your settings aren’t for Direct3D and try re-generating it. Also, taking it into image editing software and inverting the green channel only sometimes is a sufficient fix.
Normal map tangent spaces are an extremely technical subject that most users need not be concerned with as most modern applications default to the correct setting. However, if your normal maps look drastically different inside Second Life, compared to your source application, and you’ve already confirmed it’s not an inverted green channel, then checking which tangent space settings are being used is the next step. PBR Normals use Mikkelsen Tangent Space. (Often abbreviated MIKKT) If you are unsure what this means, use similar workflows and settings for Second Life PBR as those that are generally recommended for Unity Engine.
Uploading Materials:
There are two different methods of creating PBR material assets:
Method 1 : Direct Upload a GLTF File
The most convenient method to create an entirely new material is to directly upload a GLTF file from your computer.
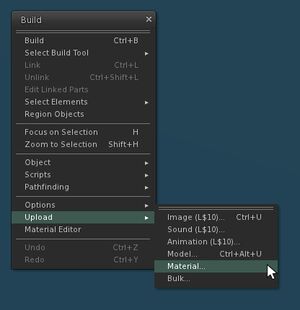
This is accessible via Build>>Upload>>Material…
Select a .GLB or a .GLTF file from your computer and Open it: This will give the following window:
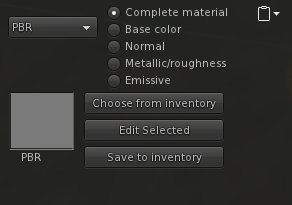
Because it is the goal of a material to be an easily applicable exchangeable unit, all of the primitive properties that most users are familiar with have now become integrated into the material UI itself. This includes Color Tint, Transparency and Emissive ( Glow ) behavior. PBR materials cannot be set to be “Full Bright”, since that setting overrides all lighting that the surface receives. Once you have adjusted these settings to desired values click “Save” to pay your upload fee and create your Material asset.
Method 2 : Edit a Blank. Create PBR Materials without a GLTF File
If you have PBR materials as textures but do not have a GLTF file you will need to build a Material from inventory. Make sure your textures are in the correct format, with the correct data in the proper channels. This requires some understanding of how PBR materials work. Once you have that, upload your textures as you normally would.
- Create a test cube and select a face, switch it to be a PBR material.
- Select “Choose from Inventory”
- Instead of choosing something from your inventory, choose “Blank” and click “Ok”
- Choose “Edit Selected”, this will open up the material creation UI.
- Choose your appropriate maps from your texture inventory and slot them into their matching locations.
- Note: While there may be a temptation to try and place a pre-PBR “Diffuse” texture into the “Base Color” slot and a pre-PBR “Specular into the “Metallic/Roughness” slot, doing so will not produce desirable results. However, trying this won’t generate any warnings as there is no way to check that you’ve put the right texture type into the inputs, and the material will save and be applicable to objects. Unfortunately what will be created is not a functional PBR material. Please do not do this.
- Click “Save to Inventory”, this will bring up a prompt to name your new PBR material.
Creating Color Variants
After you’ve uploaded your first Material for your project, if you’re a store owner who would like to release more than one color palate for your creation, as many clothing and furniture designers find it useful to do, it’s important to not upload a new GLTF file for every single variant of your Material. Most variant materials, only the base color will change. The Occlusion, Roughness, Metalness, Emissive and Normal map texture slots will remain the same. Since these maps have already been uploaded once, if we upload a second GLTF File, they will be duplicated. Having different copies of the same texture, with differing UUID’s means that they will clog up download bandwidth and video card memory (not to mention your inventory as well). This is very bad for Second Life. So, for this reason, it’s recommended that when you create texture variants, you upload the additional copies of the base-color texture separately. Then open your newly uploaded material in edit mode, choose the Base Color texture, and change it out for one of your newly uploaded Base Color textures, and click “Save”. This will create a second copy of your material that uses all the correct texture maps without needlessly duplicating them and causing additional lag.
Double Sided Parameter : Uses and Dangers
“Double Sided” is a new property unique to Materials. When “Double Sided” is checked, the surface upon which this material is placed will be drawn twice; once for the outward-facing portion of the surface, and a second time for the inward-facing side of the surface that is normally invisible without a double-sided material. This option should only be used for very specific meshes that were designed to be used with double-sided materials, since placing materials with this parameter checked on normal objects will simply cause the viewer to draw it twice ( and thereby create additional viewer lag ) for no observable change. It is very strongly recommended that this option be unchecked for any material that is to be distributed for general use. Even more so if the “Modify” permission is revoked. If you wish to distribute a version of a material that has “Double Sided” checked, please include a second copy of the material that has “Double Sided” unchecked as well, with an accompanying explanation to the next user as to why this was done.
Example:: LeafTextures_DoubleSided LeafTextures_SingleSided
When designing mesh content for use with the double-sided material parameter, it is also very strongly recommended that you separate the triangles you intend to use the double-sided material upon into a separate mesh “face”, so as to not unintentionally render the portions of the mesh that already have triangles designed to represent the internal portion of the object a second time.
Recommended Application Settings :
The GLTF file format is widely adopted and many applications have export functionality for this type of file. Below is a non-comprehensive list of some of the more popular applications that export GLTF files.
Blender
Create your materials within Blender using Principled BSDF Shader Nodes. Export them according to the official [1] Blender Documentation. Note: Second Life does not support BSDF Clearcoat, Subsurface, Anisotropy or Transmission parameters at this time.
Adobe Substance Painter
Start your project with the Unity HD Render Pipeline Metallic Standard Document Resolution: 1024 ( 2048 is also fine, you can export to 1024 ) Normal Map Format: OpenGL Compute Tangent Space Per Fragment: Off
Once you have finished your project you’ll want to choose a file folder and use the following Export Settings: Output Template: glTF PBR Metal Roughness Size: 1024
This will create both individual uploadable textures ( Useful for uploading ONLY base color for color variants ) as well as a glb file that you can use to upload directly.
Cinema 4D
Use of the PBR material within C4D is recommended, as it automatically uses the Reflectivity parameter instead of the Color parameter for objects. C4D by default uses openGL style normal maps so compatibility should not be an issue. The rest of the export process is very well documented in this blog post. 3DCoat GLTF export has been implemented since 3DCoat version 2020 and is found in the File>>Export>Export to GLTF >> Gltf Separate (gltf + .bin + textures)
Quixel Mixer
Quixel Mixer has no GLTF output, however, it does generate the functional textures, though they do need to be edited and combined in photo editing software. Export them by going to Export Target > Custom Texture Preset: Metalness Maps Select: Albedo , Roughness, Normal, AO , Metalness and ( if need be ) Emissive. Click “Export to Disk” and open the folder that the files were placed into. Albedo is the Base Color texture in this case. AO , Roughness , Metalness get combined into the ORM map as per this explanation. Normal Map : Quixel generates Direct3D Normal Maps. The green channel needs to be inverted as per here.
Upload to Second Life using Method 2.
Autodesk 3DS Max 2023
Autodesk just added the ability to create GLTF files using their new GLTF Material and GLTF Export functionalities as outlined in Autodesk's official documentation here. All prior versions of Autodesk software do not have this functionality.
