KB2/Managing land
- http://wiki.secondlife.com/wiki/Parcel_media
- http://wiki.secondlife.com/wiki/Beginner_Landowners_FAQ
- http://wiki.secondlife.com/wiki/Linden_Lab_Official:Age_Verification_Parcel_and_Estate_Management_Features
- http://wiki.secondlife.com/wiki/How_can_I_get_more_prims_on_my_land%3F
- http://wiki.secondlife.com/wiki/Freezing,_ejecting,_and_banning
- http://wiki.secondlife.com/wiki/The_About_Land_window
- http://wiki.secondlife.com/wiki/How_do_I_post_an_event%3F
- http://wiki.secondlife.com/wiki/How_to_Use_the_Edit_Terrain_Tool
- http://wiki.secondlife.com/wiki/How_can_I_make_my_land_appear_in_the_Places_tab_in_Search%3F
- http://wiki.secondlife.com/wiki/How_to_join_and_split_land
- http://wiki.secondlife.com/wiki/How_do_I_keep_people_off_my_land%3F
- http://wiki.secondlife.com/wiki/How_objects_(prims)_on_land_are_calculated
- http://wiki.secondlife.com/wiki/How_do_I_return_other_peoples%27_objects%3F
- http://wiki.secondlife.com/wiki/How_to_select_everything_you_own_on_a_parcel_of_land
- http://wiki.secondlife.com/wiki/I_don%27t_want_people_to_use_a_SLurl_to_access_my_land
- http://wiki.secondlife.com/wiki/How_do_I_block_direct_teleports_to_my_land%3F
- http://wiki.secondlife.com/wiki/Linden_Lab_Official:I%27m_experiencing_parcel_encroachment._How_do_I_get_the_offender_to_move_the_unwanted_object%3F
- http://wiki.secondlife.com/wiki/How_to_Get_to_the_About_Land_Window
- http://wiki.secondlife.com/wiki/What_does_the_%22Object_Entry%22_option_do%3F
NOTE: This article is about managing parcels of land. For information on managing estates and regions, link to Managing private regions.
Beginning land owner FAQ
This article answers some general questions about owning land in the Second Life world. Land inworld in Second Life can be owned in three varieties:
- Mainland
- Islands (Private Regions)
- Openspaces
Why would I want to own land?
Residents use their land to build homes and businesses, hold events, create attractions like zoos and carnival rides, build multi-leveled games — basically anything they can imagine. Also, if you own land and other residents hang out there, you can earn traffic (which will show your location higher in the find). Particularly impessive or innovative locations may be nominated to appear in the Second Life Showcase on our website.
Are there special conditions I have to meet in order to be able to purchase land?
To purchase Mainland land in Second Life, you must have a Premium account, current payment information on file, and your account must be in good standing (i.e., not delinquent). You may also be required to have a clean disciplinary record. Linden Lab reserves the right to refund your purchase if you do not meet our minimum criteria for land ownership.
To rent land on a Private Region, you must comply with the rules established by the Estate Owner. It's possible to purchase an entire Private Region for yourself, which would make you the Estate Owner for that Region. Note that purchasing land on a Private Region, even if you own all of the land on the Region, is not the same as being the Estate Owner for that Region.
| Note: If you wish to buy a Private Region and you are a Teen Second Life Resident, you may not use the Land Store. You must complete the Special Region Order process. |
What else do I get with a Premium account?
- Access to Live Chat and Ticket Support
- Initial grant of L$1,000. The Premium bonus is for new Premium accounts and for accounts wich upgrade from Basic to Premium. (See also: How long does it take to get the L$1000 bonus after I sign up for a Premium account?)
- Weekly stipend of L$300 (even if you don't log in)
- The ability to purchase a 512 square meter plot of land on the mainland before any maintenance fees kick in
Is there a discount if I sign up for a longer period?
Yes, it's US$7.50/month if billed quarterly (US$22.50) or US$6.00/month if billed annually (US$72.00).
Does this mean I've got 512 square meters of land waiting for me somewhere inworld as soon as I upgrade to a Premium account?
No; this means that as a Premium account holder, you have the ability to own 512 square meters initially. You still have to find and purchase your own land. See this video tutorial for a friendly walk-through on your first land purchase:
<videoflash type="vimeo">4167620|640|480</videoflash>
How do I own land on the mainland?
Land on the mainland is owned by Governor Linden and is auctioned off as it becomes available. Frequently asked questions (and their answers) about buying land at auction are answered by the Second Life Land Auction FAQ. Land owned on the mainland is also subject to the Land Use Fee (also known as a Tier Fee), which is a monthly charge in addition to Premium membership. Land use fees are billed based on the peak amount of land held during your previous 30 day billing cycle.
Mainland Land Use Fees (Land Tier)
You can own as much land as you choose; change the amount of land you own and your monthly fee will adjust accordingly. Your bill at the end of the month is based on the peak amount of land you owned during the previous 30 days.
The chart below shows the monthly cost of owning the following additional amounts of land beyond the initial 512 square meters covered by your Premium account. It also shows how many objects you can build on that amount of land.
For example: If you pay a total of US$14.95 ($9.95 for Premium and $5 for extra land), then you can own a total of 1024 square meters and use up to 234 prims.
| Monthly Land Fee(1) | Additional Land (over 512m2) | Parcel Size (m2) | Max Prims(2) |
| US$5 | 1/128 Region | 512 | 117 |
| US$8 | 1/64 Region | 1,024 | 234 |
| US$15 | 1/32 Region | 2,048 | 468 |
| US$25 | 1/16 Region | 4,096 | 937 |
| US$40 | 1/8 Region | 8,192 | 1,875 |
| US$75 | 1/4 Region | 16,384 | 3,750 |
| US$125 | 1/2 Region | 32,768 | 7,500 |
| US$195 | Full Region | 65,536 | 15,000 |
- (1) Each month, you'll bill at the lowest tier that is equal to, or greater than, the maximum amount of land you held in the month prior.
- (2) These prim limits are based on maximum amount of land you may own in this tier. If you own less, the values will be different. Your prim limits are always (total m2 owned in this Region) * 15,000 / 65,536 , rounded down.
What happens to my tier if I own more than a full Region?
Any tier beyond the first full Region is assigned in half-Region increments at a rate of US$97.50 per half Region. A higher level appears in your Land Use Fees when you upgrade beyond a full Region on the Mainland. If you sell the land and move back to a tier of one full Region or below, the system automatically tiers you down.
| Warning: Make sure to contact Concierge to set your tier status correctly if you tier up beyond one full Region, then tier down to one full Region or less, then intend to have more than one full Region again. Otherwise, you won't receive a notice the next time you tier up beyond one full Region. |
| Note: Private Region (island) fees are charged independently, and do not affect your land tier rating. |
Can I buy land before I sign up for or increase a monthly tier fee?
Yes. You'll receive a message that you need to upgrade to Premium and/or approve a higher monthly land use fee. Read this message carefully, as it details what membership you'll be using, and how much extra you'll pay per month. Make sure you approve how much you'll pay before you hit OK.
Where can I see my current land holdings and my current land use fee?
You can view your current land holdings and land use fees on your Dashboard by clicking Land Manager on the left to expand it.
What happens if I buy land but don't sign up for Premium (or a higher tier if I need one)?
If you purchase land inworld and your account is not a Premium account (including if you're a trial), you'll receiving a message that purchasing this land will upgrade you to a Premium membership. If you purchase land that brings your total holdings over your current land tier (see the table above) you'll get a message informing you that you're about to approve higher monthly land use fees. These messages always state in US$ the additional amount you're agreeing to pay. If you approve the land purchase, you are approving the additional monthly fees, so read carefully! If you have any problems, you should file a support ticket, but realize that we cannot provide refunds for land you purchase, but don't want.
Can I join parcels of land across Region boundaries?
It is currently impossible to join parcels that span more than one Region. For more information about this, see "How to join and split land".
Can I buy this land I saw on the mainland?
Generally speaking, land on the mainland will need to be made available to all Residents via an auction. We're not typically able to just sell land to the first person that asks about it. Exceptions can be made if the plot is relatively small and the requestor has a logical claim to it (for example, if a thin strip extends into an owned plot or a plot is completely surrounded). Land that is owned by Governor Linden and named "Protected Land" will not generally be sold to Residents or terraformed.
What is an island?
An island, or Private Region, is a 256mX 256m piece of standalone virtual land. Regions run on a single CPU, and have the ability to support 15,000 primitives. Private Regions have their own controls. These controls allow you to set ground textures and give you more terraforming leeway, allow and restrict access to the Region, manage environmental controls such as time of day, and agent count (the numbers of Residents allowed on the Region), along with many other levels of control not available to mainland parcel owners. Private Regions are managed through the control umbrella of an Estate. Estates can have one or more Regions in them, and are not necessarily contiguous, although they can be. Estates cannot have more than one owner, although they can have alternate payors.
- More information on Private Regions can be found in the Private Region (Island) FAQ.
- More information on Estates can be found in the Estate FAQ.
Can someone place a Region next to me without my permission?
The Land Store will not allow anyone else to place another island touching yours (even diagonally) without your permission.
What is the difference between an Estate and a Private Region?
An Estate is a collection of one or more Private Regions managed by one rule set. A Region is 16-acre square of land on the grid that belongs to an Estate. Region names are always shown at the top of the screen in the viewer. Estate names are only visible in the Region/Estate window.
Can I name the Region whatever I want?
See the Guidelines for Private Region Naming.
How long does it take for my Region to go up?
Once you have completed the process, your Private Region should go up within 30 minutes of checkout. Occasionally, your order may be delayed due to grid issues or hardware supply. If your purchase has gone through and the Region isn't up within the hour, please contact the Concierge Team or file a ticket via the Support Portal. You will also receive an email letting you know there will be a delay if there is no hardware available.
What is an Openspace? What is a Homestead?
Openspaces and Homesteads are explained in the Private Region Types article.
Why do I have to be an existing Region owner to own an Openspace or Homestead?
Openspaces and Homesteads are offered to allow Estate owners to create open ocean or land in and around their Regions in the same way that the Linden mainland does. They are intended for "light use" rather than heavy residential areas with large amounts of content. While they can and have been used in other ways, they are not recommended for any other purpose.
What is the Land Store for?
The Land Store allows you to buy Private Regions and Openspaces via our secure website.
Are there terms or conditions involved?
By purchasing a Private Region, you are agreeing to pay the set up and monthly service fees for as long as you own it. You are also agreeing to a restocking fee if you cancel your order.
When will I be charged?
You will be charged the setup fee once the order is completed. Monthly fees begin 30 days from the date you complete your purchase.
What is a Concierge user?
A Concierge-level Resident pays over USD$125 of land maintenance fees per month (mainland or Region). For example, a Resident owning one Region is a Concierge Resident because the monthly maintenance fee they pay is more than US$125.00.
Can I transfer land between two accounts that I own?
Yes, but the process is somewhat indirect: One of your accounts will need to sell the land to the other account for L$0. Keep in mind that both accounts must be Premium accounts, and the account that ends up owning the land needs to have the correct land tier amount. Also, be sure that when you set the land for sale, you set it for the specific account you want to end up owning it — otherwise, anybody could theoretically swoop in and take the land you wanted your other account to have.
What if I don't want to own land?
The Basic account is the plan for you. Without having to pay any money, a Basic membership allows you access to Second Life at any time.
How to get more prims on your land
Every parcel of land in Second Life can support a limited number of primitive objects, or "prims". The number of prims a parcel supports is directly related to its size; larger parcels are capable of supporting more prims. Under certain conditions, it is possible to increase the number of supported objects on a parcel.
Simulator primitive usage
If you own more than one parcel in a Region, the prim allowance of those parcels becomes a unified pool. For instance: If you own one parcel that supports 117 prims, and another parcel in the same Region that supports 33 prims, you have a total allowance of 150 prims on your land in that Region. If you wanted to, you could place all 150 prims on the parcel that initially only supported 33!

| Tip: If you did put all 150 prims on the smaller parcel, you would not be allowed to place any on the larger parcel (including trees and plants!) It is wise to distribute your total allowance carefully. |
| Note: This technique only works within a single Region; if you own parcels in more than one Region, you will not be able to share prim resources between them. |
Object bonus (private Regions only)

If you are the owner or estate manager of a private region, you can set a global object bonus for all parcels in the Region. You may want to do this if you plan on building heavily in small parcels while leaving large areas of your Region empty. To change your Region's Object Bonus:
- Select World > Region/Estate from the top menu bar.
- Make sure you are on the Region tab of the Region/Estate window.
- Set an Object Bonus multiplier, and click Apply.
Example: One regular region holds 15,000 prims. If you divide it into two equal parcels, each parcel will show it can hold 7,500. If you set the object bonus to 2.0, each parcel will show it can hold 15,000 prims. The region will not be able to hold 30,000 prims! In order for one of the parcels to actually hold 15,000, one parcel must be kept empty. The bonus for the other parcel is the prims not being used on the empty parcel.
| Important: A Region can only support 15,000 prims and an Open Space can hold 3,750 prims. (an Object Bonus setting of 1.0) The Object Bonus setting does not increase the total number of prims the Region supports; if the total number of prim in the region exceeds 15,000, no new objects will be allowed to rez, regardless of a local parcel's limits. |
More about object bonus
Object bonus is a multiplier for primitives allowed on any given parcel, and may have a value between 1.0 (the default) and 10.0.
Set at 1.0, each 512m2 parcel is allowed to have 117 objects. Set at 2.0, each 512m2 parcel is allowed 234, or twice as many, and so on. The maximum number of prims allowed per region is 15,000 regardless of the object bonus. Once set, lowering the object bonus may cause objects to be returned or deleted.
Freezing, ejecting and banning
Freezing, banning, and ejecting are tools that landholders may use to deal with troublemakers on their property. In order to freeze, eject, or ban someone, you must either:
- Own the land OR
- On group-owned land, you must be in the same group the land is owned by, in a Role with the following Abilities:
- Eject and freeze Residents on parcels
- Manage parcel Ban lists - You also need this to ban (in addition to ejecting and freezing).
With Viewer 2.x, in order to freeze or eject someone by right-clicking her avatar, you have to enable Admin Options from Develop menu first.
Freezing someone
- Right click on the person and select More > Freeze.
- Select Freeze from the list of options that pops up.
You may also release a frozen avatar with Unfreeze from this list. A frozen person cannot move, interact with objects or chat. They can still send and receive IMs.
Ejecting someone
- Right click and select More > Eject.
- Select Eject from the list of options that pops up.
You may also choose to save time with Eject & Ban, which will eject the avatar and add them to the ban list.The avatar will be ejected from your land onto an adjacent parcel of land. If they are already banned from the adjacent parcel, they will not be moved.
Banning someone
If the avatar is on your land, you may wish to follow the Eject procedure above, and use Eject & Ban from the list of Eject options. Otherwise, follow this procedure:
- View the About Land window for the parcel by selecting World > About Land from the menus at the top of the Second Life window.
- Click the Ban tab.
- Make sure Ban These Avatars is checked.
- Click Add.
- Type in the desired name and click Find.
- Click on the desired name in the list, then click Select.
- You may now enter another name, or click Close.
A banned person is not able to move onto or over your land (less than 800m above the ground level). They see a barrier of red lines, stretching upwards, that say "Access Denied."
| Tip: If you find banlines unsightly, you can hide them by disabling View > Banlines. |
How to post an event
Whether it's teaching a class, throwing a party, or hosting an art show, here's how to post an event:
- Go to the Events page.
- Click Submit New Event.
- Read the rules, comply, and post.

How to join and split land
Whether it's personal land you own and wish to join or split, or you're a Member of a group (with the Subdivide and join parcels Ability) wanting to make changes to group-owned land — the same methods are used. Watch this video to see it in action, and text instructions are below.
<videoflash type="vimeo">4167571|640|480</videoflash>
Splitting land
To subdivide one parcel into two parcels:
- Stand on your parcel. Select View > Property Lines. After a brief pause, you should see your land boundary shown in red.
- Right-click the ground and choose Edit Terrain or hit Ctrl-5 on your keyboard. You are now in land edit mode.
- Your mouse can now be used to left-drag a yellow bounding box around part of your land to select it. Do this to select the portion of land you want to divide into its own parcel (see the image below).
- With the area selected, you can now click Subdivide from the Edit Terrain window. If you can't see this option but can see a More button, click that first and you should see the Subdivide option appear.
- It will prompt you to confirm the split. Once you have agreed, your land will be divided into two separate parcels.
Both parcels can have their own names, land options, etc. and will accrue traffic independently of each other.
Joining land
Joining land is a very similar process, once again using the Edit Terrain tool.
- Stand on one of the parcels you wish to join to another. Select View > Property Lines.
- Ensure that both parcels of land are within the selection area.
- Ensure that both parcels are within the same Region. You cannot join land across a Region boundary.
- Ensure that both parcels have the same owner. You cannot join your group land to your personal land.
- Okay so far? Then right-click the ground and choose Edit Terrain or press Ctrl-5 on your keyboard.
- Now you're able to drag the yellow Select Land box. Drag the yellow selection such that it spans the border between the two parcels you want to join (see the image below). You need to have selected a little land from both parcels that are to be joined. You do not need to select all of both parcels, just some from both.
- With that done, you should now be able to click the Join button from the Edit Terrain window. If you can't see this option but can see a More button, click that first and you should see the Join option appear.
- With both parcels now joined into one, check the About Land window (right-click the ground and choose About Land) to make sure that your settings are correct.
| Note: The combined parcel will take its name, settings, and database ID from the larger of the two parcels. This may have an impact on search rankings related to the land you're working with, so be careful when joining parcels. |
The smallest parcel you can create in Second Life is 16m2 (4m x 4m).
| Note: There are limits to the range of the Select Land option in the Edit Terrain tool. Parcels need to be within the selected area to join them. |
How to keep other Residents off your land
A bit of a Second Life recluse? Someone in particular giving you a hard time? You can exercise your rights as a Second Life landowner by restricting access to your property.
Allowing Access For Specific People
- Right-click your parcel of land and choose About Land.
- Click the Access tab.
- Select the Group checkbox to restrict access so only group members may enter. (Go to the General tab and click Set to change this group.)
- Or, select the Avatars checkbox and enter specific Residents who may access the property.
Block Specific People from Access
- Right-click your parcel of land and choose About Land.
- Click the Ban tab.
- Select the Ban Avatars checkbox and enter specific Residents who may not access the property.
Maturity Settings
Note: Maturity blocking is available at the Region level for Private Regions. Parcel maturity settings do not affect access. They are used for search listing maturity. Maturity settings for land on a Private Region can be used to allow only Residents with a select maturity level or higher.
- If your land is set to
 Adult, only those with a
  General,
  Moderate, Adult maturity preference setting can enter the land.
 - If the land is set to Moderate, only those with a General and Moderate preference setting can enter your land.
- If your land is set to General, all Residents can enter your land.
For additional information about maturity ratings, see Maturity ratings: an overview.
Script Use
You can use scripted objects to enhance your land ownership tools. Generally, such scripts should:
- Provide adequate warning to the undesired Resident.
- Only work within the property lines (this includes projectiles that cannot operate beyond the parcel boundaries).
- Not be excessive in the removal of the unwanted Resident. Pushing them off the property or teleporting them home is usually acceptable; intentionally applying a script to disrupt their Second Life connection or online status is not allowed.
Scripts or no scripts, you cannot use land ownership as a way to unfairly restrict another Second Life Resident's personal freedoms.
How objects (prims) on land are calculated
Overview
Each Region is exactly 65536 square meters, and supports 15,000 primitive objects. Divided evenly, this means that each Region can support approximately 0.229 objects per square meter. In practical terms, this means a standard 512 square meter parcel can support up to 117 objects, a 1024 square meter parcel can support up to 228 objects, and so forth.
More than one parcel in a Region
All parcels belonging to the same owner (or group) in the same Region share their object capacity- this is represented as Simulator primitive usage in the About Land window. In this way, it is possible for the Primitives on parcel number to be higher than the Primitives parcel supports number.
To view the About Land window, stand on a parcel and select World > About Land. For information about objects on the land, select the Objects tab in the About Land window.
Vehicles and parcel limits
Objects that are Selected / sat upon do not count against the Primitives on parcel count. This allows vehicles to pass freely through parcels that might not otherwise be able to support them. Remember that a Region can only support 15,000 objects, regardless of parcel settings- if a Region is full, you cannot drive a vehicle into it.
Object Bonus Factor
In Private Regions, the owner may set a Region Object Bonus Factor to increase the number of objects supported by each parcel. This setting multiplies the number of objects each parcel can support by the Bonus Factor. It is important to note that this does not increase the maximum number of objects supported by the Region, which means that not all parcels in the Region will be able to reach their listed maximum capacity.
How to return other Residents' objects from your land
t happens sooner or later: someone puts something on your land that doesn't need to be there. A lost vehicle, a creative statue, even a random prim. Thankfully, you have several tools at your disposal to handle these objects however you wish.
Manual Returns
You can return any object on your land to the object's owner. Simply right-click the object and select More > Return.
Returning Objects on Parcel
The About Land window lets you pick whole groups of objects to remove. There are three categories of objects, as listed in the Objects tab of the About Land window, accessed by selecting World > About Land:
- Owned by parcel owner: These are objects that are owned by the landowner or have been deeded to the group (in the Tools window's General tab, click Set to choose a group, then enable the Share with Group option, then click Deed). Deeding to the group is an excellent choice for any object that's going to be a permanent fixture of the land. However, group-deeded objects can't pay Linden Dollars to other Residents, and group-deeded objects that accept L$ (like donation boxes) will divide the L$ evenly among all group members.
- Set to group: These are objects owned by group members that have been set to the group (in the Tools window's General tab, click Set and choose a group). This is a must-have setting for any object that's going to stay on the parcel that isn't deeded to the group.
- Owned by others: These are objects owned by people who are not in the group, as well as objects owned by group members that are not set to the group. This is very important. Anything you build that isn't set to the right group is placed in this category.
About Autoreturn
If the parcel is filled past capacity, it will automatically return objects. It starts with objects in the Owned by others category, then returning objects that are Set to group and objects Owned by parcel owner if need be. In each case, it goes from the newest to oldest objects in each category.
You can also set Autoreturn to automatically return any objects in the Others group after a given number of minutes. You can find the Autoreturn setting in the Objects tab of the About Land window; it's the field labeled Autoreturn other residents' objects (minutes, 0 for off). As the name implies, you should set this field to 0 to turn it off.
Autoreturn should return all objects categorized as Owned by others (in order of most recent to oldest) before any objects belonging to the group, which helps your group prevent malicious users from trying to attack your build by bringing in their own objects. When you enter a number for Autoreturn, it's set instantly and retroactively, so entering 15 (for example) will immediately cause any objects marked as Owned by others that have been left for more than 15 minutes to return to their owners.
The Region/Estate Window
If you own a Private Region, or if you are an Estate Manager for a Private Region, you may return a single Resident's objects from the entire Region using the following procedure:
| Tip: You may leave these options blank if you wish to return all objects owned by the selected Resident from the current Region. |
Blocking SLurl access to your land
If you do not want to allow other Residents to enter your land by using SLurls, you have several options for diverting or blocking such attempts. Accessing a location with a SLurl is the same as trying to execute a direct teleport to that location; as a result, any setting that blocks or redirects teleports to your land works the same way against SLurls:
Private Region owners
As the owner of a Private Region (sometimes called a Private Island), you may set up a telehub to collect all incoming teleports to your Region, including teleports that come from a SLurl. For more information about setting up a telehub, see Telehubs and Direct Teleport.
To block all teleports to your Estate (consisting of one or more Private Regions), you can disallow public access:
- Choose World > Regon/Estate
- Click the Estate tab
- Uncheck Allow Public Access
If you disallow public access, only the Residents on your Allowed residents and Allowed groups lists are allowed to teleport to your Estate.
Land Parcel Owners
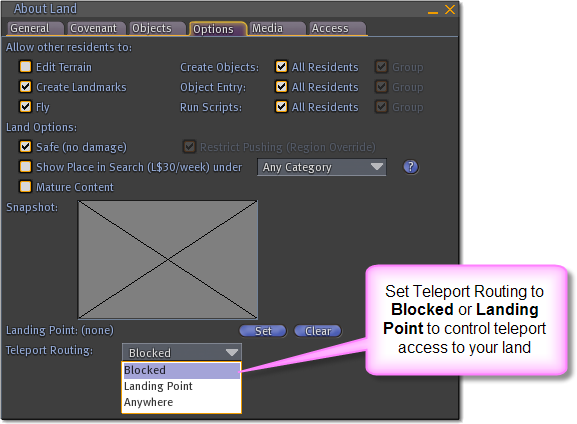
You may also control teleport access at the parcel level by changing your parcel's Teleport Routing settings:
- Stand on your parcel and choose World > About Land.
- Click the Options tab on the About Land window.
- Choose an option from the Teleport Routing dropdown menu:
- Blocked prevents any attempt to teleport to your parcel. Any Resident who tries to teleport onto your land is diverted to the nearest available parcel instead.
- Landing Point diverts any incoming Resident to a specified landing point on your parcel.

Setting a Landing Point
- Stand on the location on your parcel where you want to make a landing point and choose World > About Land.
- Click the Options tab on the About Land window.
- Press the Set button next to Landing Point.
Blocking direct teleports to your land
If you do not want to allow other Residents to enter your land by using SLurls, you have several options for diverting or blocking such attempts. Accessing a location with a SLurl is the same as trying to execute a direct teleport to that location; as a result, any setting that blocks or redirects teleports to your land works the same way against SLurls:
Private Region owners
As the owner of a Private Region (sometimes called a Private Island), you may set up a telehub to collect all incoming teleports to your Region, including teleports that come from a SLurl. For more information about setting up a telehub, see Telehubs and Direct Teleport.
To block all teleports to your Estate (consisting of one or more Private Regions), you can disallow public access:
- Choose World > Regon/Estate
- Click the Estate tab
- Uncheck Allow Public Access
If you disallow public access, only the Residents on your Allowed residents and Allowed groups lists are allowed to teleport to your Estate.
Land Parcel Owners
You may also control teleport access at the parcel level by changing your parcel's Teleport Routing settings:
- Stand on your parcel and choose World > About Land.
- Click the Options tab on the About Land window.
- Choose an option from the Teleport Routing dropdown menu:
- Blocked prevents any attempt to teleport to your parcel. Any Resident who tries to teleport onto your land is diverted to the nearest available parcel instead.
- Landing Point diverts any incoming Resident to a specified landing point on your parcel.
Setting a Landing Point
- Stand on the location on your parcel where you want to make a landing point and choose World > About Land.
- Click the Options tab on the About Land window.
- Press the Set button next to Landing Point.
Parcel encroachment
"Parcel encroachment" is our term for something that can take a few different forms:
- When objects from a neighbor's land overlap or overhang onto your land.
- Someone leaves a car or other objects on your land.
- Governor Linden has land nearby that is filled with litter.
When objects or trees overlap onto your property, the first thing you should try is to contact your neighbor and inform them that their build or tree is overhanging onto your land. Your neighbor probably doesn't realize that they've gone over the property line, and should move or remove the overhanging items.
If someone has left a car or other objects on your land, you should try the following things:
- Right-click it and select More > Return.
- Contact the object owner about removing it.
- You can also return objects by selecting World > About Land and clicking the Objects tab. Click Refresh List, select the Resident's name, and click Return Objects.
You also have the ability to stop objects from entering your land by unchecking the Create Objects and Object Entry checkboxes for All Residents in the About Land window's Options tab. By selecting only the Group checkbox or deselecting both, an object's owner gets a message like "Can't move object 'House' to { 11.5198, 217.779, 22.3401 } in region Levenhall because the parcel does not allow objects to enter."
For Governor Linden land where there doesn't appear to be any autoreturn set, please submit a support ticket informing us of the situation.
If none of the above solutions work, send an abuse report by selecting Help > Report Abuse. As always, help us help you by letting us know all about it in detail.
Getting to the About Land window
There are three ways to get to the About Land window:
- Select World > About Land from the menus at the top of the Second Life window.
- Right-click the ground terrain (not an object) and select About Land.
- Click the name of the parcel on the bar at the top of your screen.
The About Land window
Owning land lets you control what happens on that land. You can prevent others from visiting or building there, change the shape of the land, subdivide and sell it, and much more. The About Land window in the Second Life® Viewer lets you access most of your land's functions, and gives you more information about the land you own.
There are 3 ways to open the About Land window:
- World > About Land.
- Right-click on your land and select About Land.
- Click the parcel name near the top-center of the screen.
There are several different tabs in the About Land window:
- General
- Covenant
- Objects
- Options
- Media
- Access
General Tab
This tab displays basic information about your land (name and description), as well as controls to deed and sell your land.
Name - The name shown for the parcel. This name will also appear in Search window results if you choose to list your land. (See Show Place in Search below.)
Description - Additional words to describe your parcel. The description will also appear in Search results, enabling your land to be found easier.
Owner - On your land, this is you. If you've deeded land to a group, the group is the owner. See "How do I deed land to a group?"
Group - The group associated with the land. Click Set to change the group. Setting land to a group without fully deeding it can help you control group members' ability to build there without allowing non-members to build.
Allow Deed to Group - Select this and the Deed button to deed the land to the currently selected group.
Owner Makes Contribution With Deed - Check this box to give the group a "contribution" from your land use fees, so the group can own the land. Confused? See "How does group-owned land work?" and "How do I change or remove group land contributions?"
Sell Land - Clicking this sets your land for sale at the price listed, to the person listed (or anyone if no name is chosen). Don't click this until you're ready to close the deal! After you click Sell Land, you'll need to confirm 4 steps:
- Set a price - Enter what you think is a fair market price. Be sure to do research so you don't regret your choice.
- Sell the land to - Click select one to choose whether your land can be bought by anyone, or click Specific user to bring up a Choose Resident window which will allow you to specify one person. Doing this restricts the land to only being bought by this individual.
- Sell the objects with the land? - Click No, keep ownership of objects to do just that. Click Yes, sell objects with land to transfer all objects you own on the land to the buyer after purchase. This option only transfers objects with the same owner as the land, and won't transfer objects owned by someone else. Obviously, it won't transfer objects with no-transfer permissions either. Click Show Objects to see exactly what will be transferred.
- When the above is has been taken care of and you've verified everything's how you want it, click Set Land For Sale.
Claimed - When this parcel was last acquired, which is usually the result of a sale or subdivision.
Area - The parcel's size in square meters.
Traffic - An abstract representation of the amount of time Residents have spent on your land in the past day. See "What is traffic (formerly known as dwell)?"
Buy Land - Click this button to buy the land for yourself.
Buy For Group - Click this button to purchase the land for a group after setting your tag to that group. Here's how:
- Click Communicate button at the bottom of the Viewer window.
- Click the Groups tab near the top.
- Click the group for which you want to buy the land.
- Click Activate and it'll turn bold. If you have group tags visible, you'll see the tag above your avatar's head.
The group will be the owner of the land, and must already have enough contributions to own the land.
Buy Pass - If your access to this land is restricted, you can click this button to buy an access pass, letting you enter the land for the amount of time for which the pass is good. This is fairly uncommon.
Abandon Land - This option revokes all ownership to the land, setting it back to the owner of the Region (on the mainland, that would be Linden Lab under the name "Governor Linden"). Don't abandon land if you want to keep it or give it to someone else! If you own and are on your Private Region, this button becomes Reclaim Land.
Covenant Tab
This tab contains information about the Region's covenant. Private Estate owners can create a covenant in order to establish a set of rules when selling or renting their estates to tenants.
Region - The name of the Region the parcel is located in.
Estate - The name of the estate the Region is in. More than one Region may be included in a single Estate.
Estate Owner - The owner of the Estate the Region is in.
In addition, Estate owners may decide whether or not purchased land in the Region may be resold or subdivided. For more information about how covenants work, see "Estate (Private Island) Covenants".
Objects Tab
This tab contains information about the objects that are on your land, and on land you own within the Region.
'Simulator primitive usage - The total number of prims (short for "primitive objects") currently on all parcels you own in this Region, as well as the total allowed on those parcels. An object can be a single prim or multiple prims linked together in a complex form, like a house. If you don't own the land, this is the total for that landowner. If a landowner has several parcels in a Region and you buy one of them, refer to Primitives p'arcel supports.
'Primitives p'arcel supports - The number of prims that can be placed on this single parcel of land. If you purchase this land, this is the amount of additional prim usage you'll gain.
Primitives on parcel - A breakdown of the total number of prims on this parcel:
- Owned by parcel owner shows the owner's prims, or prims deeded to the group on group-owned land.
- Set to group shows prims owned by group members that are Set to the same group the parcel is set to or owned by. (Group members may have prims set to a different group that isn't shown here)
- Owned by others includes prims owned by other people, and group-member prims that aren't set to the same group.
- Selected / sat upon shows the number of prims in objects that are currently selected or sat upon by an avatar. Selected and sat-upon objects (like chairs and vehicles) do not count against the parcel's maximum prim limit. This is usually a fluctuating count depending on parcel activity, such as if you're holding a meeting with multiple avatars sitting down, or building a tower and selecting objects.
For Owned by parcel owner, Set to group, and Owned by others, you can click Show next to each tally to view exactly which objects are included. You can click Return to irreversibly return all objects in one of these categories.
| Warning: Don't do this if you're not sure what you're doing -- mass object returns are generally only done in scenarios such as moving to other land or starting over with a clean slate. |
Autoreturn other Residents' objects - Objects owned by others that are on the parcel after this period of time are returned automatically. "0" means autoreturn is off. This is useful for keeping your parcel litter-free.
| Warning: On group land, be extremely careful you don't set an autoreturn time on if objects aren't correctly set to group. Otherwise, those objects will be immediately sent back to their owners when the autoreturn time is reached, possibly destroying work-in-progress. There is no undo for returns. |
Object Owners - Click Refresh List to show a list of object owners. You can click on a specific name and click Return objects and return their objects automatically, which is useful if someone griefed you.
| Warning: Be extremely careful you don't return the wrong person's stuff. |
Options Tab
This tab lets you determine what can and can't be done on your land.
Allow other Residents to
Edit Terrain - If checked, anyone can terraform your land. It's best to leave this unchecked, as you can always shape your own land.
Create Landmarks - Checking this lets others create a landmark, which serves as a bookmark to the land. Usually best left on -- if you want privacy, see Access controls below.
Fly - If checked, other Residents can fly on your land. If unchecked, they can fly into and over your land but they can't start to fly once they've touched the ground.
Create Objects - If checked, allows for objects to be created and edited on your land by others. The owner can always create objects on their land. You can specify whether all Residents can do this, or restrict it to the group set in the General tab.
Object Entry - If checked, allows objects from other Residents to enter your parcel. For example, a crate that gets pushed over. You can specify whether all Residents can do this, or restrict it to the group set in the General tab.
Run Scripts - If checked, allows scripted objects owned by others to run on your land. Leaving this unchecked can help prevent others from doing things like firing scripted weapons on your land. You can specify whether all Residents can do this, or restrict it to the group set in the General tab.
Land Options
Safe (no damage) - If checked, damage combat is disabled. If cleared, damage combat is enabled and a heart indicating health appears at the top of the Viewer window. Health is reduced by physical collisions such as falling from a great height or being shot by a gun. If you "die", you're teleported home. You can't die permanently in Second Life.
No Pushing - If checked, prevents scripts from pushing. Checking this option is useful for preventing disruptive behavior on your land.
Show in Search (L$30/week) - If checked, your land will appear in the Search window's All and Places tabs for L$30 a week. If you enable this, be sure to also select the category you want your land to be listed under (Shopping, Hangout, Educational, and so on).
Mature Content - Select this checkbox if your land contains mature content. See "What is the difference between PG and Mature land?"
Snapshot - Click on the thumbnail box to select an image from the textures in your inventory. This picture will show up in multiple places, such as in the Search window's All, Land Sales, and Places tabs.
Landing Point - Set a landing point where people will arrive if visiting your land. Click Set to place the landing point where you're standing. This is where people will be directed to if they teleport to your land, including from Search. For example, if you're building a space station, you can set the landing point high in the sky so people don't get lost on the ground looking for it.
| Known issue Landing Point doesn't take into account the direction your avatar is facing when you set it, and it behaves inconsistently. |
Teleport Routing - Use this dropdown to select one of the following options:
- Blocked - Prevents Residents from teleporting to your parcel.
- Landing Point - Forces all Residents to land at your specified landing point.
- Anywhere - Allows Residents to teleport to anywhere in your parcel.
Each has its uses depending on your intent. For example, if you're building a game with secret areas and divided into multiple parcels, you can choose Blocked for some parcels so people don't accidentally spoil surprises, but choose Landing Point for the entrance parcel so everyone can see the instructions sign you've posted.
Media Tab
Please see "Media on a parcel" for information about this tab.
Access Tab
This tab allows you to limit access to your land.
Allow Public Access - If you uncheck this box, your parcel will be limited to you and whoever you add to the Allowed Residents list below. You can limit public access to Residents who've given Linden Lab payment info or who're age-verified.Allow Group Access - This box is only available if you aren't allowing public access. It restricts access to the group you set on the General tab.Sell Passes to - Check this to charge an admittance fee to your land and set the time period for which those passes are valid.Allowed Residents - This list of avatars always have access to your land.Banned Residents - This list of avatars never have access to your land.
| Note: If you set Object Entry to All Residents in the Options tab, objects owned by these avatars will be able to cross onto your parcel. |
About Land Video Tutorial
This tutorial shows you how many of the About Land options affect your experience. It was filmed in an older version of Second Life, so some of it may be deprecated -- if there's an inconsistency, refer to the above text for the latest revision.
<videoflash type="vimeo">4167493|640|480</videoflash>
Object Entry
In the About Land window's Options tab you'll see checkboxes for Object Entry.

This simply gives you, as a landowner, the ability to block other Residents' objects from coming onto your parcel. For example, if there are people passing by and leaving litter all over, restricting Object Entry will bounce the objects back outside your parcel, and show them a message like this:

How is this different from turning off "Create Objects"?
The Create Objects options block objects from being rezzed on a parcel.
The Object Entry options block objects being rezzed on a parcel and from entering if they're already rezzed inworld. Sometimes, there's unfortunate behavior like a griefer noticing you have Create Objects off, but a neighboring parcel has it on, so they try to annoy you by shooting projectiles from next door. Thus, Object Entry blocks them from doing that -- the two features can be used complementarily.
A situation that causes confusion which you should be aware of: On group land, a landowner might uncheck All Residents for Object Entry. Then, if a group member doesn't have the correct group active and tries to rez something, the object suddenly gets pushed out.
Tip: To set your active group, go to Edit > Groups and if desired, change it to the same group that the land is set to.
Why are there two checkboxes for "All Residents" and "Group"?
This offers you a greater level of control. Just like the checkboxes for Create Objects and Run Scripts, as a landowner, you can choose whether you want to stop everyone else from being able to push objects into your parcel, or if you want to permit this for the group the land's set to (it doesn't need to be deeded). This way, you could allow friends belonging to that group to play with objects on your parcel, while those not in the group aren't allowed to have objects enter.
Doesn't blocking "Object Entry" cause problems if you're in a vehicle?
No. If you're actively driving a vehicle, you will be able to cross through parcels with Object Entry turned off.
Making your land appear in Second Life's search
Making your land searchable is a great way to draw attention to your home or establishment. To make your land appear in the Places tab in Search:
- Right-click on your parcel's terrain and select About Land.
- Choose the Options tab in the About Land window.
- Check Show Place in Search (L$30/week).
- Choose a category from the dropdown list that most accurately describes your land.

| Warning: Parcels need to be at least 128 square meters in order to appear in All search or Places search. Do not spend L$30 to list parcels less than 128 square meters. |
Land listings and maturity settings
Your listing appears in Search, based on the maturity setting of your land and the maturity setting of those using the Search tool. For example, someone who has set their own maturity setting to ![]() General does not see search results for
General does not see search results for ![]() Moderate or
Moderate or ![]() Adult listings. A Resident who has their maturity preference set as
Adult listings. A Resident who has their maturity preference set as ![]() Adult, but only selects
Adult, but only selects ![]() General in the Search tool, only sees
General in the Search tool, only sees ![]() General search results.
General search results.
When listing your parcel in search, use keywords in your parcel description in About Land that match your parcel maturity setting. ![]() General or
General or ![]() Moderate parcels with
Moderate parcels with ![]() Adult keywords in the About Land description do not show in Search results, regardless of the maturity setting of the person searching.
Adult keywords in the About Land description do not show in Search results, regardless of the maturity setting of the person searching.
| Tip: If you have listed your land in Search and it does not show in the search results, check your parcel description for words that are not a match for the parcel maturity type. Only parcels in adult Regions can use adult keywords in About Land descriptions. |
How to edit your land's terrain
Land owners or members of groups with the Always Allow Edit Terrain ability assigned to their role can edit terrain. Members in a role with this ability can edit terrain on a group-owned parcel, even if it's turned off in About Land > Options.
| Important: Assigning Always Allow Edit Terrain to a group role gives the members in that role full access to the Edit Terrain tool. This includes the Abandon Land option. |
About Land
The About Land window includes an Options tab with settings to allow other Residents to have permissions on your land. Checking the Edit Terrain box will give permission to other Residents to edit the terrain on your land.

| Note: Allowing other Residents to edit terrain using the About Land option will NOT allow them to abandon, subdivide or join your parcels. |
Terraform To access the Edit Terrain tool, right-click on your land and select Edit Terrain from the pie menu that appears. This opens a tool with many different land edit options for terraforming your land.

The Edit Terrain tool contains six land edit options:
- Select Land - Use this option to select the land area you want to edit. Click and drag your mouse on the land. The selected area shows outlined in yellow. If you do not select part of your land, the tool defaults to the whole parcel area.
- Flatten Land - Makes the selected area flat.
- Raise Land - Raises the selected area.
- Lower Land - Lowers the selected area.
- Smooth Land - Smooths gradients to create a natural slope of the selected area.
- Roughen Land - This option gives the land bumps and ditches.
| Note: Mainland regions can be raised.lowered by +/- 4m. Estate (private) Regions can be raised/lowered by +/- 100m. |

These land edit tool options provide strength selection, application and revert edit.
- Small, Medium, or Large - Choose the size of your land edit tool. (your cursor appears as a bull dozer) and apply the effect by clicking on the white indicators in the selected land area or use the Apply to Selection option to apply the effect to the whole selected area.
- Strength - Independent of the drop-down menu tool sizes, the Strength slider provides the ability to set more specific size to your land edit tools.
- Apply to Selection - Use this button to apply your edit option to the whole selected area.
- Revert Land - This option sets the land back to its original shape before edits were applied. Several clicks may be necessary depending on how many edits you make.
Practice, Practice, PracticeMany of us have fun tales to tell of the first time we used the Edit Terrain tool! Before trying this tool on your own land, teleport to Here, where Torley Linden has set up a Terraform Box. Test the tool and become comfortable with it, then head to your own land to terraform with confidence.Additional Land Edit Options
Show owners
Selecting this checkbox offers a color code to the land:
- Reddish brown is land owned by others
- Green is your land
- Aqua is land owned by a group that you are a member of
- Grey is the rare public land
- Purple is land in the auction system
Buy Land
The Edit Terrain tool provides the option to purchase land set for sale. Click this button to open the land purchase confirmation Window. The confirmation window will provide information about any tier changes that might incur by making this land purchase.
Abandon Land
Land which is abandoned immediately reverts ownership to Governor Linden. Use caution with this option and keep in mind you do not get Linden dollars back for abandoned land.
Subdivide
You may want to break a parcel of land into multiple pieces, for example if you want to sell part of it. Select the section of your land by pressing down the left mouse button and dragging to create a rectangle of the land you want to subdivide and then click the Subdivide button.
Join
If you want to connect two or more pieces of land that you own, drag a rectangle that overlaps each of the land parcels you want to join and click the Join button to combine them into one. You can now use the About Land tool to set the features for this new piece of land. Please note that you can't join land across region boundaries.
Watch this comprehensive video tutorial!
<videoflash type="blip">AbvqAAA|640|480</videoflash>
Age verification parcel and estate management features
| Tip: Confused about the different types of Account Verification? Click here for help! |
The age verification feature extends your ability to control who may or may not access your land. Specifically, it allows you to deny access to any Residents who have not verified their adult status. If a parcel or estate owner limits access only to Residents who are age-verified, any unverified Residents trying to enter the land are blocked and receive instructions on how to verify their age.
| Note: If your land has content that is particularly sensitive or adult in nature, it is your responsibility to expressly ban adults who have not verified their ages. In all cases, we expect the community to continue to be effective and responsible in ensuring that Residents are sufficiently protected from potentially inappropriate and/or offensive content that is adult in nature. |
The age verification requirement is supported at both the parcel and estate levels.
Parcel Management
For individual parcels, landowner access and ban controls have been consolidated into a single Access tab, located in the About Land window.
If Age-verified adults is selected, Residents who have not successfully age-verified are not allowed access. This checkbox is deselected by default, allowing all Residents to access the parcel even if they have not verified their ages through the application on the Second Life website. If a parcel owner selects this checkbox, only Residents who are age-verified in this manner can access the parcel.

Estate Management
For estates, access controls are located in the Estate tab of the Region/Estate window. If Age-verified adults is selected, Residents who have not successfully age-verified are not allowed access.

Parcel media
| Important: Land and maturity access restrictions may prevent you from accessing media on a parcel or other media content. For a full breakdown of media access rules, see Maturity ratings and media access. |
The media on a parcel feature allows landowners to select and display a wide range of web-based media content, including web pages, movies, images, text documents and audio. This feature replaces and expands the existing Quicktime parcel media feature, giving you more flexibility in your media presentations. Currently, the displayed media is entirely non-interactive, meaning you will not be able to click web links, use scroll bars, or press buttons on web pages displayed on parcels.
| Trivia: The Second Life viewer uses a modified version of the Mozilla web browser to connect directly to web content. As a result, the web pages you see can potentially differ from what other Residents see depending on locally stored cookies and authentication information on your computer. |
The About Land Window
The Media tab of the About Land window contains many options for displaying media on your land in Second Life. To access the About Land window for a parcel of land, right-click the ground and select About Land. You must own the parcel, or have sufficient group abilities on a group-owned parcel in order to modify the land's media settings.

- Media Type - When you enter a Media URL, Second Life will try to automatically determine its Media Type. This drop-down list allows you to override the media you would like to play on your land. You should use this option if the Media Type is set incorrectly, or set to No Content. The text to the right of this dropdown box displays the media's MIME type.
- Media URL - This is the address of the media you would like to show on your parcel. For example, http://wiki.secondlife.com is the URL for Second Life's wiki documentation. You can set the Media URL by pressing the Set... button and entering the new URL into the popup window that appears.

- Replace Texture - Objects using this texture will display your movie or web page after you click the Play arrow. To change the texture, click the box containing the texture.
- Media Options
- Auto scale - Checking this option will scale the content for this parcel automatically. It may be slightly slower and lower in visual quality, but no other texture scaling or alignment is required.
- Loop Media - Play media in a loop. When the media has finished playing, it will automatically start again from the beginning. This option is only available for video media types
- Hide Media URL - Checking this option will hide the Media URL from unauthorized viewers of this parcel's media information. This option is not available for HTML media types.
- Hide Music URL - Checking this option will hide the Music URL from unauthorized viewers of this parcel's media information.
- Media Size - Allows you to define the size of the displayed media, in pixels. This option is not available for video media.
- Music URL - See "How to play streaming music in Second Life".
- Sound: Restrict gesture and object sounds to this parcel - Enabling this means an avatar needs to be on this parcel to hear gesture and object sounds originating from within it. This is useful if you have environmental ambience like birdsong and don't want to disturb the neighbors, or if you have an Adult-rated establishment and prefer that passerby don't hear sexually explicit noises. As cautioned above, maturity ratings take precedence.
- Voice
- Enable Voice - This is turned on by default and means people on this parcel can use voice chat to communicate. However, if voice is disabled at the estate level (in World > Region/Estate then click Estate tab), this and Restrict Voice to this parcel will be grayed out.
- Restrict Voice to this parcel - Similar to Restrict gesture and object sounds to this parcel, enabling this prevents voice chat from being heard by avatars unless they're on this parcel. Good if you want to have a spatial voice chat "in the open" yet maintain some privacy.

The Tools Window
There are two media-related When Left-Clicked options available in the Tools window:
- To access the Object Editor, right-click an object and select Edit.
- Click the More >> button to expand the Object Editor.
- Select an option from When Left-Clicked:
- Play parcel media: When the object is clicked, it will act as a "Play/Pause" button for the parcel's media stream. The same effect can be achieved by pressing the Play button in the lower-right corner of your Viewer.
- Open parcel media: When the object is clicked, your browser of choice will attempt to open the parcel media URL. Depending upon your Preferences, this can be the Viewer's Media Browser window, or an external web browser. This option will not work on a movie media type.
| Trivia: These media types will always function as Play parcel media if the media is not already playing on your Second Life viewer. |

The Preferences Window
The Web tab of the Preferences window allows you to choose your default media browser for Second Life:
- Use external web browser: If you select this option, all web hyperlinks in Second Life will open in your computer's default web browser (Firefox, Safari, Internet Explorer).
- Use built-in web browser: If you select this option, web hyperlinks in Second Life will open inside Second Life's media browser. Use this option to view web content without switching away from the Second Life viewer.
- Browser cache: Click the Clear Now button to clear the media browser's cache. This is not the same as clearing Second Life's cache!

The Audio & Video tab includes a checkbox to Automatically play media when available. If you check this box, media will automatically play when you enter a parcel with a media URL and media texture set.

The Media Browser Window
The media browser is a specialized Mozilla web browser you can use inside Second Life. It does many of the same things a normal web browser can do; type in a URL and press Go to navigate to a new web page. The Back and Forward buttons help you to navigate between previously-visited pages, and the Reload button refreshes your currently viewed media. The media browser also has a few buttons that are specific to Second Life:
- Send Current URL to Parcel: When pressed, this button replaces your current parcel media URL with the URL loaded in the media browser. You must own the land you are standing on, or have sufficient group abilities on group-owned land in order to use this button.
- Open in My Web Browser: Pressing this button opens the current media browser URL in your computer's default web browser (Firefox, Internet Explorer, Safari). You may wish to use this option if you wish to view web content that is not displaying properly inside Second Life.
- Always open in my web browser: If you check this box, web URLs will always open in your computer's default browser. You can reverse this setting on the Web tab of the Preferences window.
| Tip: If you set Second Life to use the built-in browser, you can quickly open the media browser at any time by pressing the F1 key, which opens a link to the Support Portal. |

Want more?
For some practical, hands-on education on how to use Parcel Media, check out these fantastic video tutorials by our own Torley Linden:
Play movies, webpages & more
<videoflash type="vimeo">4168095|640|480</videoflash>
Make your own Media screen
<videoflash type="vimeo">4168087|640|480</videoflash>