Building Prim Skirts Using The Loop Rezzer
Description: Upon successful completion of the tutorial, the attendee will be able to
- Construct a complete working Loop Rezzer;
- Construct a complete flexi-skirt attachment using a Loop Rezzer Script;
- Describe the what a loop rezzer script is, and how it is used;
- Create a proper flexible skirt prim and insert into the loop rezzer;
- Modify the loop rezzer script to generate skirts of different parameters;
- Attach and adjust the skirt to the proper location on your body.
Pre-Requisites: No knowledge of scripting or building necessary, but attendee must not be afraid to manipulate scripts and build. Course materials and scripts will be provided at the time of the class.
Estimated Duration: 60 minutes
Note: There are images provided below with the tutorial. For best results, right-click the images and select OPEN IN A NEW TAB or in a NEW BROWSER. Then while viewing the image, click on the FULL RESOLUTION link - so you can view the images at full resolution (particularly important when trying to read the values in the EDIT windows).
Introduction
- What is a Loop Rezzer (looprez)?
A looprez is a script written by Second Life resident Ged Larsen in 2006. It is a tool originally designed to arrange prims for making Necklaces and other jewelry. The script is especially useful where prims had to be arranged not only in a circular fashion, but also facing "outwards." It was later adapted by Ged for making skirts, where each skirt panels had to be arranced in a circular fashion, with the prims oriented in the correct direction.
- What is a Prim Skirt?
A Prim Skirt differs from a "System Skirt" or "Second Life" skirt in that it is an attachment constructed of prims (primitives). The SL skirt is something that is "built-in" and is defined by a texture. While there are numerous controls available for determining the look of the SL skirt, it just isn't powerful enough. A prim skirt allows you to have beautifully shaped skirts that are flexible and have that "flair."
- Obtaining the looprez script
The original looprez script is available from this page: looprez v0.6. For the purposes of this tutorial, I have modified this script to automatically rez a "root prim," versus following the other tutorials and creating the root prim from the looprez object. I have often left the loop rez script inside, and sold dresses.
- Creating the Root Prim and the Loop Rezzer object (one time)
Move to a build-enabled location, such as the SL Volunteer HI Sandbox. We will construct a couple of objects by hand.
- Root Prim
- Right-click the ground and select CREATE
- From the EDIT window that opens up, select a SPHERE as the prim to create
- Your cursor will look like a wand
- Click the ground in front of you - a 0.500m x 0.500m x 0.500m SPHERE should appear, with Red/Green/Blue arrows
- In the EDIT window, press the blue MORE button to expand the dialog
- In the GENERAL tab, give the root prim the following name (type it exactly) Root Prim (Rename Me)
- In the OBJECT tab, change the prim size in the SIZE(meters) section. X = 0.050 Y = 0.050 Z = 0.050
- Ensure that the ROTATION(degrees) reads X = 0.00 Y = 90.00 Z = 0.00 (needed to ensure skirt will attach properly)
- In the TEXTURE tab, pick a random texture and change the TRANSPARENCY value to 50. The idea is to be able to see the Root Prim, but not have it get in your way.
- Right-click the object and select TAKE (or TAKE A COPY) from the PIE-MENU to take it into your inventory.
- Loop Rezzer Object
- This object could be ANYTHING, but to have the "cool-looking" rezzer that Ged Larsen then follow the steps below.
- Right-click the ground and select CREATE
- From the EDIT window that opens up, select a SPHERE as the prim to create
- Your cursor will look like a wand
- Click the ground in front of you - a 0.500m x 0.500m x 0.500m SPHERE should appear, with Red/Green/Blue arrows
- On the GENERAL tab, give this a name such as MY LOOP REZZER
- On the OBJECT tab, change the TWIST BEGIN AND END values to B: -360 and E: 360 (minus 360 to plus 360)
- Also on the OBJECT tab, change the HOLLOW value to 0.95
- On the TEXTURE tab, click the the box above the title TEXTURE (the one with the wooden texture).
- On the popup TEXTURE window, press the BLANK button and press APPLY
- Also on the TEXTURE tab, change the SHININESS dropdown to LOW.
- Come out of EDIT mode and admire your handiwork.
- Copying the Script and Root Prim into the Loop Rezzer
- Right-click the nice Loop Rezzer object you just made and select EDIT
- Select the CONTENT tab
- Open your INVENTORY and locate the Root Prim (Rename Me) object
- Drag the Root Prim from your inventory over to the CONTENT window of the Loop Rezzer object. This will create the object inside the Loop Rezzer
- Locate your LoopRes v0.6 - Lum Mods script and drag it over to the CONTENT window of the Loop Rezzer object.
- Alternately, you can press the NEW SCRIPT button to create a new script - edit the script by double clicking it and delete everything inside. Next, copy the contents of the LoopRez v0.6 - Lum Mods script available from the wiki (when I put it up), and paste it into the script. Press the SAVE button. Verify there are no Compilation Errors. Close the script.
Congratulations, you now have a ready-to-customize Loop Rezzer!
Building The Skirt
Now that you have your fancy Loop Rezzer object, it still will not work as-is. Why? Because there isn't anything in there for the Loop Rezzer to rez! To do this, we must build a Skirt Prim which we will also put into the Loop Rezzer. The Loop Rezzer will rez your skirt prims and arrange them in a circle.
- Create the Skirt Prim.
- Right-click the ground and select CREATE
- From the EDIT window that opens up, select a CYLINDER as the prim to create
- Your cursor will look like a wand
- Click the ground in front of you - a 0.500m x 0.500m x 0.500m CYLINDER should appear, with Red/Green/Blue arrows
- Follow the sequence in the associated picture
- From the GENERAL tab give the Cylinder a name My Skirt Prim. This name must match the name inside the LoopRez v0.6 - Lum Mods script for the script to find it correctly.
- From the OBJECT tab set the following
- SIZE(meters) values to X: 0.500 Y: 0.500 Z: 1.140
- PATH CUT BEGIN AND END to B: 0.300 E: 0.700
- HOLLOW to 95.0
- TAPER to X: -0.95 Y: -0.75 (note: these are negative values)
- From the FEATURES tab, check the FLEXIBLE PATH checkbox. Take the default values.
- Take a copy of your Skirt Prim into your inventory. Make sure the name of it is My Skirt Prim
- You should be able to observe your prim changing shapes from a simple cylinder into an "upside-down" wedge. If your prim is half-stuck into the ground, raise it up a little so you can see the entire object.
- Rez The Skirt!
- Just like you moved the script and root prim into your loop rezzer, drag a copy of your My Skirt Prim object from your Inventory to the Loop Rezzer.
- Press ESC several times to come out of EDIT mode
- Click the Loop Rezzer ball. It should activate and begin rezzing your skirt prims!
- Sit back and marvel at your handiwork ("oooooh, ahhhh!")
- Linking The Skirt!
- Right-click and select EDIT on one of the skirt prims. This will put you into EDIT mode
- With your EDIT-mode cursor, perform an AREA SELECT as shown in the illustration. The idea is to "draw" a yello box around the Skirt Prims and the Root Prim only. When you let go of the mouse, the entire set will be selected (thus, highlighted in yellow).
- If you've selected the Loop Rezzer object as well, then redo the previous step, taking care not to select/highlight the Loop Rezzer.
- Press and hold the SHIFT key. Carefully click the Root Prim once - it'll "darken" and no longer be highlighted. The Root Prim is now de-selected. Keeping the SHIFT key pressed, carefully click the Root Prim once more - it'll once again highlight.
- This step is very important as we are telling Second Life WHICH prim will become the ROOT PRIM by making sure it is the LAST prim to be selected.
- With all of the Skirt Prims and Root Prim selected (and Root Prim was the last prim to be selected), press CTRL-L to Link the individual prims into a single object.
- If linked correctly, the Skirt Prims should all turn blue, and the Root Prim should be yellow. If this is not the case, press SHIFT-CTRL-L to Unlink and deselect/reselect the Root Prim and attempt to link once more.
- From the GENERAL tab, rename the skirt from Root Prim (Rename Me) to My First Skirt (or some other name), and take the skirt into your inventory.
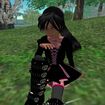
- Wearing and Fitting the Skirt
- From your Inventory, locate your new skirt (if in doubt, go to the RECENT ITEMS tab and find it there).
- Right-click your skirt and select ATTACH TO from the drop down menu. Another menu will appear beside it. Select PELVIS as the attach point. (Otherwise, simply selecting WEAR will attach the skirt to the default location--the right hand).
- You may choose to stand on a Pose Stand (free from many places) go into Appearances and adjust the skirt from there.
- Right-click the skirt and select EDIT. You might be able to simply drag the skirt straight upwards so it fits around your waist properly. You can also choose to move it forwards/backwards and left/right and even tilt it to your liking.
- If you "mess up" a positioning act, you can press CTRL-Z to "undo" your last change as long as you have not deselected your skirt or exited the EDIT mode.
Congratulations! You are now the proud owner of a beautiful, flexible, wooden skirt!
Customizing The Skirt
Obviously there are many different types of skirts out in the Second Life world. They are a result of customizations to the basic design. As you experiment, you will rez many skirts, many of which you will not use. Simply select the unwanted skirts and root prims and delete them, make your adjustments and re-rez. Here are some things to think about.
- Textures: As hard as you might look, there isn't a market for wooden skirts. This time, take the skirt prim from your inventory, and apply textures to it. Put that new, textured skirt prim into another copy of the Loop Rezzer and rez a spectacular skirt!
- Different Skirt Prims: Try experimenting with different sizes, widths, lengths. Try creating cones (by setting PATH CUT to B: 0.00 and E: 1.00). Try a shorter prim (you'll need to adjust flareangle and xRadius, yRadius later - if you use different lengths)
- Number of Prims: You'll need to open up and edit the LoopRez v0.6 - Lum Mods script, but the user-definable parameters are all near the beginning. Change the number of prims from 16 to 24 or even 36! See what that does.
- Different Poof: By changing a variable called flareangle from 65 degrees to something higher or lower, you will change the angle in which the skirt will tilt towards the center. A low flare angle would produce a "narrow" skirt (less poofy), while a higher flare angle would produce a "wider" skirt (more poofy). Experiment with the flare angles, but also note it does have an effect on the final diameter of the dress.
- Saddle Value: By changing the bendcoefficient value to something greater than zero, you will coax a saddle-shape into the prim layout.
- Rez Height: There is a rezPosition vector (a value like < 0.0, 0.0, 1.5 >) Change the 1.5 meters to something lower or higher and see what effect that has on how high above the Loop Rezzer your skirt will appear. Setting this number TOO LOW will make it difficult for you to Link your skirt without selecting the Loop Rezzer object in with the mix.
- Skirt Diameters: You will note that there are variables called xRadius and yRadius. For circular skirt layouts, these values are kept equal to each other. By making a skirt with different xRadius and yRadius values, the skirt will become more eccentric (elliptical), and would better conform to an avatars body, which is normally flat. If you decide to make short skirts, consider making elliptical layouts because the short prims do make this body shape obvious.
- Dual-Layers: Notice that the skirts, when hanging normally are overlapping, but the moment you move they'll twist and gaps show up between the prims. By making "Dual Layer" skirts, you can have a second layer of prims beneath, rotated and offset slighty so those prims would naturally cover up the gaps.
- Alternating or Special Textures: Maybe you'd like to have one or a few prims of a diffent texture than the rest - you can always apply the special texture after the skirt has been rezzed, but before it is linked.
Conclusion & References
- Other Types of Rezzers
- On Vint Falken's blog, she mentions an advanced PrimSkirtBuilder which rezzes a skirt and a special control module that allows you to adjust the various angles and twists and such of the dress AFTER it's been rezzed. The rezzer itself is a Pose Stand, which allows the creator to fit the skirt and it's appearance directly on the avatar. Pick one up in-world, because it's FREE!
- Other Uses
- Creating buildings. The store at Lum's Outdoor Boutique🖈 in Mouse Point was created using the Loop Rezzer, stuffed with 8 meter columns.
- Sculptures
- Necklace makers
- Review Questions
- What are loop rezzers and what are they used for?
- What are Prim Skirts and how do they differ from Second Life skirts?
- What script value controls the "poofiness" of the rezzed skirt?
- References
Lum Pfohl 06:00, 12 December 2007 (PST)
|
| Lum's Quick Links
|
Click to Enlarge
- External Wiki Contributions
|
| Related topics
|
|
|
| edit
|
|


