XyText-UTF8 Gimp Texture Creation
A primer on UTF-8 encoding (for our needs with lsl and xytext handling)
Just a quick view of the UTF-8 encoding used by SecondLife. It is a very complete and smart way of representing special characters.
With normal characters such as 'A', UTF-8 is perfectly equivalent to ASCII encoding and both will use 1 byte (hexadecimal 41). For special or International characters, then UTF-8 is offering a unique translation which can be more than one byte.
For instance if you take the char 'ç', this will translate (according to http://www.isthisthingon.org/unicode/index.php) in utf8 to: C3A7 (two bytes).
You can also know this writing the following simple lsl script:
<lsl> default {
   touch_start(integer total_number)
   {
       llSay(0, llEscapeURL("ç"));
   }
}
</lsl> which is giving in chat
[15:20] Object: %C3%A7
Defining the list of UTF8 characters to render and producing with GIMP
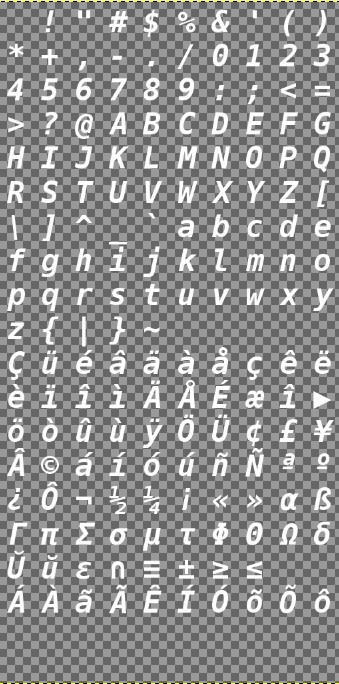
I used the following trick to extend standard XyText font texture to accomodate new characters:
- Put 20 rows of characters instead of the 10 of xytext (we use a 512x1024 texture so we have the SAME quality as of XyText fonts!!!
This allows for 100 more characters added to the usual 100 base characters.
So if you want to adapt this XyText-UTF8 engine to some other language you MUST find the UTF8 encoding for 100 chars you want to use and set up a python fu generating the texture.
The extra 100 characters are defined by a vector of up to 100 elements encoded with UTF8 coding. I use the following python-fu script for gimp to produce a compatible texture for my boards: (you have to put it under .gimp/plug-ins and obviously enable python-fu for your gim.. This tested with gimp 2.4 and gimp 2.6).
This script will appear under Filters->XyText1CharE and when pressed you are asked for
- font to use (use a non proportional font like Monospace Bold Italic, which I feel it gives one of the best results)
- Color to use leave white default
- Font Size (best result with 42 points)
- limit font generation not used
This sample produces Portuguese fonts. Note the use of a decode array, which mimics the same list used by subsequent lsl scripts in secondlife.
It will show you the image with transparent background which you can save in .tga format and upload to secondlife (or opensim),
<lsl>
- ! /usr/bin/env python
from gimpfu import *
def python_log_init():
   fileHandle = open( 'python.log', 'w')
   fileHandle.close()
def python_log(s):
   fileHandle = open ( 'python.log', 'a' )
   fileHandle.write(str(s)+"\n")
   fileHandle.close()
def python_xytext(font,color,size,limit):
 """Print the arguments on standard output"""
 python_log_init()
 python_log("font: %s color: <%d,%d,%d> size: %d limit: %d" % ( font, color[0], color[1], color[2], size, limit ))
 chars = " !\"#$%&'()*+,-./0123456789:;<=>?@ABCDEFGHIJKLMNOPQRSTUVWXYZ[\\]^_`abcdefghijklmnopqrstuvwxyz{|}~     "


 decode=  ["\xC3\x87", "\xC3\xBC", "\xC3\xA9", "\xC3\xA2", "\xC3\xA4", "\xC3\xA0", "\xC3\xA5", "\xC3\xA7", "\xC3\xAA", "\xC3\xAB" ]
 decode+=["\xC3\xA8", "\xC3\xAF", "\xC3\xAE", "\xC3\xAC", "\xC3\x84", "\xC3\x85", "\xC3\x89", "\xC3\xA6", "\xC3\xAE", "\xE2\x96\xB6" ]
 decode+=["\xC3\xB6", "\xC3\xB2", "\xC3\xBB", "\xC3\xB9", "\xC3\xBF", "\xC3\x96", "\xC3\x9C", "\xC2\xA2", "\xC2\xA3", "\xC2\xA5"]
 decode+=["\xC3\x82", "\xC2\xA9", "\xC3\xA1", "\xC3\xAD", "\xC3\xB3", "\xC3\xBA", "\xC3\xB1", "\xC3\x91", "\xC2\xAA", "\xC2\xBA"]
 decode+=["\xC2\xBF", "\xC3\x94", "\xC2\xAC", "\xC2\xBD", "\xC2\xBC", "\xC2\xA1", "\xC2\xAB", "\xC2\xBB", "\xCE\xB1", "\xC3\x9F"]
 decode+=["\xCE\x93", "\xCF\x80", "\xCE\xA3", "\xCF\x83", "\xC2\xB5", "\xCF\x84", "\xCE\xA6", "\xCE\x98", "\xCE\xA9", "\xCE\xB4"]
 decode+=["\xC5\xAC", "\xC5\xAD", "\xCE\xB5", "\xE2\x88\xA9", "\xE2\x89\xA1", "\xC2\xB1", "\xE2\x89\xA5", "\xE2\x89\xA4", " ", " "]

 decode+=["\xC3\x81", "\xC3\x80", "\xC3\xA3", "\xC3\x83", "\xC3\x8A", "\xC3\x8D", "\xC3\x93", "\xC3\xB5", "\xC3\x95", "\xC3\xB4" ];


 width=512
 height=1024
 img = gimp.Image(width, height, RGB)
 layer = gimp.Layer(img, "my font", width, height, RGB_IMAGE, 100, NORMAL_MODE)
 img.add_layer(layer, 0)
 layer.add_alpha()
 gimp.set_foreground(color)
 pdb.gimp_selection_all(img)
 pdb.gimp_edit_clear(layer)
 pdb.gimp_selection_none(img)

 index=0
 extra=-1
 #pdb.gimp_text_fontname(img,layer,50,50,"\xC3\x87",0,TRUE,size,PIXELS,font)
 try:
   for row in range(20):
      for col in range(10):
         if extra<0:
            try:
               el=chars[index]
               index=index+1
            except:
               extra=0

         if extra>-1:
            el=decode[extra]
            extra=extra+1
         python_log(str(row)+","+str(col)+":  "+el)

         y=col*51.2+12
         x=row*51.2+5
         pdb.gimp_text_fontname(img,layer,y,x,el,0,TRUE,size,PIXELS,font)

 except:
    pass

 # Now ready to display this image
 img.merge_visible_layers(0)
 gimp.Display(img)
register(
 "xytext", "", "", "", "", "",
 "<Toolbox>/Xtns/_XyText1CharE", "",
 [
 (PF_FONT, "font", "Font to use", "Arial"),
 (PF_COLOR,"color","Color to use", (255,255,255) ),
 (PF_INT,    "size", "Font size", 45          ),
 (PF_INT,  "limit", "limit font generation ", 180          ),

 ],
 [],
 python_xytext
 )
main() </lsl>
