Mesh/Uploading a multi-face mesh: Difference between revisions
< Mesh
No edit summary |
|||
| Line 27: | Line 27: | ||
== Add your mesh object to the world and edit it == | == Add your mesh object to the world and edit it == | ||
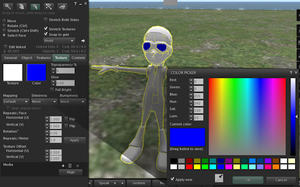
[[Image:MeshWalkthrough-Complex Mesh Upload-Edit Face.png|right|300px|thumb|Edit goggle color]] | |||
You should now be able to manipulate your mesh as if it were like any other object in your inventor | You should now be able to manipulate your mesh as if it were like any other object in your inventor | ||
* Find your "''boyShape''" object in your "''Objects''" folder; if you're having trouble or have a large inventory, use your inventory's "''RECENT''" tab view. | * Find your "''boyShape''" object in your "''Objects''" folder; if you're having trouble or have a large inventory, use your inventory's "''RECENT''" tab view. | ||
Revision as of 12:05, 8 October 2010
Just as we can texture individual faces of a primitive differently, we can texture individual faces of meshes differently if the mesh has been properly set up for materials before import.
Obtain a Second Life compatible mesh file
The first step is to get a multi-material mesh file onto your computer that you want to upload to SL. SL's mesh import is able to read COLLADA (".dae") files.
- Click on this link -- https://collada.org/owl/download.php?sess=0&parent=131&expand=1&order=name&curview=0&binary=1&id=707 -- to download the "seymour.dae" COLLADA file.
- Save the file anywhere on your hard drive where you can find it subsequently.
Upload the mesh file to Second Life
Next, take the file that you downloaded to your computer and upload it to SL. (Note that during beta, uploading is free!)
- Open the main menu "Build" menu, choose "Upload", click "Model...".
- (Alternately, open your Inventory View, click the "+" menu button, "Upload" > "Model...").
- This will cause a file dialog box will open.
- Find and select the "seymour.dae" file from your computer.
- The Import Model window will then appear.
- Click the "Generate LOD" button at the top of this window.
- The viewer will take a moment to process this, then the "Upload button" will become clickable.
- Click the "Upload" button.
- You will see 2 new assets in your inventory:
- One will appear in your inventory's top-level "Meshes" folder, the other in your top-level "Objects" folder.
- These will appear as "boyShape" for the seymour object.
- We only care about the asset in your "Object" folder right now.
- Warning : Current LOD requirements are failing for many meshes. LOD requirements and accounting is scheduled to be revised by early October. In the meantime, these errors may cause Seymour to fail to be uploaded.
Add your mesh object to the world and edit it

You should now be able to manipulate your mesh as if it were like any other object in your inventor
- Find your "boyShape" object in your "Objects" folder; if you're having trouble or have a large inventory, use your inventory's "RECENT" tab view.
- Drag the new object from your "Objects" folder to anywhere on the ground where you have permissions to build.
- The model will appear on the ground.
- Right-click on the model and select "Edit".
- The generic "Edit Object" floater will appear.
- Click "Select Face" in the top of the build window.
- Left-click the goggle lenses of the model.
- Click the color swatch in the edit tools and change the color, or click the texture swatch and change the texture.
- Add color and/or textures to other parts of the model (gloves, goggle frame, face, or cap) in the same way.
