Difference between revisions of "Lighting and shadows"
Rand Linden (talk | contribs) |
Rand Linden (talk | contribs) |
||
| Line 36: | Line 36: | ||
== Shadows == | == Shadows == | ||
Shadows are cast in the direction opposite the sun or moon (or other light source). | |||
Key to illustrations in this section: | |||
*A = avatar | |||
*B = opaque object | |||
*C = 39% transparency | |||
*D = 40% transparency | |||
*E = 80% transparency | |||
*F = opaque full-bright object | |||
*G = alpha texture (per-pixel transparency) | |||
=== Receiving shadows === | |||
[[Image:Receivers.PNG|frame|Receiving shadows]] | |||
The following can receive shadows: avatars, glowies, sculpties, water, ground, foliage, and avatar imposters. | |||
Full-bright surfaces (opaque or transparent) cannot receive shadows. | |||
<br clear="all"/> | |||
=== Casting shadows === | |||
[[Image:Casters.png|frame|right|Casting shadows]] | |||
Things that can cast shadows: | |||
* | * Alpha pixels < 40% transparent | ||
* | * Full-brights, glowies, sculpties, avatars, foliage, ground | ||
Things that do not cast shadows: | |||
* | * Alpha pixels => 40% transparent | ||
* | * Avatar imposters | ||
* | * Particles | ||
An object that both casts and receives shadows can cast a shadow on ''itself''. For example, an avatar's arm can cast a shadow on the avatar's leg, where appropriate. | |||
<br clear="all"/> | |||
=== | ===Notes=== | ||
* Sun/moon shadows cast ''onto'' partially-transparent/alpha faces ''may'' exhibit more blockiness than shadows cast onto normal opaque faces. | * Sun/moon shadows cast ''onto'' partially-transparent/alpha faces ''may'' exhibit more blockiness than shadows cast onto normal opaque faces. | ||
* The 'ambient occlusion' preference ''may'' have no effect on partially-transparent/alpha faces. | * The 'ambient occlusion' preference ''may'' have no effect on partially-transparent/alpha faces. | ||
* Sun/moon shadow fidelity is not evenly distributed across the scene; shadows being cast ''onto'' faces far from the viewer may start to look increasingly blocky, also depending on camera angle and sun angle. | * Sun/moon shadow fidelity is not evenly distributed across the scene; shadows being cast ''onto'' faces far from the viewer may start to look increasingly blocky, also depending on camera angle and sun angle. | ||
* Faces | * Faces that are far from the camera (approx 256 meters+) will not receive shadows. As they approach this distance, the received shadows should quickly fade away to zero effect. This can be tested by setting your draw distance to 300m and slowly pulling your camera back from the world by hundreds of meters. | ||
=== Shadows on bumpy objects === | === Shadows on bumpy objects === | ||
[[Image:Bumpgeneral.png|right]] | [[Image:Bumpgeneral.png|right]] | ||
Full-bright bumpy objects render the same as with lighting and shadows off. | |||
Non- | Non-full-bright bumpy objects have the following visual properties of bumpiness: | ||
Realistic lighting for the depth-like roughness detail of the bump texture, according to sun/moon direction and the direction and influence of any local lights. | Realistic lighting for the depth-like roughness detail of the bump texture, according to sun/moon direction and the direction and influence of any local lights. | ||
| Line 92: | Line 94: | ||
** ''Broadly-speaking'', viewing random existing in-world content in this 'Lighting and Shadows' mode should look very similar to toggling 'Lighting and Shadows' off, except it should look... better. Better means: | ** ''Broadly-speaking'', viewing random existing in-world content in this 'Lighting and Shadows' mode should look very similar to toggling 'Lighting and Shadows' off, except it should look... better. Better means: | ||
*** A bit smoother lighting from sun, moon, and local lights | *** A bit smoother lighting from sun, moon, and local lights | ||
*** Shiny on non- | *** Shiny on non-full-bright surfaces should look different (more testing in a later section) | ||
*** Any number of lights will now light the scene simultaneously (with some exceptions - more testing in a later section) | *** Any number of lights will now light the scene simultaneously (with some exceptions - more testing in a later section) | ||
*** Increased accuracy in lighting means that a bright light near a surface ''may'' now light nearby points on that surface more intensely than previously | *** Increased accuracy in lighting means that a bright light near a surface ''may'' now light nearby points on that surface more intensely than previously | ||
| Line 99: | Line 101: | ||
** In this mode, all of the following should behave as historically expected, i.e. very similarly to when 'Lighting and Shadows' is off, per general render testing: | ** In this mode, all of the following should behave as historically expected, i.e. very similarly to when 'Lighting and Shadows' is off, per general render testing: | ||
*** Avatar clothing, non-prim hair and skirts | *** Avatar clothing, non-prim hair and skirts | ||
*** | *** Full-bright faces | ||
*** Faces with transparency and/or alpha-textures | *** Faces with transparency and/or alpha-textures | ||
*** Animation textures | *** Animation textures | ||
Revision as of 10:09, 13 June 2011
| Warning: This is a draft in progress. Please do not use yet. |
Overview
The new lighting and shadows feature improves the quality of the in-world visual experience. The two main features are real-time shadows and improved lighting.
| Note: Sky and water environments appear and function the same regardless of whether lighting and shadows are enabled. |
Prerequisites
This feature requires a reasonably recent graphics card, such as NVIDIA GeForce 8600 and 8800, GTX 2xx, or Radeon HD 4xxxx.
If your graphics card cannot support the feature, then it is disabled, and you cannot enable it.
Graphics preferences settings
To enable or change your lighting and shadows settings:
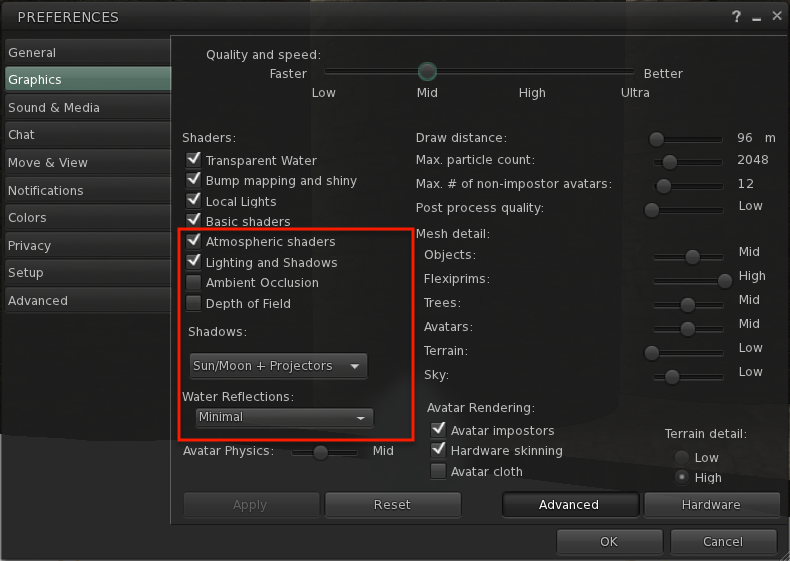
- Choose Me > Preferences.
- Click the Graphics tab.
- Click Advanced.
- Check Atmospheric Shaders And Hardware Skinning (under Avatar Rendering).
| Note: In general, enabling lighting and shadows will lower the frame-rate somewhat; by default the feature is disabled on hardware where the typical frame-rate would be decreased below 10FPS. |
When Atmospheric Shaders is enabled, if your system supports it, you can then enable:
- Lighting and Shadows
- Ambient Occlusion
- Shadows
When you check Lighting and Shadows, you can then enable Ambient Occlusion, Depth of Field, and select the desired type of Shadows.
To enable Water Reflections, check Basic shaders. Options are "Minimal", "Terrain and Trees", "All static objects", "All avatars and objects", "Everything".
Shadows
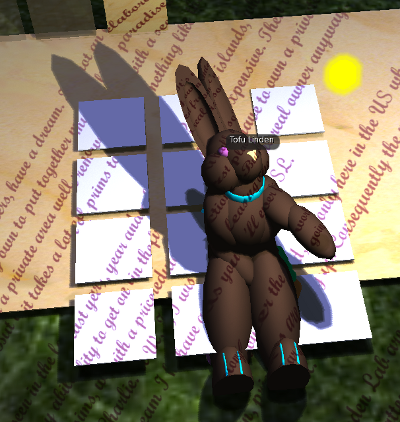
Shadows are cast in the direction opposite the sun or moon (or other light source).
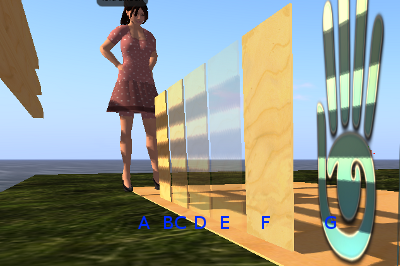
Key to illustrations in this section:
- A = avatar
- B = opaque object
- C = 39% transparency
- D = 40% transparency
- E = 80% transparency
- F = opaque full-bright object
- G = alpha texture (per-pixel transparency)
Receiving shadows
The following can receive shadows: avatars, glowies, sculpties, water, ground, foliage, and avatar imposters.
Full-bright surfaces (opaque or transparent) cannot receive shadows.
Casting shadows
Things that can cast shadows:
- Alpha pixels < 40% transparent
- Full-brights, glowies, sculpties, avatars, foliage, ground
Things that do not cast shadows:
- Alpha pixels => 40% transparent
- Avatar imposters
- Particles
An object that both casts and receives shadows can cast a shadow on itself. For example, an avatar's arm can cast a shadow on the avatar's leg, where appropriate.
Notes
- Sun/moon shadows cast onto partially-transparent/alpha faces may exhibit more blockiness than shadows cast onto normal opaque faces.
- The 'ambient occlusion' preference may have no effect on partially-transparent/alpha faces.
- Sun/moon shadow fidelity is not evenly distributed across the scene; shadows being cast onto faces far from the viewer may start to look increasingly blocky, also depending on camera angle and sun angle.
- Faces that are far from the camera (approx 256 meters+) will not receive shadows. As they approach this distance, the received shadows should quickly fade away to zero effect. This can be tested by setting your draw distance to 300m and slowly pulling your camera back from the world by hundreds of meters.
Shadows on bumpy objects
Full-bright bumpy objects render the same as with lighting and shadows off. Non-full-bright bumpy objects have the following visual properties of bumpiness:
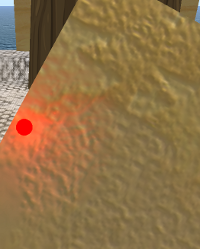
Realistic lighting for the depth-like roughness detail of the bump texture, according to sun/moon direction and the direction and influence of any local lights.
Shadow settings
In preferences, you can choose to see the following types of shadows:
- None
- Sun / Moon
- Sun / Moon + Projectors
None
- Turn on 'Lighting and Shadows', in 'Shadows:' select 'None'
- Broadly-speaking, viewing random existing in-world content in this 'Lighting and Shadows' mode should look very similar to toggling 'Lighting and Shadows' off, except it should look... better. Better means:
- A bit smoother lighting from sun, moon, and local lights
- Shiny on non-full-bright surfaces should look different (more testing in a later section)
- Any number of lights will now light the scene simultaneously (with some exceptions - more testing in a later section)
- Increased accuracy in lighting means that a bright light near a surface may now light nearby points on that surface more intensely than previously
- Avatar imposters are now lit very similarly to non-imposters
- Otherwise, there is no expected outright content breakage in this mode.
- In this mode, all of the following should behave as historically expected, i.e. very similarly to when 'Lighting and Shadows' is off, per general render testing:
- Avatar clothing, non-prim hair and skirts
- Full-bright faces
- Faces with transparency and/or alpha-textures
- Animation textures
- Faces with glow
- Underwater scenes
- Faces with bumpiness
- Media textures / shared media
- Underwater camera view
- Combinations of any of the above
- Broadly-speaking, viewing random existing in-world content in this 'Lighting and Shadows' mode should look very similar to toggling 'Lighting and Shadows' off, except it should look... better. Better means:
Sun/Moon
When you select Sun/Moon shadows, objects will cast shadows from the light of the sun and the moon.
Sun/Moon + Projectors
When you select Sun/Moon + Projectors shadows, objects will cast shadows from the light of the sun and the moon and any other inworld light sources.
Aambient occlusion
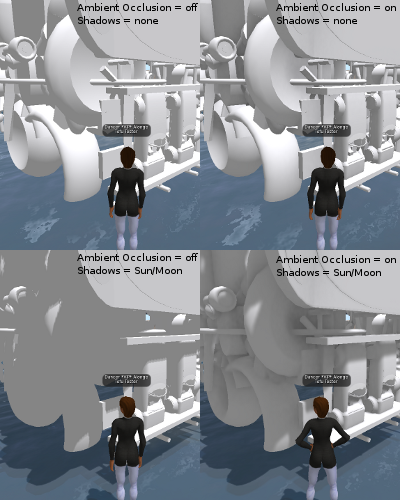
- The 'Ambient Occlusion' toggle and the 'Shadows' dropdown may be used independently.
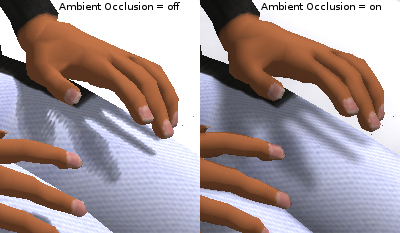
- Enabling 'Ambient Occlusion' should cause a rather subtle darkening of nooks and crannies in shapes.
- Setting 'Shadows' to 'Sun/Moon' should cause all qualifying objects (details further down!) to cast shadows and have shadows cast upon them.
- Enabling 'Ambient Occlusion' and setting 'Shadows' to 'Sun/Moon' should simultaneously exhibit both effects, with the added effect that shadows are now smoother/softer/blurrier.
Legacy point-lights
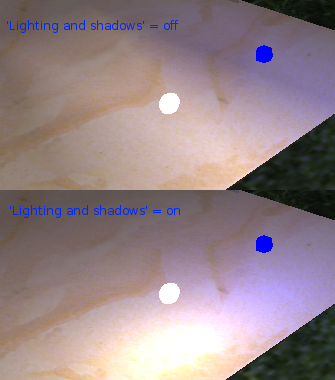
- With 'lighting and shadows' turned on, existing in-world lights should look quite similar to how they've historically looked (and continue to look, when 'lighting and shadows' is turned off), except:
- The generated light should generally look smoother (less triangular, less delineated, and more 'round' in its influence - see below screenshot for example)
- The generated light may appear brighter on surfaces close to the light source (see below screenshot for example)
- Lights whose areas of influence overlap may make that area seem lit much brighter than previously.
- Every light in the scene will have a cumulative influence on lighting (not just the closest 6 lights)
- The above exceptions may not apply to lighting falling upon transparent or alpha-textured faces - faces with a lot of partial transparency should appear essentially identical (apart from shadows falling upon them) regardless of whether 'lighting and shadows' is turned on or off.
- The light attributes 'color', 'intensity', 'radius', and 'falloff' should affect lights in visually similar ways with 'lighting and shadows' on or off.
Projector UI
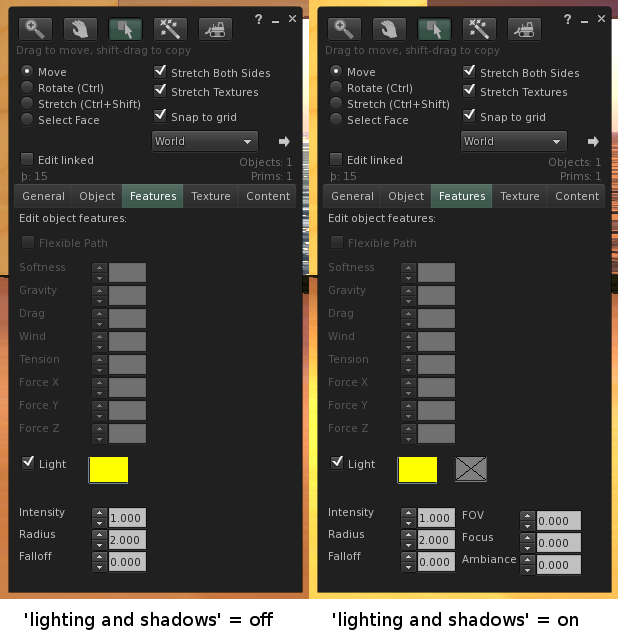
- Editing/creating a light-source should be the same process and UI as Viewer 2.0, but extra lighting options are exposed in the build->Features tab if you have 'Lighting and shadows' turned on:
The extra options are:
- A new texture-chooser next to the light's color-chooser. This defaults to 'no texture' (a grey box with an X through it).
- A 'FOV' entry (defaulting to 0.0)
- A 'Focus' entry (defaulting to 0.0)
- An 'Ambiance' entry (defaulting to 0.0)
The effects of these options are explained in the next section. 'FOV', 'Focus', and 'Ambiance' settings have no visible effect unless a texture is selected in the texture-chooser.
Projectors
A light becomes a 'projector' as long as it has a texture assigned to it (from the texture-picker next to the color-picker in the light editor). The features of projectors are only fully visibly supported when 'Lighting and shadows' is enabled (more details below).
Projectors: 'Lighting and shadows' enabled
A projector differs from a regular ('point') light in these significant ways:
- It respects the FOV, Ambiance and Focus attributes (more on these below).
- It does not cast light evenly in all directions; it only casts light along its negative Z-axis (i.e. the light is directional, and may be pointed at things).
- The upshot of this is that the effect of a projector's light depends on the rotation of the object with the Light feature.
- Light emitted along the negative Z-axis of a projector will actually cause lit objects to cast shadows appropriately, according to the same caster/receiver rules as sun/moon shadows, but only if:
- the 'Shadows' preference is set to 'Sun/Moon + Projectors', and
- the projector in question is one of the top two most influential projectors in the scene ('influential' is a fuzzy metric, but basically 'closest to the avatar')
- The light emitted along a projector's negative Z axis is itself textured (with the texture selected in the light section of the build->Feature tab, tinted with the color selected alongside it), effectively like a slide-projector.
- The scale of a prim with the Light feature proportionally affects the scale of the textured light projection from that object.
Accepted Weaknesses
Projectors may not project textures onto alpha/transparent faces which have partial transparency. Such faces may be lit by the projector as if 'Lighting and Shadows' was disabled, as detailed in the below section "Projectors: 'Lighting and shadows' disabled (a.k.a. Spotlights)"
Projectors & Shiny
A projecting prim reflecting in a shiny surface should exhibit a reflection of the projecting prim's projected texture. This should be increasingly sharper and brighter, the more shiny the reflecting surface is.
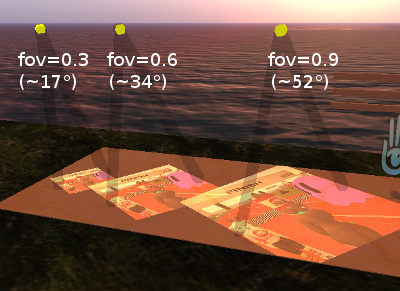
FOV
This defines the 'field of view' of the projector, in radians. This is the angular width of the cone of light projected. The possible range of values from 0.0 to 3.0 correspond to widths from 0 degrees (you can't see it - we should probably set this lower range to 0.001) to approx 172 degrees (almost a hemisphere of influence). It is accepted that the fidelity of any shadows caused by a projector may degrade as the FOV becomes larger.
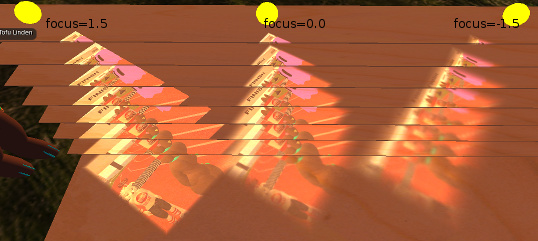
Focus
A projected texture appears blurrier the further the projection point is from the projector. The Focus value controls how attenuated this effect is. Positive values keep the projection sharper for further, negative values make the projection start to blur at a closer range.
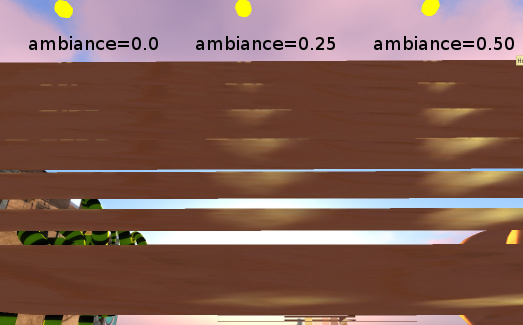
Ambiance
This adds a very blurred version of the projected image to all faces within the cone of influence, regardless of even whether they are in shadow or facing away from the projector. The goal is to very roughly simulate light influence which is being diffused in all directions by surfaces receiving a projected image. Thus it is acceptable that this be even brighter on faces facing away from the projector. The brightness of this effect should be proportional to the Ambiance value. It is probably a bug that values from 0.5-1.0 seem to have no additional effect above the 0.5 value.
Projectors: 'Lighting and shadows' disabled
- When 'Lighting and shadows' is disabled, a projector behaves like a point light, it continues to obey the Color, Intensity, Radius, Falloff attributes of the light.
