Difference between revisions of "SculptGenMax"

From Second Life Wiki
Jump to navigation Jump to search
 
(22 intermediate revisions by 2 users not shown)
Line 1: Line 1:
== Overview ==
== Description ==


Here's a 3ds Max 9 script to create sculptie textures.
SculptGenMax is a lightweight script that allows users to create sculptie prims in 3ds Max and export them to Second Life.


The forum thread is [http://forums.secondlife.com/showthread.php?t=185426 here].
=== Current Version ===


NOTE: I'm not saying that this is a better way to do it. If you are using a method that bakes textures and it's working for you, there is no reason to try this.
SculptGenMax will no longer be released as a standalone product.  


This algorithm generates the texture from the vertices. In contrast to most baking methods which generate the texture from the faces. It's not clear to me yet if one method is better than the other.
It is now a part of [http://liferain.com/downloads/primcomposer/ Prim Composer].


Anyway, instructions are in the script. It will *not* work on an arbitrary mesh. To simplify things, I used a particular cylinder or sphere mesh as my starting point. Instructions for creating the mesh are in the script.
Prim Composer is complete offline building environment for Second Life and OpenSim. Build in 3ds Max; Deploy to either Second Life or OpenSim. Both prims and sculpties supported.


Feel free to modify it for your own personal use and post bugs and fixes in the forum thread or the comments section below.
=== Features ===
=== Features ===


* Vertex-based
* Roundtrip workflow from 3ds Max to Second Life and back
* Cylinder and Sphere
* Load sculptmaps from disk to import sculpties into 3ds Max
* Editable Poly, Editable Mesh, and NURBS
* Create sculpties in 3ds Max and export them to Second Life
* Preserves UV Mapping
* All sculptmap topologies supported: sphere, torus, plane, and cylinder
* Preserves orientation and proportion in X, Y, Z
* Editable Poly, Editable Mesh, and NURBS supported
* Preserves UV Mapping — Baked textures work seamlessly


[[Image:Sculptgenmax0.4.1.jpg]]
=== License ===


=== Revision History ===
* SculptGenMax is licensed under GPL3
* Copyright 2008 Shack Dougall


Latest Release 0.4.1
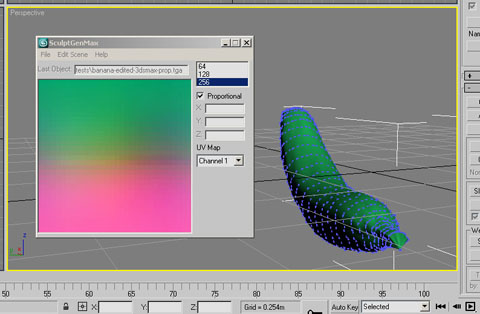
=== Screenshot ===


=== Useful Wiki Links ===
[[Image:Sculptgenmax-in-3dsmax.jpg]]
 
Sculpted Prims: Main Page and Portal
[http://wiki.secondlife.com/wiki/Sculpted_Prims]
 
Sculpted Prims: Technical Explanation
[http://wiki.secondlife.com/wiki/Sculpted_Prim_Explanation]
 
Sculpted Prims: 3d Software Guide
[http://wiki.secondlife.com/wiki/Sculpted_Prims:_3d_Software_Guide]
 
=== External Tools ===
 
Thumb Plug TGA  -- See TGA thumbnails in Windows File Explorer!
[http://greggman.com/pages/thumbplug_tga.htm]
 
== Links to Related Threads ==
 
=== Prim-based Offline Builder for 3ds Max ===
 
forum thread
[http://forums.secondlife.com/showthread.php?t=152139]
 
windyweather message board
[http://www.windyweather.net/smf/index.php?board=15.0]
 
=== Preset Geometry Methods ===
 
SculptGenMax for 3dsMax9
[http://forums.secondlife.com/showthread.php?t=185426]
 
3DsMax Tutorial for sculpt prim
[http://forums.secondlife.com/showthread.php?t=182540]
 
3DS Max Tutorial: Sculptie Egg
[http://forums.secondlife.com/showthread.php?t=186315]
 
=== Arbitrary Mesh Methods ===
 
Tutorial: Creating Sculpties From Arbitrary Meshes in 3ds Max 8/9
[http://forums.secondlife.com/showthread.php?t=188402]
 
3ds Max - Sculpted Prims exporter Petition / pledges
[http://forums.secondlife.com/showthread.php?t=182461]
 
Sculpties with 3DMax - I'm totally stuck
[http://forums.secondlife.com/showthread.php?t=187609]
 
=== Sculpties: Technical Detail ===
 
Other Sculpt Types
[http://forums.secondlife.com/showthread.php?t=193390]
 
sculpts + quad/vertex duality question w/ blender
[http://forums.secondlife.com/showthread.php?t=186099]
 
Accurate Sculpting
[http://forums.secondlife.com/showthread.php?t=188026]
 
Sculpty/texture mappings changes with LOD
[http://forums.secondlife.com/showthread.php?t=189100]
 
== Comments ==
 
Put comments, questions, feature requests, and bug reports here. --[[User:Shack Dougall|Shack Dougall]] 14:03, 30 May 2007 (PDT)
 
== The Script ==
-- ***************************************************************************************
--                                SculptGenMax
--                          Copyright 2007 Shack Dougall
--
-- This is a MAXScript written for 3ds Max 9.  It might work for earlier versions of 3ds Max,
-- but this has not been tested.  It does not work for Max5.
--
-- The script generates a Second Life sculptie texture from the selected object.
--
-- Revision History
-- ====================
-- 0.2 First released version
-- 0.2.1 Added proportional
-- 0.2.2 Fixed rotation issues
--
-- 0.3      Shifted bitmap by 1 pixel in X and Y.  changed defaults "NO SMOOTH" 128x128
--          no longer have to move the top and bottom vertices when you create the object.
--
-- 0.3.1 added x:, y:, and z: display boxes, so that you can know what dimensions to use
-- on your prim if you have the proportional feature turned off
--
-- 0.4 a) sculptmap now matches the 3dsMax UV map.
-- You should now be able to bake textures using the UV map and they
-- should line up with the sculptie in SL. NOTE: because I now use the UV map, if
-- your sculptie looks inside out, then your UV map is probably wrong.
-- b) only one vertex is used in the top and bottom row of the cylinder.  The vertices
-- used are the top and bottom vertices on the seam of the UV map,
-- i.e., the vertices at the top left and bottom left of the UV map.
-- c) sculptmap now has one more row of data.  The cylinder should be 32x32.
-- sculptmap conforms to http://forums.secondlife.com/showpost.php?p=1522861
-- d) smooth feature removed.  wasn't helpful.
-- e) 32x32 option removed.  64x64 is the lowest resolution sculptmap supported.
-- I might change this later, but it needs work to support 32x32 properly.
-- f) now supports a NURBS cylinder. See description below.
-- 0.4.1 a) fixed bug with UV map. Now handles UV maps correctly that have more vertices than are
-- in the mesh.
-- b) Poly sphere 32x32 supported.
-- c) NURBS Sphere 32x32 supported.
-- d) added drop down to allow you to change the uv map channel that is used.
-- *** CREATING THE POLY/MESH OBJECT ***
-- The script assumes a specific topology for the object.  You **CANNOT** use the script on
-- an arbitrary mesh.
--
-- Create the following object as a starting point:
-- 1) create a cylinder with 32 height segments and 32 side segments
-- 2) Apply an Edit Mesh modifier
-- 3) delete the vertex in the top and the vertex in the bottom
--
-- Now, you can move the vertices any way that you like.
--
-- When you're done, make sure that the object is selected and generate the texture.
--
-- NOTE: as of Version 0.4.1, you can also use a sphere. You need a 32x32 poly or mesh sphere.
-- The easiest way to create this is to follow the directions for the NURBS sphere
--      and then convert to mesh or poly.
-- *** CREATING THE NURBS OBJECT ***
-- As of Version 0.4, you can also use a NURBS cylinder as your starting object.
-- As of Version 0.4.1, you can use a NURBS Sphere.
--
-- 1) Create a cylinder or sphere
-- 2) Convert to NURBS
-- 3) If cylinder (skip for sphere), expand the "NURBS Surface" modifier and select "Surface" under it.
-- Select and delete the top and bottom of the cylinder.
-- 3) Go back to "NURBS Surface".
-- In the NURBS "Surface Approximation" Rollout, select Tessellation Method "Regular"
-- and set U Steps and V Steps to 32.
-- Now, you can NURB away.  Hint: Select NURBS Surface>Surface CV to see control vertices
-- When you're done, make sure that the object is selected and generate the texture.
-- *** SCRIPT INSTALLATION ***
-- MAXScript>Run Script...
-- in the dialog, select the script and press Open.
-- Customize>Customize User Interface...
-- click on the Toolbars tab. Select Category "SecondLife".  Drag SculptGenMax to one of the
-- toolbars.
--
-- *** RUNNING THE SCRIPT ***
-- Install script
-- Create object, modify it as desired, and select it.
-- Press SculptGenMax in the toolbar where you installed it.
-- A dialog will pop up.  Select desired bitmap resolution.  Then on the dialog's menu bar,
-- File>Generate Sculpt Texture
-- this will generate the texture in the dialog.
-- File>Save as..
-- to save the texture to a file.
--
-- *** UNINSTALLING THE SCRIPT ***
-- Right click on the SculptGenMax button in the toolbar and select "Delete Button".
-- Find the file "SecondLife-SculptGenMax.mcr" and delete it.
-- Restart 3ds Max
--
-- ***************************************************************************************
macroScript SculptGenMax category:"SecondLife"
(
local PROG_NAME = "SculptGenMax"
local PROG_VERSION = "0.4.1"
global SculptGenMax_CanvasRollout
try(destroyDialog SculptieGenMax_CanvasRollout)catch()
local default_keep_proportions = true -- determines the default value of the "proportional" checkbox
local default_uv_map_channel = 1 -- the default map channel from which we get the uv coordinates.
local default_resolution = 2 --determines the default selection of the resolution listbox
local defaultBitmapSize = 128 --determines the default resolution.
-- IMPORTANT: if you change default_resolution, then you must also change defaultBitmapSize
local keep_proportions = default_keep_proportions -- if true, we preserve the proportions of the model
-- otherwise, each dimension scales independently
local MAX_BITMAP = 256
local BITMAP_X = BITMAP_Y = defaultBitmapSize -- dimensions of the bitmap to be generated
local MESH_ROWS = 31  -- number of rows in mesh, excluding poles
local MESH_COLS = 32  -- number of columns in mesh
local UV_MAP_CHANNEL = default_uv_map_channel -- The map channel from which we get the UV coordinates  1 by default.
local POLE_V_LIMIT = #( 0.02, 0.98 )  -- A vertex must have a V value less than 0.02 or greater than
-- 0.98 in order to be considered a pole vertex.
-- A 64x64 bitmap is the smallest fully-specified sculptmap.  So, we need to know how much
-- bigger our current bitmap is than a 64x64 map
local bitMapTo64RatioX = BITMAP_X / 64;
local bitMapTo64RatioY = BITMAP_Y / 64;
local HORIZ_FLIP = false;  -- set this to true to flip the texture horizontally
local sculptBitmap = bitmap BITMAP_X BITMAP_Y color:white  -- generate the bitmap here
  local blankBitmap = bitmap BITMAP_X BITMAP_Y color:white  -- used to reset the dialog
local minDimensions = [0,0,0] --minimum X, Y, and Z values in the mesh
local maxDimensions = [0,0,0] --maximum X, Y, and Z values in the mesh
local maxScale -- the maximum difference between the min and max in any single dimension
local propPrimSize = [0,0,0]  --if proportional is off, this is the size we should make the prim in SL
-- so that it is proportional
local selectedPoly  -- contains a copy of the user's selection. we read the mesh data from here
-- it must be deleted after we are done or it will show up as a new object
-- in the scene
local firstRow = #() -- the indexes of the vertices in the top row of the bitmap
local lastRow = #() -- the indexes of the vertices in the bottom row of the bitmap
-- prevRow and currRow are used while iterating over the mesh
local prevRow = #() -- contains the indexes of the vertices in the previous full row of the bitmap
local currRow = #() -- contains the indexes of the vertices in the row of the bitmap that we are
-- drawing right now.
local edgeCount = #( 0, 0, 0, 0, 0, 0, 0, 0,0,0,0,0,0,0,0,0,0,0,0,0,0,0,0,0,0,0,0,0,0,0,0,0 )
--local debug = newScript()
-- uncomment previous line if you want to use print statements for debugging
-- examples of debug statements.  These will show up in the debug window if the debug line is uncommented
-- print "foo" to:debug
-- format "x = %\n" vertex.x to:debug
rcMenu CanvasMenu
(
subMenu "File"
(
menuItem generate "Generate Sculpt Texture"
menuItem save_as "Save As..."
separator file_menu_1
menuItem quit_tool "Quit Dialog" 
)
subMenu "Edit" ( )
subMenu "Help"
(
menuItem about_tool "About..."
)
fn calcPrimSizeToKeepProportions =
(
propPrimSize = [0, 0, 0]
propPrimSize.x = (maxDimensions.x - minDimensions.x) / maxScale
propPrimSize.y = (maxDimensions.y - minDimensions.y) / maxScale
propPrimSize.z = (maxDimensions.z - minDimensions.z) / maxScale
propPrimSize
)
fn scaleX xValue xMin xMax =
(
local xScale = (xValue - xMin) / (xMax - xMin)
if keep_proportions then
(
xScale = (xScale - 0.5) * ((xMax - Xmin) / maxScale) + 0.5
)
local result = floor (xScale * 255 + 0.5)
result
) --scaleX
fn vertexToColor vertPos =
(
local vertColor = [127,127,127]
vertColor.x = scaleX vertPos.x minDimensions.x maxDimensions.x
vertColor.y = scaleX vertPos.y minDimensions.y maxDimensions.y
vertColor.z = scaleX vertPos.z minDimensions.z maxDimensions.z
vertColor
) --vertexToColor
fn maxOf value1 value2 =
(
local maxValue
if value1 >= value2 then
maxValue = value1
else
maxValue = value2
maxValue
) -- maxOf
fn minOf value1 value2 =
(
local minValue
if value1 <= value2 then
minValue = value1
else
minValue = value2
minValue
) -- minOf
fn getVertexPos vertId =
(
local aPos = selectedPoly.GetVertex vertId
(in coordsys world aPos) * selectedPoly.objecttransform
)
fn getUVMapVerticesFor vertId =
(
-- we have to do this because the vertIds in the poly do not correspond directly to the
-- vertIds in the UV map.  In fact, the relationship between poly verts and uv map verts is
-- one to many.  i.e., each poly vert can be represented by 1 or more uv map verts.
--
-- to find the map verts, we get the poly faces for the poly vert.  Then, we get the
-- corresponding uv map faces.  And this gives us the map verts.
--
-- this works because the faceIds in the poly have a one-to-one correspondence with
-- the faceIds in the UV map.
--
-- get the poly vert's faces.
local faceIds = (polyOp.getFacesUsingVert selectedPoly vertId) as array
local mapVerts = #()
for faceId in faceIds do
(
-- get the vertIds for this poly face
local polyFaceVerts = polyOp.getFaceVerts selectedPoly faceId
-- get the vertIds for this map face
local mapFaceVerts = polyOp.getMapFace selectedPoly UV_MAP_CHANNEL faceId
-- find the index of the poly vert in the poly face.
polyVertIndex = findItem polyFaceVerts vertId
-- get the cooresponding mapVertId by using the same index on the mapFace
local mapVertId = mapFaceVerts[polyVertIndex]
-- put the mapVertId in mapVerts, if we haven't already
if findItem mapVerts mapVertId == 0 do append mapVerts mapVertId
)
-- at the end of this we have an array of all the map vertices that correspond to the poly vert
mapVerts
)
fn getUVpos vertId =
(
-- returns the uv coords for the vertex.  If the vertex has more than one UV coordinate,
-- then we return the one with the lowest U value.
local mapVerts = getUVMapVerticesFor vertId
local uvPos = [2,0]
for mapVert in mapVerts do
(
local tempPos = polyOp.getMapVert selectedPoly UV_MAP_CHANNEL mapVert
if tempPos.x < uvPos.x then uvPos = tempPos
)
uvPos
)
fn pass1 =
(
-- in Pass 1, we iterate over all vertices, collecting max/min x,y, and z
-- and we find the two end points
firstRow = #()
lastRow = #()
firstRowMinU = 1.0  -- set minU to 1.  At least one U value should be less than this.
lastRowMinU = 1.0
local numVertices = selectedPoly.GetNumVertices()
--format "numVertices = %\n" numVertices to:debug
for i = 1 to numVertices do
(
pos = getVertexPos i
if i == 1 then
(
minDimensions = copy pos
maxDimensions = copy pos
)
minDimensions.x = minOf minDimensions.x pos.x
minDimensions.y = minOf minDimensions.y pos.y
minDimensions.z = minOf minDimensions.z pos.z
maxDimensions.x = maxOf maxDimensions.x pos.x
maxDimensions.y = maxOf maxDimensions.y pos.y
maxDimensions.z = maxOf maxDimensions.z pos.z
numEdges = selectedPoly.GetVertexEdgeCount i
-- find the pole vertices by their position in the UV map.
local uvPos = getUVpos i
if uvPos.y < POLE_V_LIMIT[1] or uvPos.y > POLE_V_LIMIT[2] then
(
if uvPos.y > 0.5 then
(
if uvPos.x < firstRowMinU then
insertItem i firstRow 1
else
append firstRow i
firstRowMinU = minOf firstRowMinU uvPos.x
)
else
(
if uvPos.x < lastRowMinU then
insertItem i lastRow 1
else
append lastRow i
lastRowMinU = minOf lastRowMinU uvPos.x
)
)
)
maxScale = maxOf (maxDimensions.x - minDimensions.x) (maxDimensions.y - minDimensions.y)
maxScale = maxOf maxScale (maxDimensions.z - minDimensions.z)
calcPrimSizeToKeepProportions()
) -- pass1
fn getOtherSideOf aVertex edgeNum =
(
local edgeId = selectedPoly.GetVertexEdge aVertex edgeNum
anotherVertex = selectedPoly.GetEdgeVertex edgeId 1
if anotherVertex == aVertex then
anotherVertex = selectedPoly.GetEdgeVertex edgeId 2
anotherVertex
) -- getOtherSideOf
fn connectsToPreviousRow aVertex =
(
local numEdges = selectedPoly.GetVertexEdgeCount aVertex
local isConnected = false
for i = 1 to numEdges do
(
otherVertex = getOtherSideOf aVertex i
isConnected = findItem prevRow otherVertex != 0
if isConnected then exit
)
isConnected
) -- connectsToPreviousRow
fn isNotInPreviousTwoRows aVertex =
(
(findItem prevRow aVertex == 0) and (findItem currRow aVertex == 0)
) -- isNotInPreviousTwoRows
fn getFirstVertexInNextRow =
(
local currRowStart = currRow[1]
local numEdges = selectedPoly.GetVertexEdgeCount currRowStart
local firstVertex = -1
for i = 1 to numEdges do
(
aVertex = getOtherSideOf currRowStart i
if isNotInPreviousTwoRows aVertex then
(
firstVertex = aVertex
exit
)
)
firstVertex
) -- getFirstVertexInNextRow
fn getNextVertexInRow curVertex =
(
local curUV = getUVpos curVertex
local curNumEdges = selectedPoly.GetVertexEdgeCount curVertex
local nextVertex = -1
for i = 1 to curNumEdges do
(
aVertex = getOtherSideOf curVertex i
local aUV = getUVpos aVertex
--the following conditionals might be more complicated than necessary.
--the first IF was the original algorithm.
--the nested IF is a revised algorithm to use the UV map for guidance.
--it might be that the first IF can be simplified, but I haven't gotten around to it.
if connectsToPreviousRow aVertex and isNotInPreviousTwoRows aVertex then
(
if aUV.x > curUV.x and aUV.x - curUV.x < 0.5 then
(
nextVertex = aVertex
exit
)
)
)
--if nextVertex is -1, then we might have a problem
--except that we always call getNextVertexInRow one more time than we need to
--so it is -1 at the end of every row.  But we don't use that value.
nextVertex
) -- getNextVertexInRow
fn setInBitmap bitmapPos color =
(
setPixels sculptBitmap bitMapPos #(color)
)
fn putInBitmap vertId meshRow meshCol =
(
-- bitmap: x and y start at 0.  x is horizontal, y is vertical
-- mesh: row and col start at 0. row is vertical, col is horizontal
--
-- middle meshRows are put in the 64x64 bitmap at odd Y values 1..61 (31 rows total)
-- X values for middle rows are even (32 columns total)
--    so they go [0,1], [2,1]...[62,1]
--      then [0,3], [2,3]...[62,3]  .... [0,61], [2,61]...[62,61]
--
-- Poles are defined at [32,0] and [32,63].  Giving us 33 rows with data in a 64x64 bitmap
-- even Y values 2..62 are unused. (31 rows unused)
-- in the following line *bitmapTo64Ratio compensates for the size of bigger bitmaps
-- while (meshRow*2) + 1 ensures that the rows are odd.
--    and meshCol*2 ensures that the columns are even
local bitmapPos = [(meshCol * 2) * bitmapTo64RatioX, ((meshRow * 2) + 1) * bitmapTo64RatioY]
if HORIZ_FLIP then
(
bitmapPos.x = BITMAP_X - bitmapPos.x - 2 * bitmapTo64RatioX
)
local vertPos = getVertexPos vertId
local vertColor = vertexToColor vertPos
-- shift is a hack to reduce JPEG compression artifacts
local shift = 0
if bitmapTo64RatioX > 1 then
shift = -1
-- the loops allow us to write more than one pixel for each mesh vertex.
-- for example, if the mesh is 32x32 and the bitmap is 64x64, then each vertex in
-- the mesh is represented by 4 pixels in the bitmap
for xOffset = 0 + shift to bitmapTo64RatioX * 2 - 1 do
(
for yOffset = 0 + shift to bitmapTo64RatioY * 2 - 1 do
(
local x = bitmapPos.x + xOffset
local y = bitmapPos.y + yOffset
if x >= 0 then
setInBitmap [x, y] vertColor
)
)
) -- putInBitmap
fn processEndPoints vertexArray yStart =
(
local vertId = vertexArray[1]  -- arbitrarily choose the first one, they're all the same
local vertPos = getVertexPos vertId
local vertColor = vertexToColor vertPos
for x = 0 to BITMAP_X - 1 do
(
for yOffset = 0 to bitmapTo64RatioY - 1 do
(
setInBitmap [x, yStart + yOffset] vertColor
)
)
) -- processEndPoints
fn refreshDisplay =
(
SculptGenMax_CanvasRollout.theCanvas.bitmap = sculptBitmap
)
fn pass2 =
(
-- in Pass 2, we start with an endpoint and traverse the mesh one row at a time.
-- row and column numbers start at 0
-- if the bitmap resolution is greater than the mesh resolution, then we just copy the
-- a mesh point into surrounding pixels.  Thus, each point in a 32x32 mesh will
-- be represented by 4 identical pixels in a 64x64 bitmap.
local currVertex
processEndPoints firstRow 0  -- put the first row in the bitmap
processEndPoints lastRow (BITMAP_Y - bitmapTo64RatioY) -- put the last row in the bitmap
currRow = firstRow
prevRow = #()
for rowNum = 0 to MESH_ROWS-1 do  -- loop through the middle rows
(
currVertex = getFirstVertexInNextRow()
prevRow = currRow
currRow = #()
for colNum = 0 to MESH_COLS-1 do
(
putInBitmap currVertex rowNum colNum
append currRow currVertex
currVertex = getNextVertexInRow currVertex
)
refreshDisplay()
)
) -- pass2
fn updatePrimSizeTextBoxes =
(
SculptGenMax_CanvasRollout.prim_size_x.text = propPrimSize.x as string
SculptGenMax_CanvasRollout.prim_size_y.text = propPrimSize.y as string
SculptGenMax_CanvasRollout.prim_size_z.text = propPrimSize.z as string
)
fn makeHorizStripeTexture =
(
-- this function creates a texture map with a green horizontal stripe across the top and
-- then alternating black and red horizontal stripes.
-- useful for debugging UV mapping issues.
local BITMAP_XY = 512
local XY_ADJUST = BITMAP_XY/64
local texture = bitmap BITMAP_XY BITMAP_XY color:white  -- generate the bitmap here
local red = #( [255,0,0] )
local black = #( [0,0,0] )
local green = #( [0,255,0] )
for x = 0 to BITMAP_XY - 1 do
(
for yOffset = 0 to XY_ADJUST * 2 - 1 do
(
setPixels texture [x, 0 + yOffset] green
)
local y = 1
local color = black
while y <= 61 do
(
for yOffset = 0 to XY_ADJUST * 2 - 1 do
(
setPixels texture [x, (y + 1) * XY_ADJUST + yOffset] color
)
y += 2
if color == black then
color = red
else
color = black
)
) -- makeHorizStripeTexture
local theSaveName = getSaveFileName types:"Targa (*.tga)|*.tga|BMP (*.bmp)|*.bmp|JPEG (*.jpg)|*.jpg"
if theSaveName != undefined do
(
texture.filename = theSaveName
save texture
)
)
on generate picked do
(
SculptGenMax_CanvasRollout.theCanvas.bitmap = blankBitmap
sculptBitmap = copy blankBitmap
-- this builds a test texture to show how uv mapping works.
-- upload texture and apply it as the diffuse texture of the sculptie
-- the generated texture has green on the top line and then alternates red and black.
--makeHorizStripeTexture()
anObject = snapshot selection[1]
selectedPoly = anObject
try
(
convertTo selectedPoly (Editable_Poly) --convert to Editable_Poly
pass1()
updatePrimSizeTextBoxes()
pass2()
) catch
(
-- if anything goes wrong, make sure that we delete the temp copy of the
-- selection.  If we don't, it will show up in the scene.
delete selectedPoly
throw()
)
delete selectedPoly
refreshDisplay()
) --generate picked
on save_as picked do
(
theSaveName = getSaveFileName types:"Targa (*.tga)|*.tga|BMP (*.bmp)|*.bmp|JPEG (*.jpg)|*.jpg"
if theSaveName != undefined do
(
sculptBitmap.filename = theSaveName
save sculptBitmap
)
) --save_as picked
on about_tool picked do
(
local msgString = PROG_NAME + "\nVersion " + PROG_VERSION + "\nCopyright \xa9 2007 Shack Dougall"
messagebox msgString title:"About..."
)
on quit_tool picked do destroyDialog SculptGenMax_CanvasRollout
) --rcMenu CanvasMenu
rollout SculptGenMax_CanvasRollout PROG_NAME
(
bitmap theCanvas pos:[0,0] width:BITMAP_X height:BITMAP_Y bitmap:sculptBitmap
listbox resolution items:#("64x64", "128x128", "256x256") selection: default_resolution pos:[MAX_BITMAP+5,0] width:90 height:3
checkbox keep_props "Proportional" checked: default_keep_proportions align: #right
edittext prim_size_x "X:" fieldWidth:10 width:80 labelOnTop:false enabled:false align: #right
edittext prim_size_y "Y:" fieldWidth:10 width:80 labelOnTop:false enabled:false align: #right
edittext prim_size_z "Z:" fieldWidth:10 width:80 labelOnTop:false enabled:false align: #right
dropdownlist map_channel "UV Map Channel" items:#("Channel 1","2","3","4","5","6","7","8","9") selection:default_uv_map_channel height:11 width:80 align: #right
on resolution selected index do
(
BITMAP_X = BITMAP_Y = 2 ^ (index + 5)
bitmapTo64RatioX = BITMAP_X/64
bitmapTo64RatioY = BITMAP_Y/64
sculptBitmap = bitmap BITMAP_X BITMAP_Y color:white  -- generate the bitmap here
blankBitmap = bitmap BITMAP_X BITMAP_Y color:white  -- used to reset the dialog
theCanvas.width = BITMAP_X
theCanvas.height = BITMAP_Y
theCanvas.bitmap = copy blankBitmap
) -- resolution selected
on keep_props changed theValue do
(
keep_proportions = theValue
prim_size_x.enabled = not keep_proportions
prim_size_y.enabled = not keep_proportions
prim_size_z.enabled = not keep_proportions
) -- keep_props changed
on map_channel selected theMap do
(
UV_MAP_CHANNEL = theMap
)
) --rollout
createDialog SculptGenMax_CanvasRollout (MAX_BITMAP+100) (MAX_BITMAP+30) menu:CanvasMenu
) --macroscript

Latest revision as of 20:48, 7 July 2008

Description

SculptGenMax is a lightweight script that allows users to create sculptie prims in 3ds Max and export them to Second Life.

Current Version

SculptGenMax will no longer be released as a standalone product.

It is now a part of Prim Composer.

Prim Composer is complete offline building environment for Second Life and OpenSim. Build in 3ds Max; Deploy to either Second Life or OpenSim. Both prims and sculpties supported.

Features

  • Roundtrip workflow from 3ds Max to Second Life and back
  • Load sculptmaps from disk to import sculpties into 3ds Max
  • Create sculpties in 3ds Max and export them to Second Life
  • All sculptmap topologies supported: sphere, torus, plane, and cylinder
  • Editable Poly, Editable Mesh, and NURBS supported
  • Preserves UV Mapping — Baked textures work seamlessly

License

  • SculptGenMax is licensed under GPL3
  • Copyright 2008 Shack Dougall

Screenshot

Sculptgenmax-in-3dsmax.jpg