Difference between revisions of "User:Zai Lynch/Sightseeing/How to"
(credits) |
(landmarks section added) |
||
| Line 39: | Line 39: | ||
|[[Image:Draw_distance_windlight.jpg|150px|center|thumb|Windlight Viewer <br>]] | |[[Image:Draw_distance_windlight.jpg|150px|center|thumb|Windlight Viewer <br>]] | ||
|} | |} | ||
== Landmarks == | |||
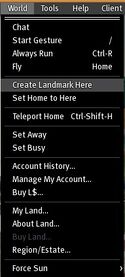
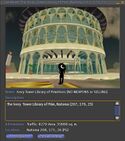
[[Image:Create_landmark_here.jpg|125px|right|thumb|Create Landmark]][[Image:About_landmark.jpg|125px|left|thumb|About Landmark]] | |||
While the HUD provides you the HUD provides all the necesarry landmarks for the tour, it might be good to know how you can create landmarks on your own and what they tell you about the location to which they are connected. | |||
Landmarks are displayed in your inventory as ether bright red ([[Image:Landmark_red.png]]) or faded mauve ([[Image:Landmark_green.png]]) pushpin icons bepending if you've used them recently (red) or not (faded mauve). You can create new landmarks by clicking at the ''World'' menu and go to ''Create Landmark Here'' as shown in the picture on the right. The landmark will be stored in your inventorys ''landmarks'' folder then. If you would like a more detailed description about the landmark, you can make a right click on it and select ''About Landmark''. A new window will pop up similar to picture on the left. It provides the name of the region, a description that can be entered by the landowner as well as information about the traffic and the area. Furthermore it states out to which sim it leads you and the coordinates x, y and z. You can choose if you would like to teleport to that region by pressing ''Teleport'', you can view it on the map to check how many people are around and what's next to it by pressing ''Show on Map'' or you can close it again by clicking the tiny '''x''' on the upper right. <br> | |||
== Credits == | == Credits == | ||
The | The Sightseeing HUD was develepod by Digi Vox and released under the [http://www.gnu.org/licenses/gpl.html GNU General Public License].<br> | ||
Modifications of the HUD, pictures for sightseeing and describing text were done as teamwork of [[User:Lum_Pfohl|Lum Pfohl]], Kuraiko Yoshikawa, [[User:Shiva_Aabye|Shiva Aabye]] and [[User:Zai_Lynch|Zai Lynch]] for the [[Volunteer_Portal|Second Life Volunteers]]. | Modifications of the HUD, pictures for sightseeing and describing text were done as teamwork of [[User:Lum_Pfohl|Lum Pfohl]], Kuraiko Yoshikawa, [[User:Shiva_Aabye|Shiva Aabye]] and [[User:Zai_Lynch|Zai Lynch]] for the [[Volunteer_Portal|Second Life Volunteers]]. | ||
Special thanks to Valie Eun and Wolwaner Jervil from [http://www.SL2Go.com SL 2 Go] for the description of Svarga. | Special thanks to Valie Eun and Wolwaner Jervil from [http://www.SL2Go.com SL 2 Go] for the description of Svarga. | ||
Revision as of 21:23, 2 March 2008
How to use the Sightseeing HUD
Search for the HUD in your Inventory, make a right click on it and choose wear. Once the HUD is attached it searches for updates and sends you a newer HUD if there's one available. If so, please accept the incoming item, detach the old HUD and use the new one.
You will see the HUD in its regular mode. By clicking at the arrows on the left you can change it into the medium mode. Clicking at the arrows in medium mode will morph it back into regular mode. Both (regular and medium mode) got a tiny button on the upper right which allows to switch the HUD to mini mode. If you click it again it will change back.
Browse through the places listed in the HUD by ether clicking the pictures in regular mode or using the arrows on the left. If you found a place where you would like to go, click the Go Here button. The HUD will send you a Landmark which leads you to the place where you wanted to go. Please read the sightseeing page for further information about these places.
Notice: The HUD won't work if you attach it in areas where scripts aren't allowed. These areas are labeled by ![]() ,
, ![]() or
or ![]() icons on top of your screen, depending on your viewer.
icons on top of your screen, depending on your viewer.
Windlight
The sightseeing experience in Second Life can be increased by using the so called Windlight Viewer. Right now, this is an optional first look viewer.
Download Windlight | Read more about Windlight in the Wiki | Video Tutorial on Windlight
How to use your camera
The default camera angle is a view from behind your Avatar. However, you can move your camera, twist it around yourself to see your face or even zoom into objects far away. Since this is very useful for sightseeings, I'll tell you how it works:
Press and hold the ALT key of your keyboard. Your cursor will change into a reading-glass. By clicking any object around you, your camera will focus that object. If you hold down your left mouse button and move your mouse forth and back, you can zoom in and out. If you move it right and left, you can spin around that object. By holding the CTRL key (or CMD on a Mac) as well you can even spin up and down. If you would like to return to your default view, just hit the ESC key multiple times until you're back to normal. Try to become familiar with the camera movement and you'll be able to notice much more detail in your surroundings then you were aware of in the beginning. To improve your camera skills beyond that, have a look at this video tutorial by Torley Linden.
How to change your Draw Distance
| Regular Viewer
Click Edit -> Preferences (or CTRL + P) and select the Graphics register card. Change the number at the Draw Distance box to the value you like to have and close the window with the OK button afterwards. |
|
| Windlight Viewer
Click Edit -> Preferences (or CTRL + P) and select the Graphics register card. Check the Custom box next to the Quality and Performance slider and change your Draw Distance to the value of your choice by moving the first slider in the new box. Close the window with the OK button afterwards. |
Landmarks
While the HUD provides you the HUD provides all the necesarry landmarks for the tour, it might be good to know how you can create landmarks on your own and what they tell you about the location to which they are connected.
Landmarks are displayed in your inventory as ether bright red (![]() ) or faded mauve (
) or faded mauve (![]() ) pushpin icons bepending if you've used them recently (red) or not (faded mauve). You can create new landmarks by clicking at the World menu and go to Create Landmark Here as shown in the picture on the right. The landmark will be stored in your inventorys landmarks folder then. If you would like a more detailed description about the landmark, you can make a right click on it and select About Landmark. A new window will pop up similar to picture on the left. It provides the name of the region, a description that can be entered by the landowner as well as information about the traffic and the area. Furthermore it states out to which sim it leads you and the coordinates x, y and z. You can choose if you would like to teleport to that region by pressing Teleport, you can view it on the map to check how many people are around and what's next to it by pressing Show on Map or you can close it again by clicking the tiny x on the upper right.
) pushpin icons bepending if you've used them recently (red) or not (faded mauve). You can create new landmarks by clicking at the World menu and go to Create Landmark Here as shown in the picture on the right. The landmark will be stored in your inventorys landmarks folder then. If you would like a more detailed description about the landmark, you can make a right click on it and select About Landmark. A new window will pop up similar to picture on the left. It provides the name of the region, a description that can be entered by the landowner as well as information about the traffic and the area. Furthermore it states out to which sim it leads you and the coordinates x, y and z. You can choose if you would like to teleport to that region by pressing Teleport, you can view it on the map to check how many people are around and what's next to it by pressing Show on Map or you can close it again by clicking the tiny x on the upper right.
Credits
The Sightseeing HUD was develepod by Digi Vox and released under the GNU General Public License.
Modifications of the HUD, pictures for sightseeing and describing text were done as teamwork of Lum Pfohl, Kuraiko Yoshikawa, Shiva Aabye and Zai Lynch for the Second Life Volunteers.
Special thanks to Valie Eun and Wolwaner Jervil from SL 2 Go for the description of Svarga.


