Preferences window
This guide explains the many settings available in the Second Life® Viewer's Preferences window, detailing what each setting does, and how changing them may impact your Resident experience.
To open the Preferences window, press Ctrl-P on your keyboard after logging in, or select Edit > Preferences from the menus at the top of the Second Life window.
General tab
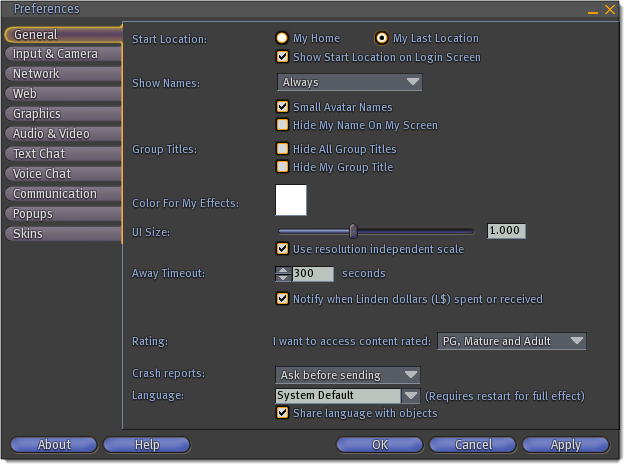
Start Location
This setting determines where you arrive in the Second Life world after logging in:
- My Last Location - Places you at the location where you last logged out.
- My Home - Places you at your home location (chosen from World > Set Home to here). If you have no home, you are placed at the first Infohub you landed at.
Show Start Location on Login Screen - Select this to make the Start Location choices appear near the lower-left corner of the Second Life login screen.
Show Names
- Never - Hides the names of other avatars.
- Show Temporarily - Displays avatar names briefly, then they disappear.
- Always - Avatar names are always displayed over their heads.
Hide My Name On My Screen - Select this to prevent your own name from appearing over your head, regardless of your Show Names setting. Other Residents see your name based on their own personal settings.
Hide My Group Title - Select this to hide the title of your active group (selected from Edit menu > Groups) from yourself and other Residents.
Hide All Group Titles - Select this to hide all group titles from view and narrow name tag.
Show titles:Hide all titles:

Small Avatar Names - Select this to show avatar names in a smaller font size.
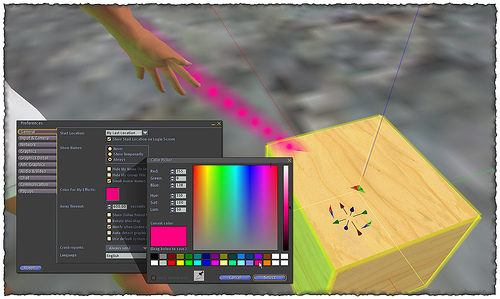
Color For My Effects
You can choose the "Selection Beam" color used for avatar particle effects: The dots that shoot out of your hand when you are interacting with objects. This setting isn't avatar-specific, and affects all accounts on the same computer.
UI Size
If the user interface (UI) looks too small, which may happen if you're running Second Life at a high resolution, you can move this slider to the right to enlarge windows, text, buttons, menus, etc. Compare UI Size: 0.750 and 1.400.
Use resolution independent scale - This only applies when you're running Second Life fullscreen, and ensures the UI looks the same size at different resolutions.
Away Timeout
If you don't use the mouse or keyboard for an extended period of time, Second Life marks your status as "(Away)". This setting determines the idle time before you're placed in "(Away)" status. Maximum value is 600 seconds (10 minutes).
Show Online Friend Notifications - Selecting this shows a visible pop-up window stating:
[Friend Name] is Online/Offline
like this:
whenever one of the Residents on your Friends list (click the Friends button on the toolbar to see it) logs on or off. Residents with many Friends frequently turn this off, because it can get annoying.
Notify when Linden dollars (L$) spent or received - Select this option to show a popup window whenever you transact L$. Deselect this option to hide these windows.
Use default system color picker - When you tint something (like objects and clothes) in Second Life, an integrated window comes up to let you choose the color you want. If you're more comfortable with the default color picker your operating system (Windows, Mac OS, Linux) uses, select this box.
Rating
This setting allows you to choose what maturity level of content you are able to access inworld. You may only find search results and access regions of equal or lower maturity than you select here. In order to select PG, Mature and Adult, you must first verify yourself as an adult.
Crash reports
Crash reports are useful for Linden Lab to troubleshoot problems you may have, and to fix bugs. Crash reports can be sent if Second Life quits or fails unexpectedly.
- Ask before sending - Second Life asks you to confirm before it sends a crash report.
- Always Send - Crash reports are always automatically sent.
- Never send - Crash reports are never be sent.
Although the Crash Reporter causes a momentary delay, we recommend that you send crash reports and help us improve Second Life.
Language
Second Life is expanding internationally, and localized translations of the user interface are available. Please note we're still working on these translations, but you can try them if you prefer to use Second Life in a language other than English.
If you have a non-English language Operating System, and have not previously selected "English" as your chosen language option in the Viewer, the Viewer defaults to your Operating System's language!
Share Language with objects:Check this box to share your system language preference with inworld scripted objects.
Input & Camera tab
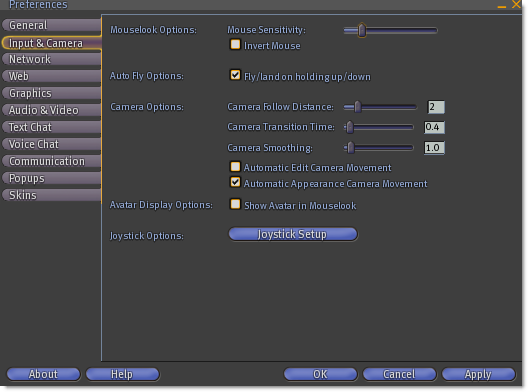
Mouselook Options
Mouse Sensitivity - Changing this value affects how far your avatar turns in Mouselook mode when you move the mouse. Moving the slider to the right causes your avatar to turn farther with the same movement.
Invert Mouse - Select this option to invert mouse movement in Mouselook: moving the mouse up moves the view down, and vice-versa. Flight-simulator fans and some first-person-shooter players select this option; most Residents leave it deselected.
Auto Fly Options
Fly/land on holding up/down - Select this option to automatically start flying when you hold down the Jump/Fly Up key (E, Page Up, or the numeric keypad's 9), and automatically stop flying if you touch the ground when holding down the Crouch/Fly Down key (C, Page Down, or numpad 3). Deselect this option to only start/stop flying by pressing the Fly key (F, Home, or numpad 7). This is usually selected.
Camera Options
Camera Follow Distance - This value extends the distance that camera view follows an avatar. Higher numbers result in the camera acting "looser" and more cinematic. An easy way to compare is to watch yourself falling from a great distance onto the ground.
Camera Transition Time: This is the amount of time it takes for the camera to move from one camera point to another. A lower value causes a more instant 'snap' to the new camera position. Higher values cause a slower, more gradual transition.
Camera Springiness - This value affects how tight the camera following your avatar feels. Higher numbers result in the camera acting "looser" and more cinematic. An easy way to compare is to watch yourself falling from a great distance onto the ground.
Camera Smoothing - This setting applies a smoothing factor to all motion and keeps the camera from making abrupt movements.
Automatic Edit Camera Movement - When selected, the camera automatically moves to center on the object you're editing. Residents who are skilled at manually moving their camera often deselect this to leave the camera where it is.
Automatic Appearance Camera Movement - When selected, the camera automatically zooms in on your avatar when you enter Appearance mode. It also automatically focuses as you select different Body Parts and Clothes tabs. Deselect this to leave the camera where it is.
Joystick Options
Joystick Setup - Produces the Joystick Configuration window for adjusting alternative input devices. The settings are currently optimized for 3D Connexion SpaceNavigator (click SpaceNavigator Default button), but are tunable for many joystick or 3D input devices. Joystick devices can control the Avatar, Edited Objects or Flycam. (View Menu > Joystick Flycam).
Avatar Display Options
Show Avatar in Mouselook- Allows you to see yourself when in Mouselook. If you look down with this option enabled, you can see your feet. If you're holding an object like a gun in front of your face, you can see it. Wearing attachments on your head (such as glasses or hair) does not generally interfere with your vision if you have this setting turned on.
Network tab
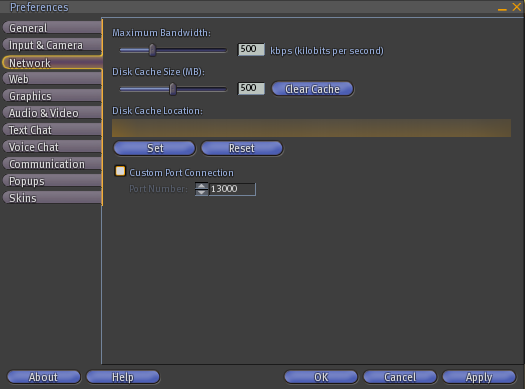
Maximum Bandwidth - Move this slider to the right to increase the download rate for data in Second Life. Decrease this slider to reduce download rates. Higher numbers may result in objects and avatars appearing more quickly. However, very large values may tax your computer and reduce performance; setting this number greater than your total available bandwidth can result in packet loss. Residents often set this value to slightly less than their upload rate, or find the maximum value that doesn't result in excessive packet loss.
Disk Cache Size - This setting indicates how much hard drive space is used on your computer to store Second Life data (object info, textures, Inventory item names, etc.). Increasing this value may cause frequently visited areas to load faster. Decreasing this value may reduce hard drive usage while you're on Second Life. The "Clear Cache" button can be pressed to remedy several problems.
Disk Cache Location - Click Set to specify the location of your cache, and Reset to reset the cache location to the system default.
Custom Port Connection - Residents behind NAT devices often have conflicting UDP ports when running more than one viewer. This setting allows you to specify a custom port. Second Life's priority order as far as port setting goes is as follows:
- Use port number on command line if provided
- Use port number in Preferences window if enabled
- Use OS default
If you alter this setting, you need to restart Second Life for it to take effect.
Web tab
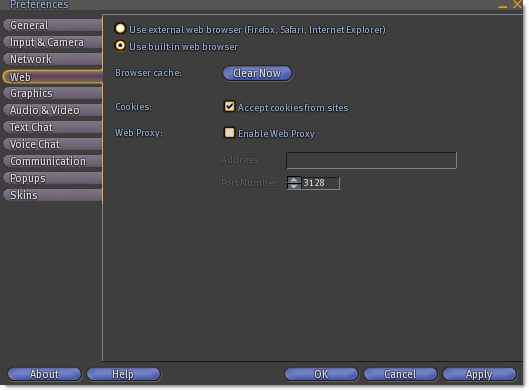
Use external web browser - Select this setting to open pages in external browser as default.
Use built-in web browser - Select this setting to open pages in your in-world media browser as default.
Browser cache
Click Clear Now to clear the browser's cache.
Cookies
Accept cookies from sites - Determines whether you accept cookies from Websites.
Web Proxy
Checking Enable Web Proxy enables you to set a web proxy address and port number. You may need this option if you are operating in a restricted Internet environment, such as a research lab or at some companies. The web proxy settings should match those of your system's default web browser. If you are unsure what these settings should be, contact your network administrator.
Graphics tab
Display Resolution
Run in a window - Select this to display Second Life in a standard, resizable application window, allowing you to shift focus to other applications like a normal program. Deselect this to specify Second Life's fullscreen resolution. Higher resolutions provide more detail, but also require more computer power. This may result in reduced performance. (You can also toggle between windowed and fullscreen mode by pressing Alt-Enter.)
Fullscreen Aspect Ratio
Three common options are provided. For instance, standard monitors have a 4:3 ratio, while widescreen monitors have a 16:9 aspect ratio. Most Residents should have "Auto detect" selected.
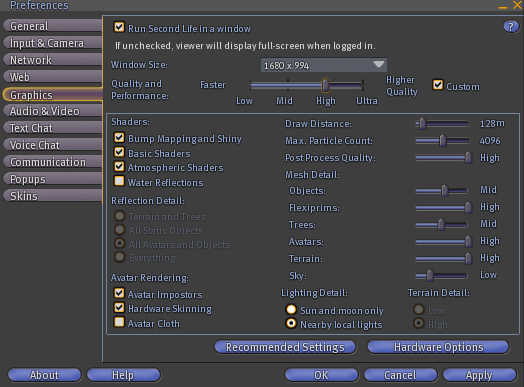
Quality and Performance - Allows you to chose between four graphics levels: Low, Mid, High, and Ultra. You may also customize your graphics settings by checking the Custom checkbox and manipulating the graphics settings.
Custom
Shaders: Enable or disable various types of pixel shaders.
- Enable Bumpmapping and Shiny - Selecting this shows more detailed surfaces and metallic "shine" on applicable objects. Many Residents keep this on for aesthetic reasons.
- Basic Shaders - Allows rendering of high-quality water, basic lighting, and other graphical effects.
- Atmospheric Shaders - Enables advanced atmospheric and lighting (these were a set of enhancements originally introduced as part of the WindLight First Look Viewer).
- Water Reflections - Allows water to reflect terrain, objects, and avatars.
Reflection Detail - Sets the types of objects that water can reflect.
- Terrain and Trees
- All Static Objects
- All Avatars and Objects
- Everything
Avatar Rendering - Sets options that affect how the client renders avatars.
- Avatar Impostors
- Hardware Skinning - Formerly Avatar Vertex Program, this allows some aspects of avatar rendering to be handled by your graphics card to improve performance.
- Avatar Cloth - Allows the rendering of flexible cloth on avatar clothing, such as shirts and flared pants.
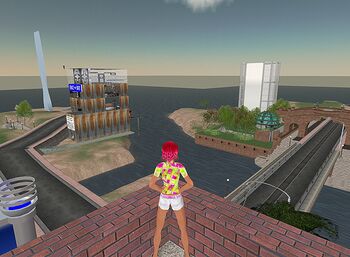
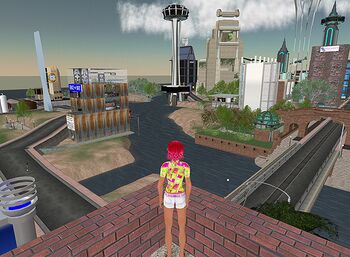
Draw Distance - Affects how far out from your viewpoint objects are rendered in the scene.
Increasing this number makes Second Life show more of the world so you can see farther. This has a dramatic impact on performance, as it also increases the number of objects to both render and download to your computer.
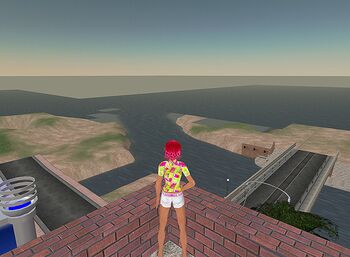
This is most commonly set to 128; lowering it to 64 is recommended for slower systems. Temporarily raising it all the way to 512 is great for epic snapshots.
Max Particle Count - Sets the maximum number of particles you are able to see on your screen at once.
- Particle effects come in a variety of forms, such as "poofers", jewelry "bling", and even the dots that shoot out of your hand when you're using objects. You can generally leave this at 4096, which is already quite high, unless you want to see an even higher simultaneous number of particles at once, or lower it to improve performance on certain configurations.
Post Process Quality - Sets the resolution with which Glow is rendered.
Mesh Detail - Sets the amount of detail or number of triangles used in rendering certain objects. A higher value takes longer to render, but makes these objects appear with more detail.
>>These sliders can be moved to the left for faster performance, and to the right to increase visual quality:
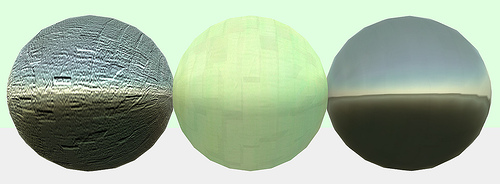
'Object'Mesh Detail - Affects the appearance of prims (short for "primitive objects"), especially from a distance. For example, decreasing this makes spheres look blocky and chunky when you zoom out, instead of being accurately round.
Flexiprims Mesh Detail - Affects the fluid motion of flexible objects, also known as flexiprims. (In the Edit tools, Features tab > "Flexible Path" checkbox.) Decreasing this makes flexiprims move roughly, like a stop-motion cartoon.
Tree Mesh Detail - Affects the detail of Linden trees, especially from a distance. Trees will display more branches and crisper leaves when this is set higher.
Avatar Mesh Detail - Culls avatars' attachments, especially from a distance. Lowering this will hide attachments at nearer distances. Since objects like attachments require computer processing time to render, it also potentially results in a higher framerate.
Terrain Mesh Detail - Determines the amount of detail the client uses in rendering terrain.
Sky Mesh Detail - Determines the amount of detail the client uses in rendering sky.
Lighting Detail - Select what types of lights you would like to render.
- Sun and moon only - When it's daytime, it's light, and when it's nighttime, it's dark. No object lights.
- Nearby local lights - Lit objects (when editing an object, it's the Features tab > "Light" checkbox") cast a visible glow on their surroundings, including the ground, other objects, and avatars. Like ripple water, it adds richness to the environment, but may deteriorate performance on slower graphics cards.
Terrain Detail - Sets the amount of detail you would like to see for the terrain texture.
- Low - Ground textures are blurry.
- High - Ground textures are noticeably sharper. This may have a small performance decrease on certain configurations.
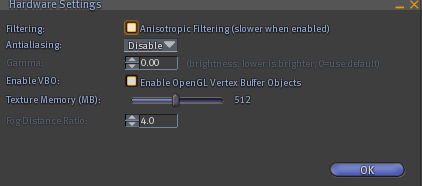
Hardware Options
Filtering
Anisotropic Filtering - Selecting this results in sharper textures, particularly when they're viewed at an angle. This comes a cost of decreased performance, depending on your graphics card, because textures in Second Life (and most 3D applications) blur (bilinear filtering) as they move farther away from your view. The difference tends to be subtle, but noticeable.
Antialiasing - Smoothes jagged edges. Renders a scene the number of multiple times that is actually shown and scales it down.
Gamma - Increasing this number makes your whole screen (and all monitors) brighter. Decreasing it makes the display darker.
Enable VBO - VBO stands for "Vertex Buffer Objects." Selecting this should improve performance for most configurations.
Texture Memory (MB) - Amount of graphics card RAM is dedicated to storing textures.
Fog Distance Ratio - Raising this increases the cutoff clarity of your current Draw Distance, and it doesn't affect your performance at all. Many Residents prefer to set it to the normal maximum of 4.0.
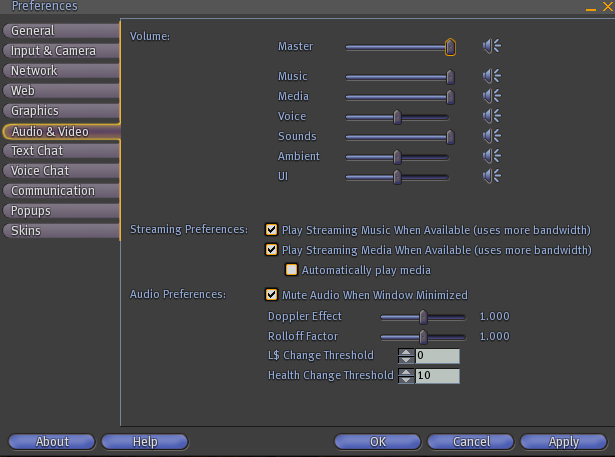
Audio & Video
Volume
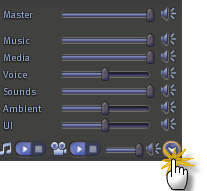
Use this bank of sliders to adjust the volume of Second Life's various audio streams. You may also mute any of the streams by clicking the speaker icon next to the slider:
Master - Controls the overall volume of Second Life
Music - Controls the volume of parcel-based streaming music in.
Media - Controls the volume of streaming media (usually video).
Voice - Controls the overall volume of voice communication.
Sounds - Controls the volume of sounds played by avatars and objects.
Ambient - Controls the volume of the "wind" and other ambient sound.
UI - Controls the volume of Second Life's user interface- buttons, menu items, etc.
Streaming Preferences
Streaming media can be enabled if you want to listen to music and watch movies inworld; disable it if you don't have a fast enough Internet connection, or if you'd rather not make connections to a third party server.
Music and movie streams are direct connections from your computer to each stream's server, and don't go through the Second Life service. Streaming audio servers are generally owned and operated by third parties, and not by Linden Lab.
Play Streaming Music When Available - Selecting this allows your Second Life client to play music streams.
Play Streaming Video When Available - Selecting this allows your Second Life client to play movie streams.
When your avatar is on a parcel that has a Music or Media URL entered (About Land > Media tab), you can see Music and/or Movie controls atop your toolbar like this:
For more info, read "Overview of Music in Second Life".
All volume sliders increase in volume as you move them to the right; moving them to the left decreases volume.
Audio Preferences
Various sound-related options for tweaking your listening experience:
Mute Audio When Window Minimized - Selecting this makes Second Life stop playing all in-world sound, including music, when it's minimized.
The following three audio sliders are dependent on your camera position, you can hear sounds distant from your avatar's location if you move your camera towards their originating objects:
- Doppler Effect - Moving this slider to the right increases Doppler effects (sounds raise in pitch as objects move faster towards you, and lower in pitch as the object moves faster away). Moving it to the left decreases Doppler effects (sounds change in pitch less).
- Distance Factor - Moving this slider to the right decreases the distance at which you hear sound effects (e.g., you'll no longer hear sounds that are further away).
- Rolloff Factor - Moving this slider to the right causes sounds to decrease in volume more rapidly as they move away from you. Moving it to the left causes sounds to remain louder as they move away from you.
L$ Ch'ange Threshold -' If you send or receive L$ in a transaction that's equal to or greater than this value, you'll hear a cha-ching! sound.
Health Change Threshold - If you lose health equal to or greater than this value in a damage-enabled area, you'll hear a painful grunt.
Text Chat tab
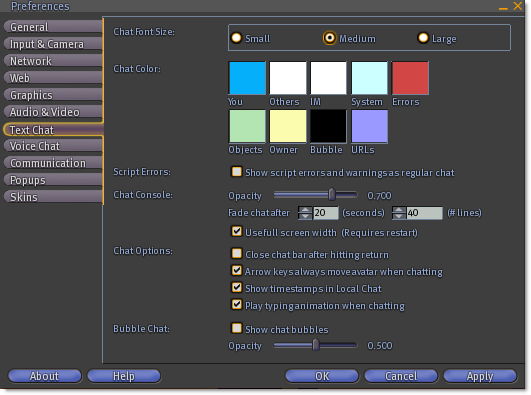
Chat Font Size
This changes the size of the text that appears in the Chat Console. It doesn't affect text in any window, including Chat History. (To change that, use the Preferences' Graphics tab > UI Size, as detailed previously.)
Chat Color
These settings change the colors of different kinds of text in your Chat Console and Chat History.
- You - Change the color of your name in text chat.
- Others - Change the color of clickable names in text chat.
- IM - Includes Instant Messages.
- System - Includes server messages (such as Linden grid-wide announcements and when you receive Inventory).
- Errors - Changes the color of the script error/warning chat.
- Objects - Includes other resident owned scripted objects in-world.
- Owner - Includes your scripted object in-world.
- Bubble - Includes bubbles.
- URLS - Includes URLs that appear in chat. Use this setting to change color of Resident name to profile links.
Script Errors
Show script errors and warnings as regular chat - Script errors and warnings display as regular chat when they occur.
Chat Console
Opacity - Controls the transparency of chat when it appears at the bottom of the Second Life window.
Fade chat after __ (seconds) __ (# lines) - Fades chat at the bottom of the Second Life window after the specified number of seconds or lines.
Use full screen width - Chat text uses the entire bottom of the Viewer window if you select this option. Toggling this option requires a restart.
Chat Options
Close chat after hitting return - Chat closes after you hit Return or Enter on your keyboard.
Arrow keys always move avatar when chatting - The arrow keys move your avatar around if you hit them while chatting.
Show timestamps in Local Chat - Displays timestamps next to each message in chat.
Play typing animation when chatting - This option is enabled by default. To turn off your avatar's typing animation, uncheck this box.
Bubble Chat
Show chat bubbles - Displays chat as bubbles attached to the name/group tags of other Residents' avatars.
Opacity - Controls the transparency of the bubbles.
Voice Chat tab
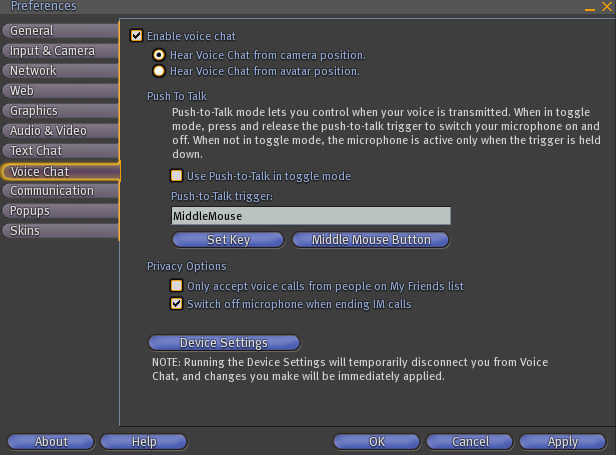
Enable Voice Chat
Enables you to send and receive voice chat on voice-enabled land.
Hear Voice Chat from camera position - You hear voice chat as if your "ears" are positioned at your camera's location. For instance, you can zoom in on a speaker in order to hear him better.
Hear Voice Chat from avatar position - You hear chat as if your "ears" are attached to your avatar. You need to move your avatar closer to a speaker in order to hear him better.
Push To Talk
Allows you to control when you transmit your computer's microphone input. This can be a very effective means of reducing background noise in your voice transmissions.
Use Push-to-Talk in toggle mode - When checked, your microphone activates after you press your push-to-talk key. It does not stop transmitting until you press the key again. If this mode is unchecked, you only transmit when you are holding down your push-to-talk key.
Push-to-Talk trigger - Displays the key you are currently using for your push-to-talk trigger.
Set Key - Prompts you to set a new key for push-to-talk.
Middle Mouse Button - Sets your push-to-talk key to your middle mouse button.
Privacy Options
Only accept calls from people on my friends list - Allows only your designated friends to make private voice calls to you.
Device Settings
Allows you to configure your input and output hardware for Second Life voice.
Communication tab
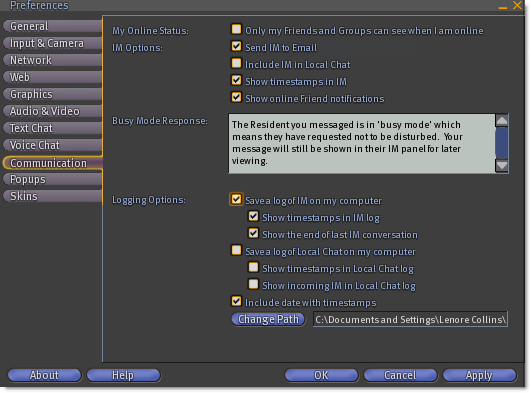
My Online Status
Only my Friends and Groups can see when I am online - Selecting this means that only your Friends and Groups can know when you're online.
IM Options
Send IM to Email (<address>) - The first time someone sends you an IM, a copy gets sent to the e-mail address specified.
Include IM in Local Chat - Includes the text of IMs in your chat history
Show timestamps in IM - Displays timestamps in front of each message in IM windows.
Show online Friend notifications - Notifies you when your friends change online or offline status.
Busy Mode Response
Allows you to enter the message other Residents see when you're in Busy mode. This response can be up to 255 characters long.
Logging Options
Save a log of IM on my computer - Keeps a log of all IM conversations in plain .txt format.
- Show Timestamps in IM Log - Adds timestamps to each logged IM message so you can see when the conversation took place.
- Show end of last IM conversation - Displays the end of your last IM conversation with someone the next time you log on and IM them again.
Save a log of Local Chat on my computer - Keeps a log of all local chat conversations in plain .txt format.
- Show Timestamps in Local Chat Log - Adds timestamps to each logged chat message.
- Show Incoming IM in Local Chat Log - Includes received IMs in your chat log, but not your IM responses.
Include Date With Timestamp - Includes the day in addition to the time in a timestamped message.
Change Path - Allows you to change the folder where your IM and Chat logs are kept. The default is in the Second Life user settings folder, which might look something like:
C:\Documents and Settings\BobAvatar\Application Data\SecondLife\Bob_Avatar
Popups tab
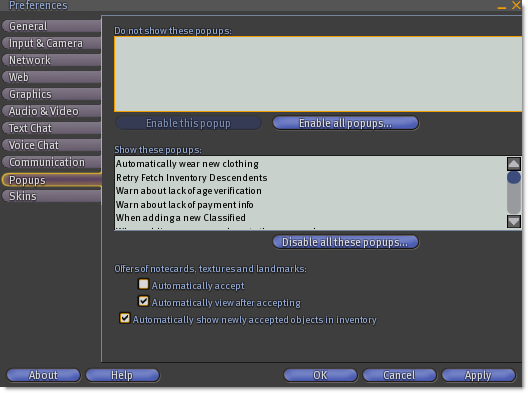
Do not show popups - Lists all of the events for which no popups are shown.
Enable this popup - Selecting a popup event in the Do not show popups list, transfers that event to the Show these popups list.
Enable all popups - Enables all popups from the Do not show popups list, and transfers those events to the Show these popups list.
| Important: Caution: It is very difficult to undo the action of enabling all popups. There is no way to easily restore the default setting! |
Show these popups - Lists all of the events for which popups are shown.
Disable all these popups - Disables all popups from the Show these popups list and transfers those events to the Do not show these popups list.
Offers of notecards, textures and landmarks
- Automatically accept - Automatically accepts offers of notecards, textures, and landmarks; the items are transferred into your Inventory without asking your approval.
- Automatically view after accepting - Automatically opens every notecard, texture, or landmark that you accept, immediately after you accept them.
Automatically show newly accepted objects in inventory - This option is turned on by default. Your inventory window opens when you accept an object being transferred to you.
Skins
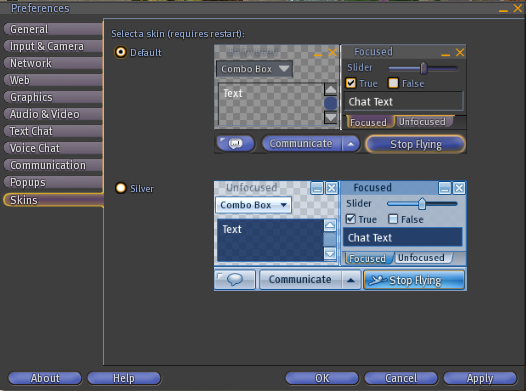
Default Skin - The Viewer installs with a classic gray color of the user interface.
Silver Skin - This option refreshes the visual design of the user interface with a lighter color scheme and improved UI graphics.
| Tip: Tip: A restart of the Viewer is required for a skin change to take effect. |
Save changes to Preferences
We have begun making changes to Preference window tabs so that changes take affect only when you click OK or Apply. These changes are introduced with Viewer release 1.22. We are working to optimize all of the tabs in the Preferences window and it is good practice to begin using the OK and Apply buttons throughout. Listed below are the tabs which now require clicking either the OK or Apply button to save your changes, as well as those tabs which still save information in real time. Optimized tabs (require clicking OK or Apply to save changes):
- General
- Input & Camera (Exception of the sub-window Joystick Setup. The Joystick settings will (as before) take effect immediately as you change them.)
- Network
- Web
- Text Chat
- Voice Chat (Exception of the sub-window Device Settings. These Device Settings will (as before) take effect immediately as you change them.)
- Communication
- Popups (Offers of notecards, textures and landmarks settings only.)
The remaining tabs are not yet optimized in this way:
- Graphics
- Audio & Video
- Popups (Enable all Popups and Disable all these Popups)
