Difference between revisions of "Viewer 2 Microsoft Windows Builds"
Jonathan Yap (talk | contribs) |
|||
| Line 74: | Line 74: | ||
$(SystemRoot)\System32\wbem | $(SystemRoot)\System32\wbem | ||
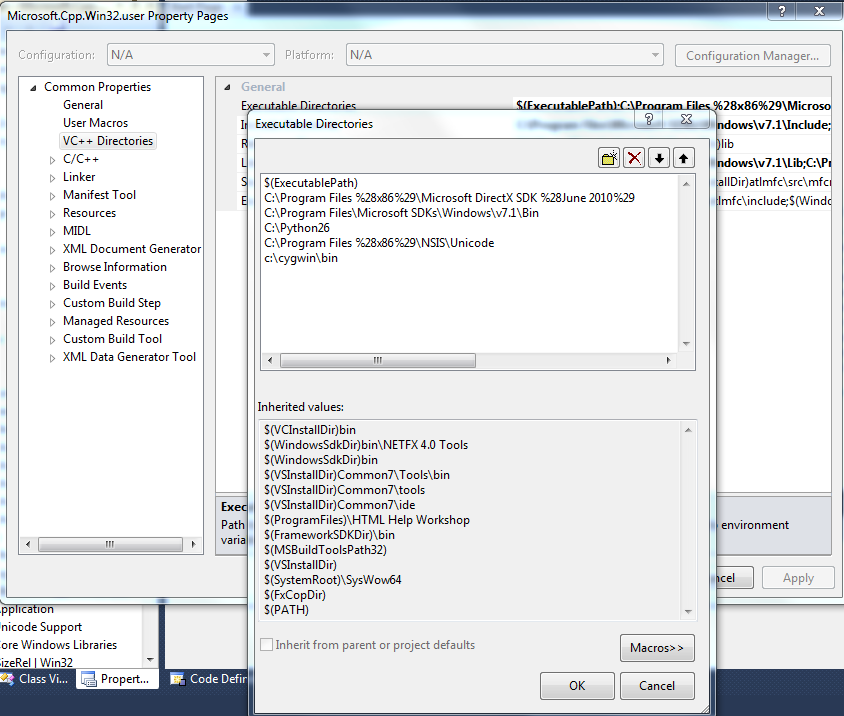
[[ | [[Media:VS2010_Executable_Directories.PNG|thumb]] | ||
Revision as of 12:54, 31 May 2011
| Work in progress These instructions are not yet complete or debugged as of May 31, 2011. |
When finished, we hope this page will constitute a complete recipe for compiling viewer 2 from source on a Windows machine.
Philosophy: to keep it brief, this page should only include steps we KNOW ARE NEEDED, not random hints. Extra details or open issues can go on the talk page.
| Note: Following this recipe will probably take 6 to 12 hours of wall-clock time, and 2 to 6 hours of your time, if you're starting from a fresh Windows XP/Vista/7 system. |
Establish your programming environment
This is needed for compiling any viewer based on the LL open source code, but only needs to be done once.
- Install Visual Studio 2010 (Express is okay)
- If you installed VS2010 Express also install Microsoft Visual C++ 2010 Redistributable Package
- Install Windows SDK for Windows 7 and .NET Framework 4 (ISO) or Windows SDK for Windows 7 and .NET Framework 4 (Web Install)
- Note: You may need to install the .net 4 framework: Web install or Full install.
- Run Microsoft Update, and keep running it until no updates are needed. This may take 6~8 iterations on older versions of windows.
- Note: For windows Vista and Windows 7, you need to select "Get updates from other Microsoft products." to get the updates for Visual Studio.
- For Windows XP, use the provided link above to go to update.microsoft.com and not update.windows.com that is the default update service for XP.
- Install DirectX SDK (June 2010)
- Install other development tools
- CMake
- This should be version 2.8.4 (or above in the 2.8.x series). Ensure that any older versions aren't in your PATH environment variables.
- Cygwin
- When you run the cygwin setup utility make sure you have selected to install patchutils, flex, bison (all located under "devel"), curl (under "Web"), and unzip (under "Archives"), which are not part of the default install. Do not install Cygwin Python or Mercurial. You won't need to use the Cygwin shell for anything; just have the binaries accessible to the regular command line via your PATH.
- Python (either Standard Python or ActivePython)
- Note: Version 2.7.1 has been reported to work with the build scripts.
- Mercurial (either TortoiseHg or Mercurial Hg)
- Unicode NSIS (Nullsoft Scriptable Install System)
- This is the package installer used to build Setup.exe.
- (optional) Notepad++
- You need to use an editor that conforms to the Coding Standard. In particular, you must not check in files with DOS line endings except in very limited circumstances; see How to avoid DOS line endings in Windows tools.
- CMake
| Note: If the installer for a particular package does not update your PATH environment setting you will have to do this manually. |
Set up Autobuild
- Install Autobuild
- Modify your path statement to include the autobuild
\bindirectory
Configure VS2010
While you may choose to use autobuild for all your compiling you still need to establish certain settings internal to VS2010.
Start the IDE
Navigate to Tools->Options->Projects and Solutions->Build and Run and set "maximum number of parallel projects builds" to 1
Check Tools->Settings->Expert Settings
You need to set a number of paths.
Open an existing project or make a New Project. At this point it doesn't need to be a Second Life solution just any project.
At the bottom on the Solution Explorer you will see three tabs. Click the one on the right "Property Manager" though the name may be somewhat truncated.
Click on the + to open the project and then on one of the +'s just revealed
Right click on Microsoft.Cpp.Win32.user
Pick Properties->VC++ Directories
This is where the build environment is pulled together into a functional VC2010 build system and also where much hand wringing, hair pulling, and fist pounding frustration takes place.
Set Executable Directories to:
$(ExecutablePath)
c:\Program Files (x86)\Microsoft DirectX SDK (June 2010)
c:\Program Files\Microsoft SDKs\Windows\v7.1\Bin
c:\Python26
c:\Program Files (x86)\NSIS\Unicode
c:\cygwin\bin
$(SystemRoot)
$(SystemRoot)\System32
$(SystemRoot)\System32\wbem
Set Include Directories to:
c:\Program Files\Microsoft SDKs\Windows\v7.1\Include
c:\Program Files\Microsoft SDKs\Windows\v7.1\Include\gl
c:\Program Files\Microsoft SDKs\Windows\v7.1\Samples\winui\tsf\tsfapp
Note: The above line may no longer be required
c:\Program Files (x86)\Microsoft DirectX SDK (June 2010)\Include

Set Library Directories to:
c:\Program Files\Microsoft SDKs\Windows\v7.1\Lib
c:\Program Files (x86)\Microsoft DirectX SDK (June 2010)

Good luck
Set up your source code tree
Plan your directory structure ahead of time. If you are going to be producing changes or patches you will be cloning a copy of an unaltered source code tree for every change or patch you make, so you might want to have all this work stored in it's own directory.
To get a copy of the source code tree:
- Open up a DOS/Command window
- Make a directory to contain your build tree (it is strongly suggested to name it
viewer-development). Do not have any spaces in this path. - Go into that directory
- Do
hg init - Do
hg pull http://hg.secondlife.com/viewer-development
Let's say some time has gone by since you have performed the previous steps and now you want to develop a change or work on a jira. You will:
- Go into
viewer-development(or whatever you named the master source tree copy) - Do
hg pull - Do
hg update - Move up one level from
viewer-development - Do
hg clone viewer-development VWR-nnnnn(wherennnnnis the jira number, or clone to a name of your choosing if there is not jira number)
Set up Fmod
Create a directory for the 3p-fmod repository and clone it:
hg clone https://bitbucket.org/lindenlab/3p-fmod
CD into the 3p-fmod directory you created and build it:
autobuild build --all
Package the results:
autobuild package
Now update autobuild with the filename and hash just displayed.
In the directory where you cloned viewer-development copy autobuild.xml to my_autobuild.xml and modify the copy as follows:
Replace:
         <key>hash</key>
              <string>d9a9a6ad86895353bcd63374a4c1a91d</string>
        <key>url</key>
              <string>http://s3-proxy.lindenlab.com/private-builds-secondlife-com/hg/repo/3p-fmod-private/rev/221852/arch/CYGWIN/installer/fmod-3.75-windows-20110222.tar.bz2</string>
With:
         <key>hash</key>
             <string>4219e57263975ebceabdf9eefc1a79b1</string>         [NOTE: Insert your hash value here]
         <key>url</key>
             <string>file:///3p-fmod/fmod-3.75-windows-20110531.tar.bz2</string>       [NOTE: Insert your directory name here; this example assumes 3p-fmod]
Note: Having to copy autobuild.xml and modify the copy from within a cloned repository is a lot of work for every repository you make, but this is the only way to guarantee you pick up upstream changes to autobuild.xml. |
Configuring the viewer
If you are compiling with Fmod you will need to do:
set AUTOBUILD_CONFIG_FILE=my_autobuild.xml
At the command line in the source tree's root directory (presumably a directory you have cloned from viewer-development, as it is not a good idea to work in viewer-development, unless you are only compiling for youself) e.g. C:\linden\VWR-12345\) run:
autobuild configure -c [CONFIGURATION]
where [CONFIGURATION] is one of those listed at Building the Viewer with Autobuild#Build a desired configuration (ReleaseOS, RelWithDebInfoOS, DebugOS)
Compiling the viewer with autobuild
You can compile the viewer with either autobuild (the encouraged/supported method) or with the VS IDE
Run:
autobuild build -c [CONFIGURATION] --no-configure
There are some useful switches to know about, so your commands may look like this:
set AUTOBUILD_CONFIG_FILE=my_autobuild.xml
autobuild configure -c ReleaseOS -- -DLL_TESTS:BOOL=OFF -DPACKAGE:BOOL=OFF -DFMOD:BOOL=TRUE
autobuild build -c ReleaseOS --no-configure
| Note: It is possible to use autobuild to do both the configure step (only needed once) and the build step with one command. I find it is clearer and saves a bit of time if these steps are done separately. |
Compiling the viewer with the IDE
The autobuild configure step will create the \build-vc100 directory at the root of the source tree. In here will be the SecondLife.sln solution file.
Start the IDE and open this solution.
You need to adjust the Platform Toolset setting.
- Select all the projects in the Solution Explorer list on the left of the screen.
- Click on the first project and scroll to the bottom of this list and shift-click on the last project.
- Right click on the selected list
- Navigate to Properties->Configuration Properties->General->Platform Toolset
- Change this value to Windows7.1SDK
You might want to change the build type in the drop-down from Debug to Release or RelWithDebInfo.
Push F7 to start the compiler.
Iteratively fix things until the compile succeeds
If you encounter errors during building or configuration, check the talk page and report useful experiences there.
Running your newly built viewer
- Make a shortcut for
Drive:\your-path\build-vc100\newview\Release\secondlife-bin.exe
- Right-click the shortcut, Properties, and set "Start in:" to
Drive:\your-path\indra\newview
Handling Problems
If you run into problems following the instructions above, please first check whether someone else already had the same issue. A solution might be known already. See the issue list below and search our issue tracker. Even when no description of your problem has been written down yet, someone might know about it, so get in touch with the community to get help.
Getting help
- Subscribe to OpenSource-Dev Mailing List (subscribe) and post your question there.
- For faster response, find a free IRC client program and join #opensl on freenode, the general open source viewer discussion and development channel. Hopefully a helpful person is online when you ask your question.
Common Issues/Bugs/Glitches And Solutions
Not being able to find objidl.h in the Microsoft Windows SDK, when compiling llwindow
https://lists.secondlife.com/pipermail/opensource-dev/2011-April/006562.html
- Can be caused by path problems or some installation conflicts with the DirectX SDK.
stdint.h typedef conflicts between Quicktime and VS2010
https://lists.secondlife.com/pipermail/opensource-dev/2011-April/006565.html
- Can be solved by some small edits to header files to make sure the two don't bash on each other.
Eliminate depreciated switches messages and use memory more efficiently
- The VS2010 compiler uses a lot of memory while compiling the viewer. If you run out of memory you will start to page heavily and your compile time will become much longer. The /Zm1000 switch affects compiler memory usage.
- You may see this message while compiling
use 'EHsc' instead of 'GX'
Here is how to free up some memory the compiler allocates and to eliminate these messages:
Edit \CMake 2.8\share\cmake-2.8\Modules\Platform\Windows-cl.cmake
replace line 156 with:
 IF(MSVC10)
   SET(CMAKE_CXX_FLAGS_INIT "/DWIN32 /D_WINDOWS /W3 /EHsc /GR")
 ELSEIF(NOT MSVC10)
   SET(CMAKE_CXX_FLAGS_INIT "/DWIN32 /D_WINDOWS /W3 /Zm1000 /EHsc /GR")
 ENDIF(MSVC10)
replace line 172 with:
 IF(MSVC10)
   SET(CMAKE_CXX_FLAGS_INIT "/DWIN32 /D_WINDOWS /W3 /EHsc /GR")
 ELSEIF(NOT MSVC10)
   SET(CMAKE_CXX_FLAGS_INIT "/DWIN32 /D_WINDOWS /W3 /Zm1000 /GX /GR")
 ENDIF(MSVC10)
replace line 184 with :
 IF(MSVC10)
   SET(CMAKE_CXX_FLAGS_INIT "/DWIN32 /D_WINDOWS /W3 /EHsc /GR")
 ELSEIF(NOT MSVC10)
   SET(CMAKE_CXX_FLAGS_INIT "/DWIN32 /D_WINDOWS /W3 /Zm1000 /GX /GR")
 ENDIF(MSVC10)
References
- Tip of the hat to Nicky_Perian for User:Nicky_Perian/Visual_Studio_10_Autobuild