* [[Animation|Pose]]: ''loel - spring serenade 05''
* [[Environmental Enhancement Project#EEP_Settings_Object|Environment Preset]]: [[Placeholder|''Studio Saberhagen - Studio Dark (P)'']] - '''TODO: Add MP link to photo presets, when available.'''
* [[Environmental Enhancement Project#EEP_Settings_Object|Environment Preset]]: [[Placeholder|''Studio Saberhagen - Studio Dark (P)'']] - '''TODO: Add MP link to photo presets, when available.'''
Note that when converting a colour from regular LSL space (sRGB) to linear space for use in a light, it's likely quicker and cleaner to use the internal function llsRGB2Linear. This is mostly a function that can be used for fun to manipulate the gamma space of colours.
vectorsrgb_eotf(vectorcolor,floatgamma)//To convert from regular LSL colour to light colour, gamma value should be 2.4{//Conversion from gamma-encoded sRGB space to linear space. Credit: Jenna Huntsman, Christopher J. Howardvectorlow=color/12.92;vectorhigh=<llPow((color.x+0.055)/1.055,gamma),llPow((color.y+0.055)/1.055,gamma),llPow((color.z+0.055)/1.055,gamma)>;returnmix(low,high,step(<0.04045,0.04045,0.04045>,color));}floatmax(floatx,floaty){//Return the higher of 2 given values.if(y>x)returny;returnx;}vectormix(vectorx,vectory,vectort){vectorret;ret.x=x.x*(1-t.x)+y.x*t.x;ret.y=x.y*(1-t.y)+y.y*t.y;ret.z=x.z*(1-t.z)+y.z*t.z;returnret;}vectorstep(vectoredge,vectorx){vectorret=<1,1,1>;if(x.x<edge.x)ret.x=0;if(x.y<edge.y)ret.x=0;if(x.z<edge.z)ret.x=0;returnret;}
Examples
vectorLampCol=<1,0.74510,0.47451>;//3200 kelvinllSetLinkPrimitiveParamsFast(LINK_THIS,[PRIM_POINT_LIGHT,1,srgb_eotf(LampCol,2.4),1,20,0,PRIM_GLOW,ALL_SIDES,1,PRIM_COLOR,ALL_SIDES,LampCol,1,PRIM_FULLBRIGHT,ALL_SIDES,1]);//Set light source colour and prim colour to same colour; despite taking different input values.
Random Notes
I be a placeholder. At least for now.
Editor note: All sections below this box are considered drafts, and may move, change name, or be deleted at any time.
Photo Checklist Page Update
This is some text. I need to do something here.
Lens Settings
The table below contains settings for simulating various real-life lenses within Second Life. These settings will change the camera's Field of View (FoV), as well as Depth of field (DoF) settings. You may want to play around with some of these settings (for example, the Aperture value) to manipulate the depth-of-field effect.
Tip: The default Second Life camera is roughly equivalent to a full frame digital (36x24mm sensor) camera using 31mm lens.
For reference, the following table describes the debug settings changed, their units, and what the setting does. Default values are not provided as these settings may vary between viewers.
Camera Field-of-View angle, horizontal. Equivalent to Angle of View - width degrees to equate a real lens. This changes the visible FoV.
CameraDoFResScale
Linear
Amount to scale down resolution of DoF effect. Manipulating this value may change performance.
CameraFieldOfView
Degrees
Field-of-View angle used for the DoF effect. Note that this value is the height FoV, NOT width.
CameraFNumber
F Stop
F Stop (or Aperture) value to be simulated by DoF effect. This is the value you should change to adjust the intensity of the DoF effect.
CameraFocalLength
mm
Focal length of the lens to be simulated by the DoF effect.
CameraMaxCoF
mm*1000
Lens Circle of Confusion value to be simulated by the DoF effect.
CameraFocusTransitionTime
Seconds
Time the camera will take to transition between 2 focal planes.
Editor note: The below settings assume that the screen is in the 16:9 aspect ratio - These values vary depending on aspect ratio, so if you have a screen of a different ratio, you may need to recalculate these values.
Note: To manipulate the intensity of the Depth-of-Field effect, change the aperture (F number) value. Common values are: 1.4, 2, 2.8, 4, 8, 12, 16, 20, 24
8 mm (Fisheye)
Debug Setting
Value
CameraAngle
2.306
CameraFieldOfView
103.4
CameraFocalLength
8
CameraMaxCoF
29.0
16 mm
Debug Setting
Value
CameraAngle
1.688
CameraFieldOfView
64.65
CameraFocalLength
16
CameraMaxCoF
29.0
24 mm
Debug Setting
Value
CameraAngle
1.287
CameraFieldOfView
45.75
CameraFocalLength
24
CameraMaxCoF
29.0
31 mm (SL Default)
Debug Setting
Value
CameraAngle
1.047
CameraFieldOfView
35.98
CameraFocalLength
31
CameraMaxCoF
29.0
50 mm
Debug Setting
Value
CameraAngle
0.691
CameraFieldOfView
22.9
CameraFocalLength
50
CameraMaxCoF
29.0
75 mm
Debug Setting
Value
CameraAngle
0.471
CameraFieldOfView
15.38
CameraFocalLength
75
CameraMaxCoF
29.0
100 mm
Debug Setting
Value
CameraAngle
0.350
CameraFieldOfView
11.56
CameraFocalLength
100
CameraMaxCoF
29.0
Did you know that you can leave DoF enabled for daily use? Try the settings given above for 31 mm, with an F-Stop (F number) value of 16.0.
How to calculate lens settings
If you don't have a 16:9 aspect ratio monitor, you will want to recalculate the lens settings.
The desired focal length is also one of the settings we need. (Debug setting: CameraFocalLength)
Scroll down, and select Option 1.
Advanced users: You may also want to change the sensor size if you are trying to match footage shot with a specific camera (e.g. a phone camera). See the following website to get some additional values: Sensor chart
Under Option 1, select the desired Aspect Ratio crop.
Enter the value from the first website called "Angle of View - Diagonal Degrees" in the "deg" field of the second website.
The value given in the "rad" field is the new value for your FoV (Debug setting: CameraAngle).
Back on the first website, find the value for "Angle of View - Height Degrees".
The value in this field is the new value for the DoF FoV (Debug setting: CameraFieldOfView)
Lighting
Lighting in Second Life is just as important as your framing for your scene - it governs everything that you see; as it does in real life.
General tips
When lighting a dark or night scene, instead of using dim 'white' lights, you should instead use lights with a blue cast (Approx. XXXX kelvin). This is simulating a phenomenon in the human eye, wherein perceived color gains a blue shift before losing color vision altogether. This is known as the Purkinje effect.
In Second Life, lighting starts with the choice of your Environment preset, introduced as part of EEP. By default, the viewer uses whichever preset the landowner has decided to use on their parcel.
Tip: While many people play with 'flat' environment presets (e.g. CalWL), these often make for poor photography lighting. Avoid using these where possible, instead, try making use of specific photography presets for your shoots.
Warning: When selecting presets, endeavour to use EEP-specific (i.e. not converted from the prior WindLight system) presets, as older presets would have undergone a conversion into the new EEP Settings asset, which is not a perfect conversion.
In-world lighting
Another thing to consider is placing lights in-world. Any object in-world can be made into a light (via the Build floater > Features > Light) - Second life has 2 types of light:
Point lights - this is the default type of light that Second Life uses. It acts similarly to a lightbulb, wherein light is cast out in all directions.
Projector lights - these lights will emit light in a specific beam pattern, for example, a car headlamp or a flashlight.
In a studio setting, it's recommended to use projector lamps wherever possible to keep tight control of the lighting in your scene. It also matches real-life photography lamps, most of which are actually different forms of projector lamps.
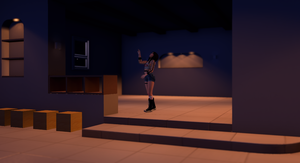
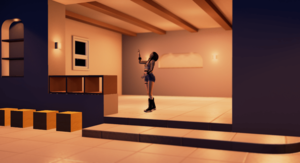
The below example makes use of basic 3 point lighting on a plain background.
Lit with point lights only
Lit with projector lights only
Photo Settings
General
Viewer: Alchemy Project AgileAkita (6.5.5.1529)
Pose: loel - spring serenade 05
Environment Preset: Studio Saberhagen - Studio Dark (P)