User:Mako Nozaki/The Solutions Against The Viewer Troubles
< User:Mako Nozaki
Jump to navigation
Jump to search
Revision as of 22:19, 15 June 2012 by Mako Nozaki (talk | contribs)
Why my SecondLife Viewer 2 or 3 won't work on Mac OS X or Linux despite working on Windows?
If you have trouble such as ...
- Have to wait forever before login. (e.g. "Logging in ..." for literally a minute)
- After login, you can't see the neighbor sims at all.
- If you try to teleport, you will be kicked off from the SecondLife grid.
Messages
You may see lots of following messages in the log file:
- WARNING: BaseCapabilitiesComplete::error: 499: STATUS_EXPIRED
- INFO: error: LLInventoryModelFetchDescendentsResponder::error 499: STATUS_ERROR
- WARNING: LLURLRequest::process_impl: URLRequest Error: 3, URL using bad/illegal format or missing URL, <EMPTY URL>
Cause
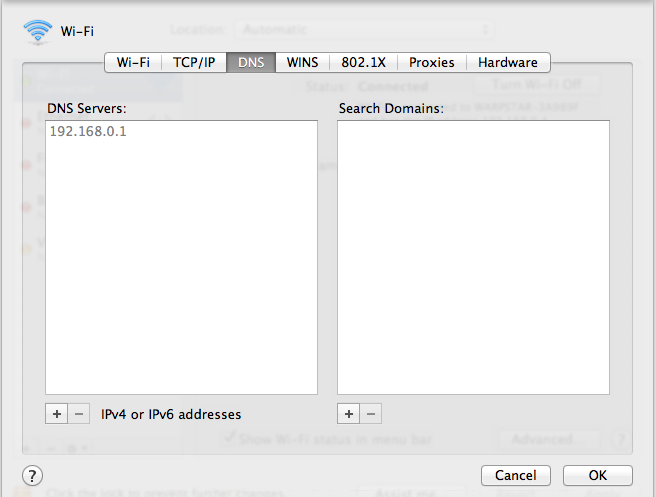
Probably because you specify private IP address as DNS server. You will need to review your DNS setting. You need to explicitly specify global DNS address for there. In general, if you access from behind home or office LAN network, your computer defaults to private address (i.e. "192.168.0.1").
How to check
Mac OS X
- Choose Apple menu > System Preferences, and then click Network.
- Click your using connection in the network connection services list. Click Advanced... button.
- Click DNS tab. You will see like that:
If the address in DNS Servers: pane starts with any of the following, proceed to the following step.
- 10.
- 172.16 to 172.31
- 192.168
How to fix
Mac OS X
- Find out the global DNS addresses you can use. In general, you may find them in your internet provider's website. Or you may find them in your home router's setting page if it has. Or you can plug out your router and connect once directly connect your computer instead, and then look at your DNS setting again.
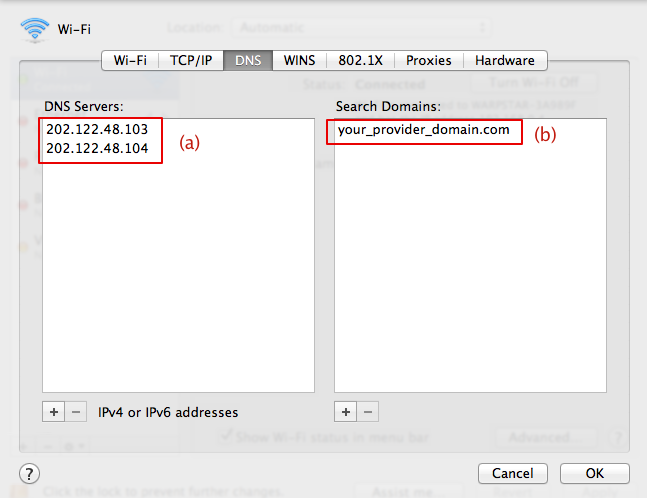
- Click + button under the DNS Servers: pane (a).
- Type the global addresses (primary, secondary) you found in step 1.
- Optionally, provide your domain name in (b).
- Click OK and Apply.
| Important: Provide YOUR DNS addresses in DNS Server: pane. Please don't use the IP addresses in the snapshot above. |

