Difference between revisions of "Context Menu"
(navbox) |
Rand Linden (talk | contribs) m (Text replace - '{{Help|Viewer=*}}' to '{{User Guide Disclaimer}} {{Help|Viewer=*}}') |
||
| (16 intermediate revisions by one other user not shown) | |||
| Line 1: | Line 1: | ||
{{User Guide Disclaimer}} | |||
{{Help|Viewer=*}} | {{Help|Viewer=*}} | ||
{{GettingStartedNav}} | |||
{{LeftToc}} | |||
This page is part of the Second Life User's Manual, describing how the Viewer software works. Please see the main [[User's Manual]] page as a starting point. | This page is part of the Second Life User's Manual, describing how the Viewer software works. Please see the main [[User's Manual]] page as a starting point. | ||
===Opening the Menus=== | |||
The descriptions below are clockwise starting from the top. Once the menu appears, | If you click the '''right mouse button (RMB) (PC)or CMD-click (MAC)''' anywhere in the 3D view area, a context menu will appear. This menu is round and is often called the "pie" menu because of how it looks. The menu will change according to what you are pointing at (object, your avatar, another avatar, or land). | ||
The descriptions below are clockwise starting from the top. Once the menu appears, sliding the mouse over one of the pie sections will highlight that item, and left-click will select that option. Any options not available for a given object or avatar will be greyed out. | |||
===Object Context Menus=== | ===Object Context Menus=== | ||
[[File:V1.23 Context Object 1.jpg|thumb|300px| | [[File:V1.23 Context Object 1.jpg|thumb|300px|right|'''Object Menu First Page''']] | ||
These menus are opened when you right click on an object in the 3D view area. | |||
'''First Page:''' | '''First Page:''' | ||
| Line 26: | Line 28: | ||
* '''''Edit ''''' - Opens the Tools floating window to the Edit tool. This is for detailed editing of an object. | * '''''Edit ''''' - Opens the Tools floating window to the Edit tool. This is for detailed editing of an object. | ||
* '''''More ''''' - Goes to the second page of the context menu | * '''''More ''''' - Goes to the second page of the object context menu | ||
* '''''Pay ''''' - If an object is set up with a script to accept money, allows paying an avatar from your Linden Dollar (L$) account balance through the object. Only avatars have account balances, so payments go to them, not to the object. | * '''''Pay ''''' - If an object is set up with a script to accept money, allows paying an avatar from your Linden Dollar (L$) account balance through the object. Only avatars have account balances, so payments go to them, not to the object. | ||
| Line 35: | Line 37: | ||
[[File:V1.23 Context Object 2.jpg|thumb|300px| | [[File:V1.23 Context Object 2.jpg|thumb|300px|right|'''Object Menu Second Page''']] | ||
'''Second Page:''' | '''Second Page:''' | ||
* '''''Take Copy ''''' - Places a copy of an object in your inventory, while leaving the original in the map region. | |||
* '''''Wear ''''' - Attaches object to right hand by default, or last attach point if previously worn. | |||
* '''''Delete ''''' - Removes an object from the map region and places it in your inventory trash folder. | |||
* '''''Buy ''''' - If item is set for sale, opens the 'Buy Contents' floating window | |||
* '''''More > ''''' - Goes to the third page of the object context menu | |||
* '''''Return... ''''' - If you have parcel content abilities on a parcel, allows you to remove an object from the parcel and return it to the owner's 'Lost and Found' folder. If you do not have such abilities, popup will tell you it is disallowed. If multiple objects are selected, it will be returned as a 'coalesced object' - a single inventory item containing all the objects and their relative positions. | |||
* '''''Attach > ''''' - Attaches a selected object to a specified avatar attachment point, according to the following menu map: | |||
[[File:Context_Body_Parts_Map.jpg]] | |||
[[File:V1.23_Context_HUD.jpg|thumb|300px|right|'''Attach HUD Menu''']] | |||
* '''''Attach Hud > ''''' - Attaches a selected object to the 8 specified Head Up Display (HUD) locations. A HUD is a special location in front of other objects in the 3D view, but behind floating windows. It can be edited horizontally and vertically, but not in and out of the screen. HUDs remain in place as you move your camera view. | |||
The 8 locations are named for their default places on the screen, but items can be rearranged to suit by using the '''Right Click > Edit''' context menu, then the left green and top blue axis arrows. If the Viewer window is resized, HUDs can end up offscreen. They can be recovered by going into edit mode with any other HUD you can see, and then scroll mouse out to shrink the HUD view. | |||
<br clear="all"/> | |||
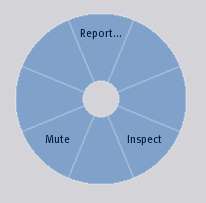
[[File:V1.23 Context Object 3.jpg|thumb|300px|right|'''Object Menu Third Page''']] | |||
'''Third Page:''' | |||
* '''''Report...''''' - Opens "Report Abuse" floating window. Abuse reports are intended to report violations of Linden Lab rules (Terms of Service and Community Standards) to the Linden staff. | |||
* '''''Inspect''''' - Opens "Inspect Objects" floating window. This allows seeing who created and when, and who owns, the component parts of an object. | |||
* '''''Mute''''' - Opens the "Muted Residents & Objects" floating window, and adds the object to the muted items list. This is useful if the object is behaving in an annoying manner - emitting excessive chat, sounds, etc. | |||
<br clear="all"/> | <br clear="all"/> | ||
=== My Avatar Context Menu === | === My Avatar Context Menu === | ||
[[File:V1.23 Context My Avatar.jpg|thumb|300px|right|'''My Avatar Menu''']] | |||
This menu is opened when you right-click on your own avatar in the 3D view area. | |||
* '''''Touch''''' - The same as left mouse-click on an object. If the internal script is programmed to respond to a click, will make the object do something. | |||
* '''''Drop''''' - Remove an object from the avatar attach point, and place it on the ground in front of the avatar. | |||
* '''''Profile''''' - Opens the 'Profile' floating window to your own profile, where you can edit it. Other users can see your profile by using the Other Avatar context menu > Profile, or using Search > People tab and entering your avatar name. | |||
* '''''Edit...''''' - Opens the 'Tools' floating window to edit an attached object | |||
* '''''Appearance...''''' - Opens the 'Appearance' floating window to edit your avatar's basic appearance (skin, shape, eyes, default hair, and clothing layers. | |||
* '''''Gestures...''''' - Opens the 'Active Gestures' floating window. This lists what gestures in your inventory are currently available to be triggered. | |||
* '''''Detach''''' - Removes the selected item from it's attach point on your avatar. | |||
* '''''Stand Up''''' - Stands you up from whatever object you are currently sitting on. | |||
<br clear="all"/> | <br clear="all"/> | ||
=== Other Avatar Context Menus === | === Other Avatar Context Menus === | ||
[[File:V1.23 Context Other Avatar 1.jpg|thumb|300px|right|'''Other Avatar Menu First Page''']] | |||
These menus are opened when you right click on another avatar in the 3D view area. | |||
'''First Page:''' | |||
* '''''Go To ''''' - Walk to the selected avatar. | |||
* '''''Mute ''''' - Opens the "Muted Residents & Objects" floating window, and adds the avatar to the muted items list. This is useful if the avatar is behaving in an annoying manner. It you from seeing their chat, instant messages, and item offers, and greys out their avatar image on the screen. | |||
* '''''Profile... ''''' - Opens the "Profile" floating window for the selected avatar. Note: the window title will include the avatar name. Displays account profile for an avatar. Most items are set by the named user, except the My Notes tab, which you can write your personal notes in. | |||
* '''''Send IM... ''''' - Opens the "Communicate" floating window with an instant message open to the selected avatar. | |||
* '''''More > ''''' - Opens the second page of the context menu | |||
* '''''Pay... ''''' - Opens the "Pay Resident" floating window with the selected avatar name. Allows transferring Linden Dollars (L$) from your account to their's. | |||
* '''''Add Friend... ''''' - Opens the "Add Friend" floating window. Allows you to offer to add the selected avatar to your friends window. If they accept, they are added to your friend's list, and you to their's. | |||
* '''''Report... ''''' - Opens the "Report Abuse" floating window. Abuse reports are intended to report violations of Linden Lab rules (Terms of Service and Community Standards) to the Linden staff. | |||
<br clear="all"/> | |||
[[File:V1.23 Context Other Avatar 2.jpg|thumb|300px|right|'''Other Avatar Menu Second Page''']] | |||
'''Second Page:''' | |||
* '''''Group Invite...''''' - Opens the '''[[Group_Windows#Groups|Groups]]''' floating window to select a group, then "Group Invitation" floating window with their name pre-added to the avatar list | |||
* '''''Give Card''''' - Offers your "Calling Card" to the selected avatar. A calling card is an inventory item that opens their profile. | |||
* '''''Freeze...''''' - Opens "Freeze" floating window. Allows temporarily freezing an avatar on a parcel you have this ability on. They will be unable to move, chat, or interact for 30 seconds. They can log out though. | |||
* '''''Inspect''''' - Opens "Inspect Objects" floating window for the selected attachment on the avatar. This does not work if you click on the avatar body, rather than an attachment. Allows you to see the name, creator, date, and current owner of the components of the selected object | |||
* '''''Eject...''''' - Opens "Eject" floating window if you have eject power on the land parcel. Allows you to eject, or eject and ban the selected avatar. | |||
<br clear="all"/> | <br clear="all"/> | ||
=== Land Context Menu === | === Land Context Menu === | ||
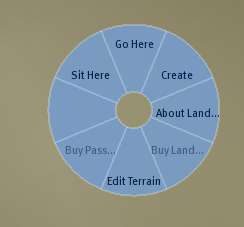
[[File:V1.23 Context Land.jpg|thumb|300px| | [[File:V1.23 Context Land.jpg|thumb|300px|right|'''Land Menu''']] | ||
This menu is opened when you right click on the terrain in the 3D view area. You must click on the land itself, and not the floor of a building or other object at ground level, or the surface of the water. For underwater areas, you must move your camera view so you can click on the 'sea floor'. | |||
* '''''Go Here''''' - Walks your avatar to the selected point | |||
* '''''Create''''' - Opens the '''[[Building Tools]]''' floating window to the Create tool, and changes your pointer to a magic wand. If you have build rights on the land parcel, lets you create a new object. | |||
* '''''About Land...''''' - Opens the '''[[About Land]]''' floating window for the selected land parcel. It displays detailed information about a land parcel, including covenants, objects and who owns them, access and use permissions, and media settings. | |||
* '''''Buy Land...''''' - If land is set for sale, opens the '''[[Land_Windows#Buy_Land|Buy Land]]''' floating window. Note that 'buy' is a misnomer. Holding land in Second Life is actually a rental of server and networking capacity, for which you pay a monthly fee. You do not acquire ownership rights in the normal legal sense. | |||
* '''''Edit Terrain''''' - Opens the '''[[Building Tools]]''' floating window to the Land tool, and changes your pointer to a little bulldozer. If you have the edit terrain ability, allows you to adjust the vertical shape of the land parcel, and divide, join, buy, or abandon it. | |||
* '''''Buy Pass...''''' - Opens the '''[[Land_Windows#Buy_Pass|Buy Pass]]''' window. Seldom used, this allows you to buy an entry pass to a land parcel if one is required. | |||
* '''''Sit Here''''' - Walks your avatar to the selected land location and places it in a sitting pose | |||
<br clear="all"/> | <br clear="all"/> | ||
Latest revision as of 10:09, 25 May 2011
| Important: This is an unofficial guide for Second Life Viewer 1.23 helpfully compiled by Second Life Residents. Much of it does not apply to the current version of the SL Viewer (Viewer 7). |
| Help Portal: |
Avatar | Bug Fixes | Communication | Community | Glossary | Land & Sim | Multimedia | Navigation | Object | Video Tutorials | Viewer | Wiki | Misc |
This page is part of the Second Life User's Manual, describing how the Viewer software works. Please see the main User's Manual page as a starting point.
Opening the Menus
If you click the right mouse button (RMB) (PC)or CMD-click (MAC) anywhere in the 3D view area, a context menu will appear. This menu is round and is often called the "pie" menu because of how it looks. The menu will change according to what you are pointing at (object, your avatar, another avatar, or land).
The descriptions below are clockwise starting from the top. Once the menu appears, sliding the mouse over one of the pie sections will highlight that item, and left-click will select that option. Any options not available for a given object or avatar will be greyed out.
Object Context Menus
These menus are opened when you right click on an object in the 3D view area.
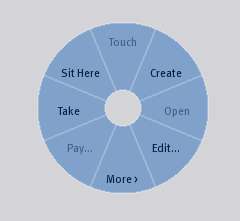
First Page:
- Touch - same as LMB-click, will activate whatever script action is contained in the object
- Create - Changes mouse pointer to "Magic Wand", and opens the object edit floating window. If you are on land that permits you to create objects, the next click will create the default object at the magic wand location. If you are not, a popup message on the bottom right corner will tell you so.
- Open - If an object you own or have edit rights to, opens the 'Object Contents' Floating window. This allows adding, deleting, editing, and copying the contents to your inventory.
- Edit - Opens the Tools floating window to the Edit tool. This is for detailed editing of an object.
- More - Goes to the second page of the object context menu
- Pay - If an object is set up with a script to accept money, allows paying an avatar from your Linden Dollar (L$) account balance through the object. Only avatars have account balances, so payments go to them, not to the object.
- Take - Removes an object from the map region and places it in your inventory.
- Sit Here - Note: a script may change the label on this menu item. Makes your avatar sit on the object pointed at and shows the "Stand Up" button above the bottom toolbar.
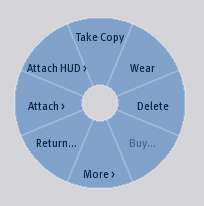
Second Page:
- Take Copy - Places a copy of an object in your inventory, while leaving the original in the map region.
- Wear - Attaches object to right hand by default, or last attach point if previously worn.
- Delete - Removes an object from the map region and places it in your inventory trash folder.
- Buy - If item is set for sale, opens the 'Buy Contents' floating window
- More > - Goes to the third page of the object context menu
- Return... - If you have parcel content abilities on a parcel, allows you to remove an object from the parcel and return it to the owner's 'Lost and Found' folder. If you do not have such abilities, popup will tell you it is disallowed. If multiple objects are selected, it will be returned as a 'coalesced object' - a single inventory item containing all the objects and their relative positions.
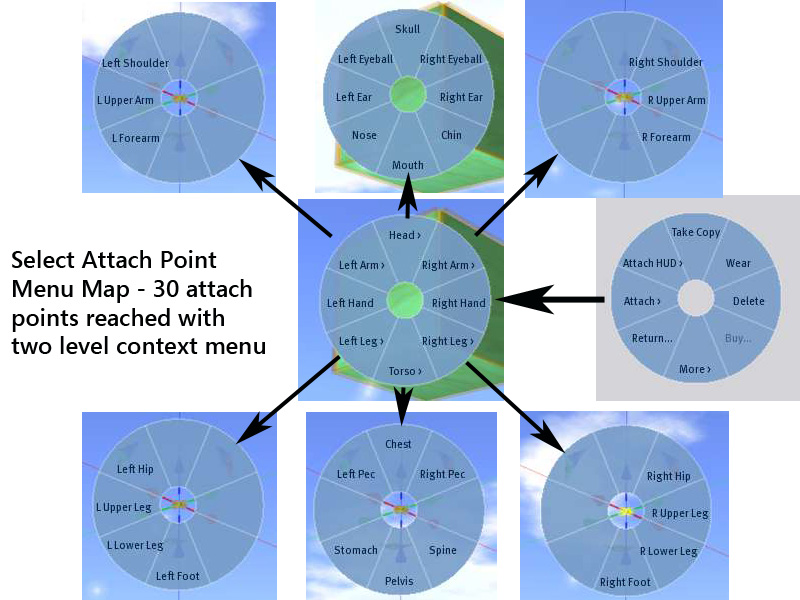
- Attach > - Attaches a selected object to a specified avatar attachment point, according to the following menu map:
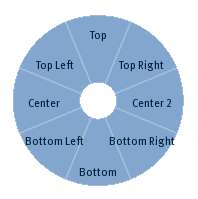
- Attach Hud > - Attaches a selected object to the 8 specified Head Up Display (HUD) locations. A HUD is a special location in front of other objects in the 3D view, but behind floating windows. It can be edited horizontally and vertically, but not in and out of the screen. HUDs remain in place as you move your camera view.
The 8 locations are named for their default places on the screen, but items can be rearranged to suit by using the Right Click > Edit context menu, then the left green and top blue axis arrows. If the Viewer window is resized, HUDs can end up offscreen. They can be recovered by going into edit mode with any other HUD you can see, and then scroll mouse out to shrink the HUD view.
Third Page:
- Report... - Opens "Report Abuse" floating window. Abuse reports are intended to report violations of Linden Lab rules (Terms of Service and Community Standards) to the Linden staff.
- Inspect - Opens "Inspect Objects" floating window. This allows seeing who created and when, and who owns, the component parts of an object.
- Mute - Opens the "Muted Residents & Objects" floating window, and adds the object to the muted items list. This is useful if the object is behaving in an annoying manner - emitting excessive chat, sounds, etc.
My Avatar Context Menu
This menu is opened when you right-click on your own avatar in the 3D view area.
- Touch - The same as left mouse-click on an object. If the internal script is programmed to respond to a click, will make the object do something.
- Drop - Remove an object from the avatar attach point, and place it on the ground in front of the avatar.
- Profile - Opens the 'Profile' floating window to your own profile, where you can edit it. Other users can see your profile by using the Other Avatar context menu > Profile, or using Search > People tab and entering your avatar name.
- Edit... - Opens the 'Tools' floating window to edit an attached object
- Appearance... - Opens the 'Appearance' floating window to edit your avatar's basic appearance (skin, shape, eyes, default hair, and clothing layers.
- Gestures... - Opens the 'Active Gestures' floating window. This lists what gestures in your inventory are currently available to be triggered.
- Detach - Removes the selected item from it's attach point on your avatar.
- Stand Up - Stands you up from whatever object you are currently sitting on.
Other Avatar Context Menus
These menus are opened when you right click on another avatar in the 3D view area.
First Page:
- Go To - Walk to the selected avatar.
- Mute - Opens the "Muted Residents & Objects" floating window, and adds the avatar to the muted items list. This is useful if the avatar is behaving in an annoying manner. It you from seeing their chat, instant messages, and item offers, and greys out their avatar image on the screen.
- Profile... - Opens the "Profile" floating window for the selected avatar. Note: the window title will include the avatar name. Displays account profile for an avatar. Most items are set by the named user, except the My Notes tab, which you can write your personal notes in.
- Send IM... - Opens the "Communicate" floating window with an instant message open to the selected avatar.
- More > - Opens the second page of the context menu
- Pay... - Opens the "Pay Resident" floating window with the selected avatar name. Allows transferring Linden Dollars (L$) from your account to their's.
- Add Friend... - Opens the "Add Friend" floating window. Allows you to offer to add the selected avatar to your friends window. If they accept, they are added to your friend's list, and you to their's.
- Report... - Opens the "Report Abuse" floating window. Abuse reports are intended to report violations of Linden Lab rules (Terms of Service and Community Standards) to the Linden staff.
Second Page:
- Group Invite... - Opens the Groups floating window to select a group, then "Group Invitation" floating window with their name pre-added to the avatar list
- Give Card - Offers your "Calling Card" to the selected avatar. A calling card is an inventory item that opens their profile.
- Freeze... - Opens "Freeze" floating window. Allows temporarily freezing an avatar on a parcel you have this ability on. They will be unable to move, chat, or interact for 30 seconds. They can log out though.
- Inspect - Opens "Inspect Objects" floating window for the selected attachment on the avatar. This does not work if you click on the avatar body, rather than an attachment. Allows you to see the name, creator, date, and current owner of the components of the selected object
- Eject... - Opens "Eject" floating window if you have eject power on the land parcel. Allows you to eject, or eject and ban the selected avatar.
Land Context Menu
This menu is opened when you right click on the terrain in the 3D view area. You must click on the land itself, and not the floor of a building or other object at ground level, or the surface of the water. For underwater areas, you must move your camera view so you can click on the 'sea floor'.
- Go Here - Walks your avatar to the selected point
- Create - Opens the Building Tools floating window to the Create tool, and changes your pointer to a magic wand. If you have build rights on the land parcel, lets you create a new object.
- About Land... - Opens the About Land floating window for the selected land parcel. It displays detailed information about a land parcel, including covenants, objects and who owns them, access and use permissions, and media settings.
- Buy Land... - If land is set for sale, opens the Buy Land floating window. Note that 'buy' is a misnomer. Holding land in Second Life is actually a rental of server and networking capacity, for which you pay a monthly fee. You do not acquire ownership rights in the normal legal sense.
- Edit Terrain - Opens the Building Tools floating window to the Land tool, and changes your pointer to a little bulldozer. If you have the edit terrain ability, allows you to adjust the vertical shape of the land parcel, and divide, join, buy, or abandon it.
- Buy Pass... - Opens the Buy Pass window. Seldom used, this allows you to buy an entry pass to a land parcel if one is required.
- Sit Here - Walks your avatar to the selected land location and places it in a sitting pose
