Difference between revisions of "MLPV2 and Chains TUTORIAL"
(Created page with '* MLPV2 Tutorial made by Teq Hutchinson, November 2009. * '''GOAL:''' Create a multi-animations object and generate automatically chains often used in bdsm to attach an ...') |
|||
| (5 intermediate revisions by 4 users not shown) | |||
| Line 1: | Line 1: | ||
* [[MLPV2]] | {{Navbox/MLPV2}} | ||
* [[MLPV2 Texture Changer Add-on]] | |||
* [[MLPV2 Color Changer Add-on]] | |||
* [[MLPV2 Ambiant Sound Add-on]] | |||
* [[MLPV2 Props Texture Changer Add-on]] | |||
| Line 16: | Line 21: | ||
*# Know how the MLPV2 works (see [[MLPV2_Tutorial]]). | *# Know how the MLPV2 works (see [[MLPV2_Tutorial]]). | ||
*# MLPV2 scripts made by Learjeff Innis (available inworld | *# MLPV2 scripts made by Learjeff Innis (not available inworld region is off: jPose Island). | ||
*# MLPV2 Give Item Add-on made by Chaz Longstaff (available in the wiki here: [[MLPV2_Give_Item_Add-on]]). | *# MLPV2 Give Item Add-on made by Chaz Longstaff (available in the wiki here: [[MLPV2_Give_Item_Add-on]]). | ||
*# CISS, the Cuff Integrated Support System made by Shan Bright & Innula Zenovka (available inworld here: {{SLurl|region=McFarren|x=58|y=207|z=29|title=Bright Corporation Adultshop}}). | *# CISS, the Cuff Integrated Support System made by Shan Bright & Innula Zenovka (available inworld here: {{SLurl|region=McFarren|x=58|y=207|z=29|title=Bright Corporation Adultshop}}). | ||
| Line 72: | Line 77: | ||
* Once you have defined all your animations you can save the "CISS main script" and close it. If you have made a mistake just re-open it. Your system is ready to use. | * Once you have defined all your animations you can save the "CISS main script" and close it. If you have made a mistake just re-open it. Your system is ready to use. | ||
* Note: Animation names are translated to UUID, and a simple renaming of an animation does not change the UUID, so differently named copies of a defined animation within the linkset will behave identically. Uploading an original animation with a new name will work around this. | |||
* '''STEP 4 - OPTIONAL:''' | * '''STEP 4 - OPTIONAL:''' | ||
| Line 83: | Line 88: | ||
Thanks to Learjeff Innis, Shan Bright, and Innula Zenovka for their wonderful work. | Thanks to Learjeff Innis, Shan Bright, and Innula Zenovka for their wonderful work. | ||
[[Category:MLPV2]] | |||
Latest revision as of 12:01, 9 March 2016
- MLPV2 Texture Changer Add-on
- MLPV2 Color Changer Add-on
- MLPV2 Ambiant Sound Add-on
- MLPV2 Props Texture Changer Add-on
Tutorial made by Teq Hutchinson, November 2009.
- GOAL:
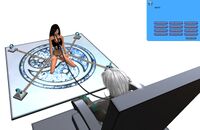
Create a multi-animations object and generate automatically chains often used in bdsm to attach an avatar to it.
- WHAT YOU WILL NEED:
- Know how the MLPV2 works (see MLPV2_Tutorial).
- MLPV2 scripts made by Learjeff Innis (not available inworld region is off: jPose Island).
- MLPV2 Give Item Add-on made by Chaz Longstaff (available in the wiki here: MLPV2_Give_Item_Add-on).
- CISS, the Cuff Integrated Support System made by Shan Bright & Innula Zenovka (available inworld here: Bright Corporation Adultshop🖈).
- Optional: install the Restrained Life viewer (can be downloaded here: http://www.erestraint.com/realrestraint/ ).
(Note: I have choosen MLPV2 and CISS because they are free and opensource).
- STEP 1:
All your custommers won't already have a collar and cuffs, so we will create a button on the blue menu that when clicked will deliver them.
- Drop the ~Give script (MLPV2 Give Item Add-on) in the content of the prim where your MLPV2 scripts are.
- Rezz inworld the CISS collar and cuffs (Bright Collar #022 - Bright Cuffs left wrist #009 - Bright Cuffs right wrist #009 - Bright Cuffs left ankle #009 - and Bright Cuffs right ankle #009).
- Right clic on each of these objects and choose "edit" - delete the ""#"" in the name of each. You have to do this because the "#" is the separator used by the ~Give script
- Once done, take them back to your inventory, and drop them in the content of the prim where your MLPV2 scripts are.
- Add to the menu in an MLPV2 menu notecard the following line:
LINKMSG Wear Cuffs | 1,-4,987789,Bright Collar 022#Bright Cuffs left ankle 009#Bright Cuffs left wrist 009#Bright Cuffs right ankle 009#Bright Cuffs right wrist 009##Wear these collar and four cuffs and chains will appear
A new button "Wear Cuffs" will now be shown in your MLPV2 menu, and when clicked your custommers will receive the collar and cuffs.
- STEP 2:
Now we will dropp the required CISS scripts into your object.
- Find the "CISS main script" in your inventory and drop it in the content of the prim where your MLPV2 scripts are.
- Find the "CISS sit script" in your inventory and drop it in the content of the pose ball rezzed by the MLPV2 (~ball).
- STEP 3:
Now we will create the four anchors where the avatar wearing the cuffs will be attached.
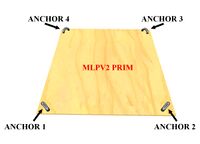
- Create four prims (little torus for example), give to each a different name (for example "anchor1" "anchor2" "anchor3" and "anchor4") and link them to the prim where your MLPV2 scripts are. You don't have to drop any script into these prims, only their names are important.
- In the content of the prim where your MLPV2 scripts are, open the "CISS main script", and find the line beginning by "list animations = ["
- Now you will have to say to the script, for each animation that you will use, wich part of the avatar you want to be attached, and where:
list animations = [
"Animation_number_1", "leftwrist,anchor1,rightwrist,anchor2,leftankle,anchor3,rightankle,anchor4",
"Animation_number_2", "leftankle,anchor1,rightankle,anchor2"
];
In this example, when playing the Animation_number_1, the avatar will have the left wrist attached to the prim you have previously named "anchor1", the right wrist to the anchor2, the left ankle to the anchor3, and the right ankle to the anchor4.
When playing the Animation_number_2, the avatar will only have his ankles attached to anchors 1 and 2.
- Once you have defined all your animations you can save the "CISS main script" and close it. If you have made a mistake just re-open it. Your system is ready to use.
- Note: Animation names are translated to UUID, and a simple renaming of an animation does not change the UUID, so differently named copies of a defined animation within the linkset will behave identically. Uploading an original animation with a new name will work around this.
- STEP 4 - OPTIONAL:
If the avatar you want to be attached on your object is connected with the Restrained Life viewer, and if you are the owner of his collar, you can force him to sit on your MLPV2 object.
- Do a left clic on his collar, or type in the chat windows "*menu" - this will open a blue dialog boxe with the options of the collar.
- Select "RLV", then "Sit", then "SitNow", and choose the matching pose ball in the menu. This will force the avatar to sit on it. If you have previously selected "RLV">"Sit">"Forbid Stand" the avatar won't be able to leave the pose ball by himself.
Thanks to Learjeff Innis, Shan Bright, and Innula Zenovka for their wonderful work.

