Difference between revisions of "Context Menu"
| Line 57: | Line 57: | ||
[[File:Context_Body_Parts_Map.jpg]] | [[File:Context_Body_Parts_Map.jpg]] | ||
* '''''Attach Hud > ''''' - | [[File:V1.23_Context_HUD.jpg|thumb|300px|left]] | ||
* '''''Attach Hud > ''''' - Attaches a selected object to the 8 specified Head Up Display (HUD) locations. A HUD is a special location in front of other objects in the 3D view, but behind floating windows. It can be edited horizontally and vertically, but not in and out of the screen. HUDs remain in place as you move your camera view. | |||
The 8 locations are named for their default places on the screen, but items can be rearranged to suit by using the '''Right Click > Edit''' context menu, then the left green and top blue axis arrows. If the Viewer window is resized, HUDs can end up offscreen. They can be recovered by going into edit mode with any other HUD you can see, and then scroll mouse out to shrink the HUD view. | |||
<br clear="all"/> | |||
[[File:V1.23 Context Object 3.jpg|thumb|300px|left]] | [[File:V1.23 Context Object 3.jpg|thumb|300px|left]] | ||
Revision as of 17:40, 20 August 2009
| Help Portal: |
Avatar | Bug Fixes | Communication | Community | Glossary | Land & Sim | Multimedia | Navigation | Object | Video Tutorials | Viewer | Wiki | Misc |
This page is part of the Second Life User's Manual, describing how the Viewer software works. Please see the main User's Manual page as a starting point.
If you click the right mouse button (RMB) (PC)or CMD-click (MAC) in the 3D view area, a context menu will appear. This menu is round and is often called the "pie" menu because of how it looks. The menu will change according to what you are pointing at (object, your avatar, another avatar, or land).
The descriptions below are clockwise starting from the top. Once the menu appears, moving the mouse over one of the pie sections will highlight that item. and LMB click will select that option. Any options not available for a given object or avatar will be greyed out.
Object Context Menus
These menus are opened when you right click on an object in the 3D view area.
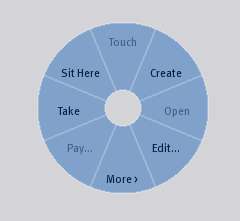
First Page:
- Touch - same as LMB-click, will activate whatever script action is contained in the object
- Create - Changes mouse pointer to "Magic Wand", and opens the object edit floating window. If you are on land that permits you to create objects, the next click will create the default object at the magic wand location. If you are not, a popup message on the bottom right corner will tell you so.
- Open - If an object you own or have edit rights to, opens the 'Object Contents' Floating window. This allows adding, deleting, editing, and copying the contents to your inventory.
- Edit - Opens the Tools floating window to the Edit tool. This is for detailed editing of an object.
- More - Goes to the second page of the object context menu
- Pay - If an object is set up with a script to accept money, allows paying an avatar from your Linden Dollar (L$) account balance through the object. Only avatars have account balances, so payments go to them, not to the object.
- Take - Removes an object from the map region and places it in your inventory.
- Sit Here - Note: a script may change the label on this menu item. Makes your avatar sit on the object pointed at and shows the "Stand Up" button above the bottom toolbar.
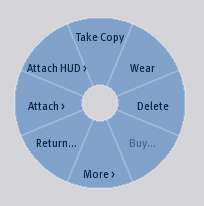
Second Page:
- Take Copy - Places a copy of an object in your inventory, while leaving the original in the map region.
- Wear - Attaches object to right hand by default, or last attach point if previously worn.
- Delete - Removes an object from the map region and places it in your inventory trash folder.
- Buy - If item is set for sale, opens the 'Buy Contents' floating window
- More > - Goes to the third page of the object context menu
- Return... - If you have parcel content abilities on a parcel, allows you to remove an object from the parcel and return it to the owner's 'Lost and Found' folder. If you do not have such abilities, popup will tell you it is disallowed. If multiple objects are selected, it will be returned as a 'coalesced object' - a single inventory item containing all the objects and their relative positions.
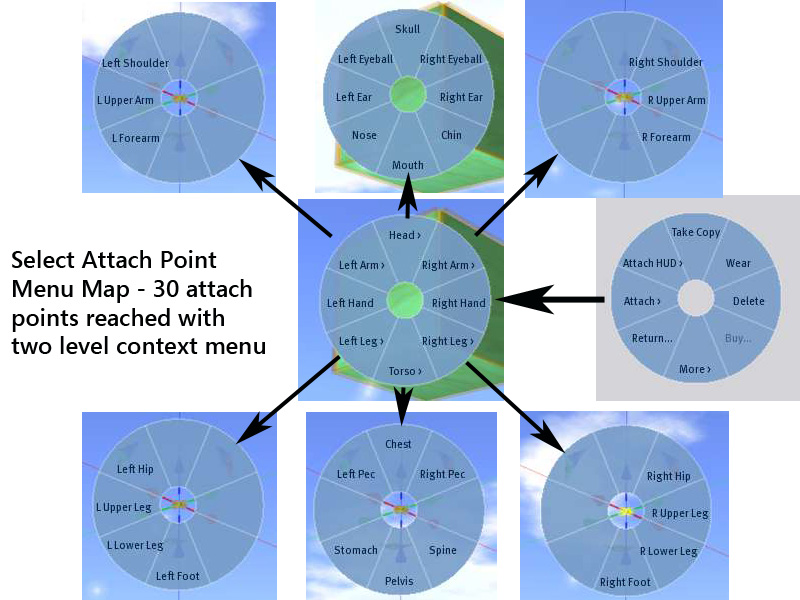
- Attach > - Attaches a selected object to a specified avatar attachment point, according to the following menu map:
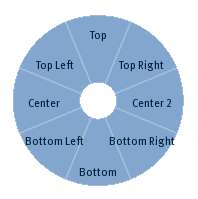
- Attach Hud > - Attaches a selected object to the 8 specified Head Up Display (HUD) locations. A HUD is a special location in front of other objects in the 3D view, but behind floating windows. It can be edited horizontally and vertically, but not in and out of the screen. HUDs remain in place as you move your camera view.
The 8 locations are named for their default places on the screen, but items can be rearranged to suit by using the Right Click > Edit context menu, then the left green and top blue axis arrows. If the Viewer window is resized, HUDs can end up offscreen. They can be recovered by going into edit mode with any other HUD you can see, and then scroll mouse out to shrink the HUD view.
Third Page:
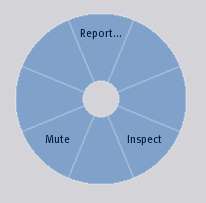
- Report... -
- Inspect -
- Mute -
My Avatar Context Menu
This menu is opened when you right-click on your own avatar in the 3D view area.
- Touch -
- Drop -
- Profile - Opens the 'Profile' floating window to your own profile, where you can edit it. Other users can see your profile by using the Other Avatar context menu > Profile, or using Search > People tab and entering your avatar name.
- Edit... - Opens the 'Tools' floating window to edit an attached object
- Appearance... - Opens the 'Appearance' floating window to edit your avatar's basic appearance (skin, shape, eyes, default hair, and clothing layers.
- Gestures... - Opens the 'Active Gestures' floating window. This lists what gestures in your inventory are currently available to be triggered.
- Detach - Removes the selected item from it's attach point on your avatar.
- Stand Up - Stands you up from whatever object you are currently sitting on.
Other Avatar Context Menus
These menus are opened when you right click on another avatar in the 3D view area.
First Page:
- Go To -
- Mute -
- Profile... -
- Send IM... -
- More > -
- Pay... -
- Add Friend... -
- Report... -
Second Page:
- Group Invite... -
- Give Card -
- Freeze... -
- Inspect -
- Eject... -
Land Context Menu
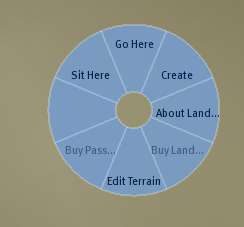
This menu is opened when you right click on the terrain in the 3D view area. You must click on the land itself, and not the floor of a building or other object at ground level, or the surface of the water. For underwater areas, you must move your camera view so you can click on the 'sea floor'.
- Go Here -
- Create -
- About Land... -
- Buy Land... -
- Edit Terrain -
- Buy Pass... -
- Sit Here -
