Communication
| Important: This is an unofficial guide for Second Life Viewer 1.23 helpfully compiled by Second Life Residents. Much of it does not apply to the current version of the SL Viewer (Viewer 2). |
| Help Portal: |
Avatar | Bug Fixes | Communication | Community | Glossary | Land & Sim | Multimedia | Navigation | Object | Video Tutorials | Viewer | Wiki | Misc |
This Page is part of the User's Manual, discussing the communication features of the Second Life Viewer.
Second Life has multiple methods of communicating between users. These include public and private text chat, notecards, voice chat, your profile, and streaming audio and video. Many of these are activated by the bottom toolbar.
Chat Bar
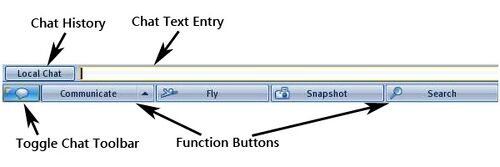
The chat toolbar is activated with the button in the bottom left corner of the screen. It appears just above the row of function buttons at the very bottom. Chat settings can be found at the top menu Edit > Preferences > Text Chat tab.
Local Chat - This button opens the chat history window. Local chat is displayed for 20-60 seconds on the screen before fading away. The history will show all chat since you logged in. If you use Edit > Preferences > Communication > Logging Options you can save chat to a text file on your computer.
Besides human users, other items can generate chat messages. These are displayed in selectable colors, controlled from the top menu Edit > Preferences > Text Chat tab.
Chat Text Entry Box - Entering text here and hitting enter will display the chat text on your screen above the box if chat history is closed, or in the history box if it is open. Chat is also visible to anyone within range in the 3D view area. Normal chat range is 20 meters. If you use the Whisper or Shout buttons, the range is changed to 10 or 100 meters respectively.
The name of the Avatar sending the chat starts each line. if you type /me at the start of the line, it leaves off the ":", and is used to indicate an action or emotion, rather than spoken words.
Mute List
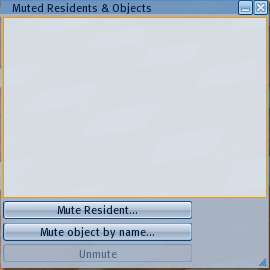
You may find some users or objects to be annoying. The mute list prevents you from receiving communications from them, and in the case of avatars, from seeing them. The list can be opened from the top menu View > Mute List item, or the bottom toolbar Communicate |^| popup menu. You can add items to the list using the following methods:
- The Mute Resident... and Mute Object... buttons in this window
- If an account profile is open, using the Mute button
- When a popup message appears from a user or object, using the Mute button.
Mute List Box - The main portion of this window lists Resident accounts and objects you have muted.
Mute Resident... - Opens Choose Resident window to select a name.
Mute object by name... - Opens a list of objects which have recently generated chat.
Communicate Window
The Communicate window merges several features into one collective window with multiple tabs. It is opened by the bottom toolbar Communicate button, or the top menu View > Communicate item.
Several of the tabs can be "torn off" into separate windows using Tear Off Tab Button. They can be redocked using the bottom toolbar Communicate |^| > Redock Windows popup menu item. When a new Instant Message arrives or is started by you, it will create a new bottom tab.
Contacts Tab: Friends
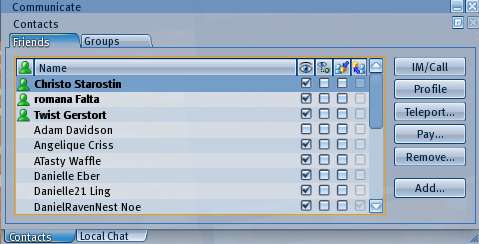
Friends are users whom you have chosen to stay in closer contact with. This tab allows you to see your friend's status and take various actions with respect to them. Clicking on any name will highlight it. Double-clicking will open an Instant Message to that user. The main Friends list box can be sorted by clicking on the column headings. The six columns are as follows:
Body Icon - Appears when a friend is online
Name - User account name. Is in bold when they are online. By default online names are listed first in alphabetical order, followed by offline names in alphabetical order.
Eye Symbol - If checked, friends can receive notifications when you log in off.
Map Symbol - If checked, allows friends to find you on the Map.
Edit My Items - If checked, allows your friend to edit your objects in the 3D view. It does not allow them to edit items in your inventory
Edit their Items - If checked, allows you to edit their objects in the 3D view.
The right hand buttons are as follows:
IM/Call - Opens an instant message tab with the selected user.
Profile - Opens the Profile window for that user.
Teleport... - Opens an Offer Teleport window.
Pay... - Opens the Pay Resident window.
Remove... - Opens the Remove Friend window to delete a name from your Friends list.
Contacts Tab: Groups
See also Contacts: Groups
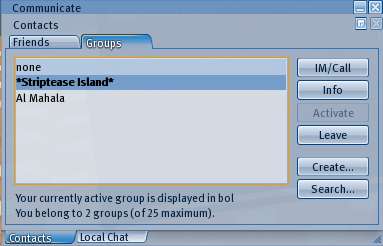
This tab of the "Communicate" floating window allows you to access your groups list and perform actions related to groups. It is opened with the top menu View > Communicate item, then clicking on the groups tab. The main part of the window lists the current groups you belong to. Included in the list is 'none' for when you want no group active. You may belong to a maximum of 42 groups at one time, and underneath the list it will show how many you belong to currently.
Clicking once on a group in the list will highlight it, after which the right side buttons will do the actions listed below. Double clicking will open a group IM immediately.
IM/Call - Opens a group Instant Message/Call tab to allow text or voice chat with group members who are online.
Info - Opens the Group Information window for detailed information about the group.
Activate - Makes the selected group active. This displays the active title for the group in the 3D view area over your avatar name. Some land permissions and objects will only work if you have the proper group active. Any objects you create while a group is active will have the group set on the item properties.
Leave - Remove yourself from a group's membership list.
Create - Opens a blank group information window to create a new group. You can fill in the group title and charter. You will then be asked if it is a mature group, and finally if you want to pay 100L$ to create the group. Groups must have at least 2 members or they will be deleted in 48 hours.
Search - Opens the "Search" window to the groups tab, so you can search for existing groups.
Local Chat Tab
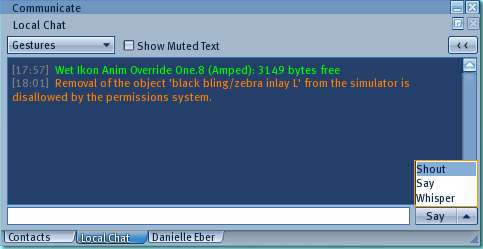
Local chat is normally displayed in a transparent console over the 3D view area. The text fades after 20-60 seconds. This window shows all local chat since you logged in in the main text box. Different colors are available for various sources, which can be set in preferences. If you have selected it, time stamps are shown.
The white box near the bottom is used for entering your text. Hitting Enter by default uses the Say mode, which has a range of 20 meters. The popup selector lets you choose Whisper (10 meter range), and Shout (100 meter range, use with care).
Gestures - Gestures are a package of animations, sounds, and text, which are triggered by a short key when active. This button lists the active gestures and also lets you play it from the list.
Show Muted Text - The Mute List, above, prevents you from getting communication from users or objects. This box overrides that list and lets you see any text from them.
< < - This button opens a side panel that lists current avatars within chat range.
Instant Message
Instant messages (IM) are private conversations between two users. While Local Chat is readable by anyone within range (normally 20 meters), IMs can operate anywhere within Second Life. If you have the top menu Edit > Preferences > Communication > IM Options > Send IM to Email checkbox selected, then a limited number of IMs will be delivered when you are not online.
A new Instant Message can be started by one of the following methods:
- Point mouse at another avatar in the 3D view area and right click Context Menu > Send IM...
- From their Profile window > 2nd Life tab > Instant Message button
- From the bottom toolbar Inventory > Calling Card > right click > Send Instant Message
- From the Communicate window > Friends tab > IM/Call button.
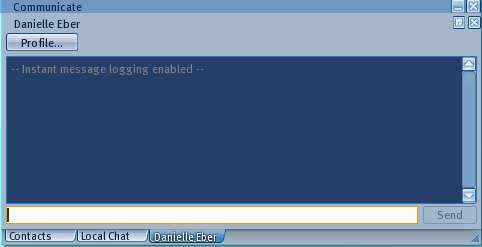
Each IM will get a separate tab in the Communicate window. When a new line of text is received, the tab will flash several times. Incoming IMs make a sound to alert you. If you attempt to send an IM to a user that is not online, a message will appear that they are offline. The white box at the bottom of the window is for entering text. Use Enter key or the Send button to send. The Profile button will open the user's profile window.
Friends Conference
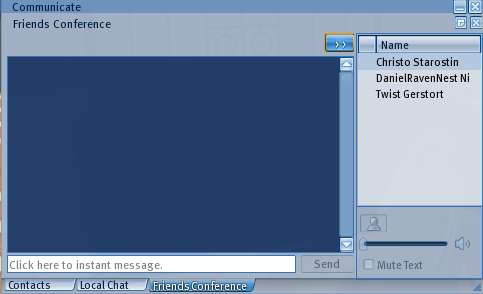
Highlighting several names from your Friends list or Calling Cards who are online will open a Friends Conference window which all participants can read. This is essentially identical to an Instant Message except more than two people are connected. The Groups Tab > IM/Call button above is similar except all online members of a group are connected. The < < button will open a side panel listing all the people connected in the conference. Clicking a name on the list, then the person icon at the bottom will open their Profile window.
You may leave a conference at any time, but not rejoin it. The conference will continue until only one person remains.
Media Console
The media console is part of the bottom toolbar on the right side, and is always visible. By default it is minimized, and only shows the audio and video and main volume controls. The ^ button will pop up the detailed volume sliders. The top menu Edit > Preferences > Audio & Video tab > Streaming Preferences has check boxes for playing music and media. If those boxes are not checked, the console buttons will be greyed out. If they are checked, you have the choice to play or stop audio and media streams. There must be streams active on the land parcel for you to hear or see them. Video streams appear on the surface of some object in the 3D view area. See Also: Streaming Audio FAQ
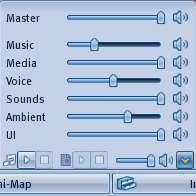
The minimized console has a master volume slider for overall volume of the Viewer. This will be modified by the overall computer and speaker volume settings. The opened console volume sliders are as follows:
Note: clicking any speaker icon mutes that item.
Master - same as the minimized volume slider, controls overall volume Viewer audio.
Music - Incoming audio stream volume on the current parcel.
Media - Incoming audio channel of media stream on the parcel.
Voice - Overall volume of Second Life voice chat speakers. Speakers in the 3D view area have L/R stereo directionality and volume depending on where your camera view is located.
Sounds - Volume of sound clips played in Gestures or by objects in the 3D view. Affected by distance from the camera viewpoint.
Ambient - Volume of background sounds such as local wind at your current location.
UI - User Interface volume, the sounds generated by the Viewer program when you open or close windows, etc.
Voice Chat
Second Life has a voice chat feature that is activated on installation. The feature turned off or on with the top menu Edit > Preferences > Voice Chat tab. You can listen to voice conversations without a microphone connected. To talk you will have to install a microphone. See the Voice FAQ page for instructions.
Voice Console
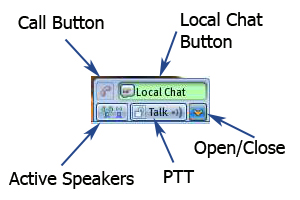
When the voice feature is active, the Voice Console will appear on the right side of the bottom toolbar. When minimized the console shows the following items:
Active Speakers - this button toggles the Active Speakers window.
Lock Talk Mode - will lock microphone on
Talk - Push to talk button
^ - Up arrow to expand console
The upper row of the expanded console has the following:
Hang Up - Button to hang up a call
Local Chat - Opens the communicate window (not sure why)
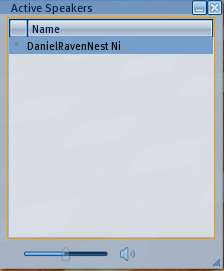
Active Speakers Window
The active speakers window lists current voice users within hearing range. It has a volume slider at the bottom.
