User:Lum Pfohl/How to use the MAKE OUTFIT button to save their current appearance
How To Use The MAKE OUTFIT Button To Save Their Current AppearanceTo my knowledge, this is the most overlooked topic in all of SL. No newbie tutorial discusses it, no Orientation HUD mentions it, no helper recommends it. This is something I take the most time teaching, but I only have to teach it once. Then they can apply it every time they acquire an outfit. By the time we encounter them, newbies may have spent considerable time editing their appearances and are often quite proud of what they've achieved. As seasoned residents, we simply put on a different shape and skin. Newbies don't yet have that luxury. They are also very curious about putting on other avatars (such as a Darth Vader outfit). Then they realize they're stuck! They can't go back to what they were wearing earlier because they haven't saved it off. They scramble through their inventory but can't remember what it was they had on.
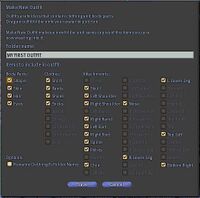
Mentoring a newbie on this topic will take about 20 - 30 minutes. I compliment the newbie on their looks, especially if they have customized it in any way. Often I can tell they have spent more than just 10 minutes on it. I ask them if they'd like to be able to save that "look" so they can return to it at any time, in case they run into trouble. They all say, "yes!" I start my explanation with a picture of a menu. I have a texture called MAKEOUTFIT which I send to them, and tell them to let it display on their screen until it is no longer fuzzy. It is the same picture as the one shown on this page. (Right click this image and open it in another window or tab, to follow along). I explain to them that when they reach this window, they are to provide a name for their outfit which they will type into the textbox. Their outfit will be stored in the INVENTORY -> MY INVENTORY -> CLOTHING folder with that name. I let them choose their outfit name. Next I tell them to CHECK EVERY CHECKBOX they can. The ones that are whitened are the ones they should check. Make especially sure to check the 4 on the left (Shape, Skin, Hair, Eyes). Then they must UNCHECK the RENAME CLOTHING TO FOLDER NAME checkbox. They should not have anything automatically renamed. I tell them to double check their work, making sure they checked all the checkboxes except for the lower left. Then they are to click the SAVE button and exit Appearances. I ask them if they have any questions at this point. The reason I show them this first (and I've tried other ways, believe me) is that if they are on a PC and they enter this Make Outfit Dialogue, they cannot chat until they dismiss this window. Once they feel they are ready, I coach them:
Once they are done with their Make Outfit steps, I have them open their Inventory.
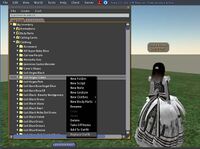
Then it's time to have fun! I give the newbie a series of folders: DARTH VADER, DIVINE TECH BY DAITENSHI KATO, KOOLAID MAN BY BEBOP VOX, HALO AVATAR BY PARTY PUSSYCAT. They are geared towards male avatars, but I give them to the female newbies too. I coach to find these folders in their inventory:
They'll "wooo" and "whoa" and "ahahahhaa" for a few moments. Most of them say, "Lum, I am your father!" or something and we'll have a laugh. This step is very important, as it will completely change the newbie's shape, skin, eyes, clothing - everything.
If they missed anything, you'll know immediately. Their skin is still black, or they're missing their shoes - or they're bald. Better it happens now with YOU, than on their own. If they have missed something, help them to find their missing pieces and get them looking normal, and coach them through the steps again to make another outfit. Or you can show them that once they find their missing items, they can copy / paste it into their New Outfit folder. Then confirm that they've done it correctly by having them change into some other outfit and back. At this point, they'll want to learn how to look at themselves from the front. Explain that there are several methods, but show them the quickie way:
Happy Mentoring! Related Pages
Lum Pfohl 12:54, 2 December 2007 (PST) |
|


