Difference between revisions of "Building Tools"
m (Minor spelling/grammar fixes.) |
Rand Linden (talk | contribs) |
||
| Line 1: | Line 1: | ||
{{Help|Object=*|LandSim=*}} | {{Help|Object=*|LandSim=*}} | ||
{{User Guide Disclaimer}} | |||
{{GettingStartedNav}} | {{GettingStartedNav}} | ||
Latest revision as of 10:16, 25 May 2011
| Help Portal: |
Avatar | Bug Fixes | Communication | Community | Glossary | Land & Sim | Multimedia | Navigation | Object | Video Tutorials | Viewer | Wiki | Misc |
| Important: This is an unofficial guide for Second Life Viewer 1.23 helpfully compiled by Second Life Residents. Much of it does not apply to the current version of the SL Viewer (Viewer 7). |
The Second Life viewer has built in tools to create and modify objects, a process known as "building". Once created, objects can be stored in your personal inventory, shared with other users, or placed somewhere within the 3D world.
Objects are made of one or more "primitive shapes", or "prims", which can linked together to form more complicated items. Each prim has one or more images called "textures" applied to its surfaces, and can contain an unlimited number of items inside it, including other objects.
The items placed inside an object can include software scripts, animations, sounds, and additional textures. These can make an object perform an almost unlimited number of actions.
This page discusses the Tools floating windows. For software scripts see the Linden Scripting Language (LSL) Portal. See also (Other portals related to building).
Opening the Tools
There are five build tools selectable either from the top menu or within the Tools window: Focus, Move, Edit, Create, and Land. Within the window, the five icons along the top will change tool selection. The bottom portion of the window has five tabs which work with the edit tool to change a selected object.
Any of the following will open the Tools floating window. Note the Tools window has no title. You must have permission to create new objects on the land parcel or edit an existing object for the tools to work. You should also be familiar with the camera controls to build effectively.
- Top menu View > Build
- Top menu Tools > Select Tool > (any of the five tools)
- 3D view right-click an existing object Context Menu > Edit which will select that object for editing.
- 3D view right-click on an existing object or on bare land Context Menu > Create which will create a new object at that location.
- If local chat is closed, keyboard B.
You can click-drag on any empty part of the window to move it to a different screen location.
Focus Tool
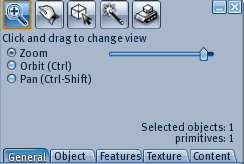
This tool changes where the camera is looking in the 3D view. Selecting this tool will change your mouse pointer to a magnifying glass. Clicking any point in the 3D view will center that point.
Zoom - Using the scroll wheel or slider will zoom the view in or out.
Orbit - Click-drag will rotate the view around the selected point. This option can be selected temporarily by holding the Ctrl key.
Pan - Click-drag will slide the view parallel to the current viewing plane. This option can be selected temporarily by holding Ctrl + Shift.
Move Tool
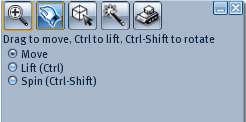
This tool moves a selected object smoothly. Selecting this tool changes the mouse pointer to a hand.
Move - Click-drag will move the object smoothly in the horizontal plane.
Lift - Click-drag will move the object smoothly parallel to the current viewing plane.
Spin - Appears to work the same as Move.
Edit Tool
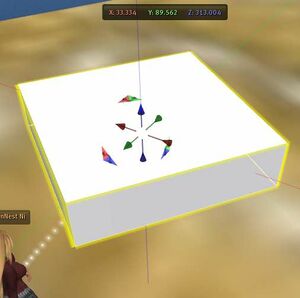
This tool edits the details of an object. Selecting this tool changes the mouse pointer to an arrow with a crossed axis symbol. Clicking an editable object will highlight the object with a yellow outline for the "root prim" and a blue outline for any other prims, and show edit axes and coordinate values on the screen. A slightly out of date introduction video can be found at YouTube.
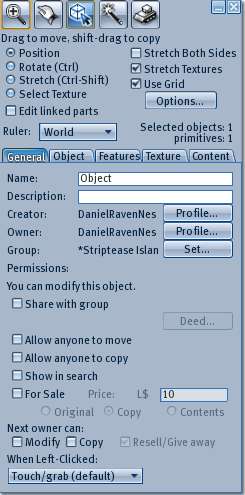
Position - The axes are color coded: red for X (east), green for Y (north), and blue for Z (height). The axes are centered on the center of the object, which gives it it's "location" measured in meters from the bottom south west corner of the map region. An object is considered "in" a region or parcel if it's center point is within the boundaries, even if part of it overhangs.
There are small arrows at the intersection of the axes, which when click-dragged will move the object along that axis. There are two-color triangles near the arrows, which when click-dragged will display a grid and move the object within that plane.
Rotate - Also selected temporarily by holding the Ctrl key. Changes the axes to three rings. Click-drag on a ring will rotate the object along that plane. Sliding outwards will show a circular ruler, which will rotate the object in 1/64th of a circle (5.625°) steps.
Stretch - Also selected temporarily by holding Ctrl+Shift keys. Changes to small cubes on the sides and corners of the object. Click-drag of a colored cube will stretch the object in one dimension. Clicking the grey corner cubes will stretch the object in all three dimensions, with the opposite corner staying fixed.
Select Texture - Shows a white target on each side of the object. If unselected, texture tab will apply to all sides of the object. If selected, changes will apply to one side at a time. You can click-drag a texture from your inventory to apply.
Edit linked parts - Lets you select one prim of a multi-part linked object for editing. The single prim will be outlined when selected.
Ruler: - When the use grid option is checked, affects the numbers that appear on the rulers. World will show the region coordinates, Local will show 0 as the current location, Reference ???.
Stretch Both Sides - When checked, using Stretch on a single prim will extend opposite sides rather than just the one side.
Stretch Textures - When checked, will stretch the textures on the object. When unchecked textures remain the same size as the object changes.
Use Grid - When checked, shows rulers parallel to the axis you are changing position for. If you drag mouse over the ruler, the object will jump to the nearest tick mark on the ruler rather than moving smoothly. If you drag near the axis line between the rulers it will move smoothly.
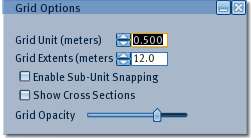
Options... - This button opens the Grid Options window, so you can adjust the ruler.
- Grid Unit (meters) - Sets the major grid unit tick mark spacing.
- Grid Extents (meters) - Sets the overall length of the rulers when zoomed out. When you are zoomed close to the object, the rulers are truncated.
- Enable Sub-Unit Snapping - Shows smaller tick marks between the grid unit marks for smaller jumps as you move the mouse.
- Show Cross Sections - Shows transparent cross sections of the object perpendicular to the edit direction to help with alignment.
- Grid Opacity - Varies the transparency of the grid rulers from transparent (left) to opaque (right).
Selected objects: - The number of objects you have selected currently, where linked items are counted as one object.
primitives: - The total number of prims included in the selected objects.
General Tab
Name: - A newly created object has the default name "Object". This box lets you change it to any other name up to 63 characters long.
Description: - Blank by default. You can enter up to 127 characters of text here.
Creator: - Shows the original creator of the object, with a button to open their profile.
Owner: - Shows the current owner of the object, with a button to open their profile window.
Group: - Shows the group name assigned to the object. By default it is set to the same group as the active group of the creator. The Set... button allows changing the group assigned. The group assignment affects whether an object can remain on a parcel and who can use it.
Permissions: - Second Life has a permissions system to control how people use objects they did not create. The original creator has full permissions to copy, modify, and transfer the item, but they can restrict subsequent users from some or all of these abilities. Note: the contents of an object can have different permissions than the container, and copies may inherit different permissions than the original.
- You can (cannot) modify this object - Indicates whether you have rights to change the object. Even if you cannot change it, normally you can take it in and out of your inventory, and if it is a wearable item, edit how it is attached to your avatar.
- Share with group - If checked, any member of the group listed above can use the object.
- Deed... - Opens a window to make the item group owned.
- Allow anyone to move - If checked, any user can move the object.
- Allow anyone to copy - If checked, any user can take a copy of the object for their own.
- Show in search - If located on a land parcel which is listed in search, the object will also be listed in that search result page.
- For Sale - If checked, the object can be bought by other users. When checked, the price box becomes active, and you can set any price, including zero. The three buttons allow selling the original item, a copy with all contents, or just the contents and not the container.
Next Owner Can: - Sets the user permissions for the next owner.
- Modify allows editing any part of the top level object's features with the edit tool except adding more permissions. The permissions of the contents may be different and not allow editing them internally, though they can be removed or added.
- Copy allows making an unlimited number of copies of the object.
- Resell/Give away (known as "Transfer" by most people) allows you to transfer the object to any other user.
When Left-Clicked: - Changes the default action when someone clicks on the object.
Object Tab
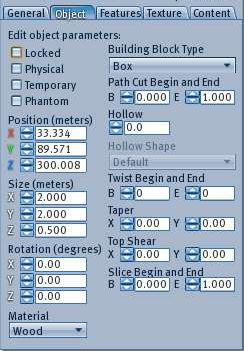
This tab allows you to edit the size, shape, and location of an object. Most objects start as simple geometric block selected from the Building Block Type dropdown list. The default shape is a 0.5m cube. The Sculpt type is defined by a texture map and can be a fairly complex shape but still only be one prim. See this 3D modeling guide for detailed information.
Locked - When selected prevents you from moving an object.
Physical - If not selected, objects ignore the physics simulation. For unscripted objects, they will stay in one location, unaffected by gravity or collisions. If selected, objects will fall and move if hit by something else.
Temporary - If selected, the object will disappear after a short time.
Phantom - If selected, the object can be walked through or penetrated by other objects in motion.
Position - The location of the object center in map region coordinates X (east), Y (north), and Z (height) in meters. Using the number entries here rather than moving with the object axes allows more accurate positioning. The maximum values are 256 for X and Y, and 4096 for Z since that is the size of a map region.
Size - The X, Y, and Z size of an unmodified building block. Various distortions on the right side of the tab will affect the actual size. New objects are limited to 10 meters in each dimension. So-called megaprims were originally created via loopholes in the software with dimensions larger than 10 meters. If you attempt to edit the size of a megaprim, it will revert to 10 meters. In other respects they can be edited normally.
Rotation - The rotation of the object clockwise around the stated axes in degrees. X and Y are limited to -180 to +180, and Z is limited from 0 to 360.
Material - Affects how the object reacts to gravity (mass) and collision sounds. It does not affect how it looks.
Building Block Type - Lets you change the basic geometric shape.
Path Cut Begin and End - This is a vertical slice removed from the basic shape, the way a cake or pie is cut in real life. The numbers define a starting and ending angle for the cut using a scale of 1.000 for the complete circle.
Hollow - The size of a center hole in the object in percent of the full X and Y dimensions. The hole is aligned with the Z axis when the rotation is 0. Rotating the object will point the hole in a different direction. The value is limited to 0 to 95 percent.
Hollow Shape - Default will make the hole match the basic shape of the object.
Twist Begin and End -
Taper -
Top Shear -
Slice Begin and End -
Features Tab
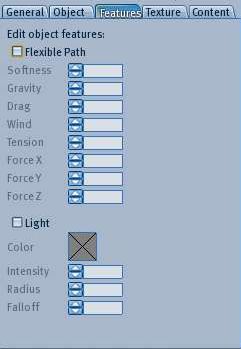
This tab applies optional features to an object.
Flexible Path - When checked, the object becomes flexible rather than rigid, and behaves according to the 8 parameters listed below. The parameters have arbitrary scales. The base of the unrotated object stays fixed while the rest moves.
- Softness - Controls how 'bendy' the object is. Range is 0 to 3.
- Gravity - Controls how hard gravity pulls downward on the object. Negative values pull up. Range is -10 to 10.
- Drag - Controls how much viscous drag (or friction) the object appears to have when moved. Range is 0 to 10
- Wind - Controls how much the object bends in response to local map region winds.
- Tension - Controls how much 'force' is tugging the object away from it's base. Range is 0 to 10.
- ForceX - Controls how much 'force' is applied in the X (east) direction. Range is -10 to 10.
- ForceY - Controls how much 'force' is applied in the Y (north) direction. Range is -10 to 10.
- ForceZ - Controls how much 'force' is applied in the Z (up) direction. Range is -10 to 10.
Light - When checked, the object emits light to the surrounding area. This is separate from glow in the Textures tab.
- Color - When the box is clicked, a Color Picker floating window opens to select a color for the light.
- Intensity - How bright the light is.
- Radius - The distance the light extends, in meters.
- Falloff - How fast the light fades from the center.
Texture Tab
Textures are the images applied to object surfaces to make them look like something besides a plain grey shape. When an object shape has loaded, but not the texture it is shown as grey.
Texture sizes are forced to be power-of-2 dimensions (64, 128, 256, etc pixels)in each direction for efficiency in graphics memory. Maximum size for a newly created texture is 1024x1024. A few legacy textures are larger.
Once textures are loaded into Second Life's database, they cannot be edited. You use any one of the many Texture Tools such as the GIMP, Photoshop, or even MS Paint to prepare a texture. The texture itself can be used multiple times and shared with other users.
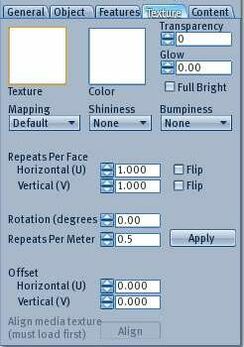
Texture - Clicking this box will open the Pick: Texture floating window, allowing you to select a new texture. Alternatively you can drag a texture from your Inventory window to the box, or directly to the object. If the Select Texture item in the upper pane of the Tools window is selected, you can change one side at a time of the object. Otherwise texture changes are applied to all sides at once. If an object uses more than one texture, the word Multiple will appear in this box.
Color - Clicking this box will open the Color Picker floating window. Color tints selected are additive to the color of the base texture. This means it will be darker or more strongly tinted.
Transparency - Uploaded textures may be RGB colored, or may contain a fourth, alpha, channel which defines transparency. This setting applies an overall transparency to the texture in addition to any transparency in the alpha channel. The range is 0 to 90 percent.
Glow - This item creates a surface glow on the object, separate from the light emitted with the Features tab. The range is 0 to 1, but any glow above 0.1 tends to wash out the surface texture.
Full Bright - If checked renders the object as if fully day-lighted, regardless of the environment day cycle position of the sun.
Mapping -
Shininess - Gives the object an apparent gloss or matte appearance.
Bumpiness - Gives the object an apparent bump map shading in addition to the texture.
Repeats Per Face - Controls how many times the texture is repeated on one fact of the object. Range is 0 to 100 in each axis, and can be flipped in both axes.
Rotation - Controls rotation of the texture relative to vertical. Range is -360° to 360°.
Repeats per Meter - If a value is used here, the texture is applied according to the object size, rather than a number of times per face. Range is 0.1 to 10.
Offset - Shifts the texture horizontally and vertically relative to the object surface. If the texture is rotated, the shift is along the texture, not the object face.
Align Media Texture -
Content Tab
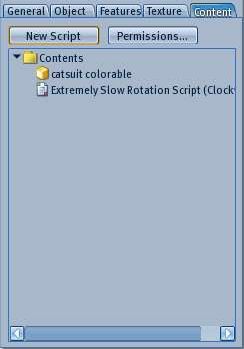
This tab shows the internal contents of the selected object. An object can contain any type of inventory item, including other objects which in turn have nested contents. There is no set limit on the number of items that can be placed inside an object, though if it in the hundreds, it can take some time to fetch or edit the contents.
New Script - When objects are located in a map region, any active software scripts inside them are run by the host server. This allows objects to perform a wide variety of actions. Objects stored in your inventory are not actively run. This button will open a new Script window for editing.
Scripts are written in a "C++"-like "Linden Scripting Language" (LSL), which has many functions specific to Second Life. Objects may contain multiple scripts. See the LSL Portal for details. Scripts can also modify the inventory contents of prims that contain them, see Inventory for details.
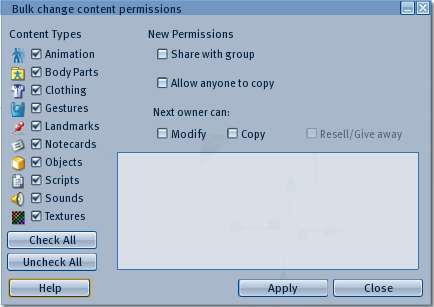
Permissions... - Opens the Bulk change content permissions window. This allows you to mass-edit item permissions. Note: you cannot grant yourself more permissions than you started with for the items.
The main list box - Items are listed in alphabetical order, without regard to inventory type. If an item has limited permissions, it will say (no copy), (no modify), or (no transfer) after the item name. Clicking an item will highlight it, and right-click will bring up a context menu. Editable items (notes and scripts) can be opened while inside the container. Items may be dragged from inventory to this list, or from this list to your inventory.
Create Tool
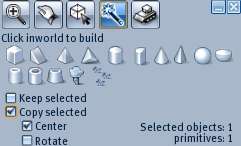
This tab allows you to create a basic geometric shape (prim). The mouse pointer changes to a magic wand when this tool is active. Clicking one of the shapes in the tool, then clicking somewhere in the 3D view, will create an object at that location. New objects are 0.5 meters in size and have a plywood texture by default. The last two items, trees and grass, can only be used by the landowner. The others can be used by anyone with building permission on the land parcel.
Each land parcel has a limit to how many prims it can contain in total. If this limit has been reached, you will get an error message if you try to add another item.
Keep selected - If not checked, after creating a new object, the window will change to the edit tool so you can edit your new object. If checked the window will stay on this tool so you can make more items.
Copy selected - If checked, will create more objects of the selected type, and align them touching the face of where you click next.
- Center -
- Rotate -
Land Tool
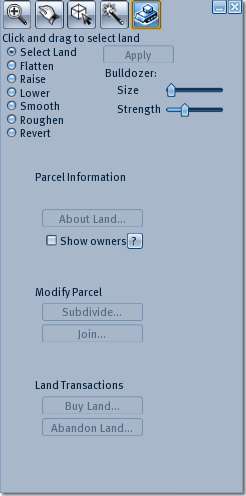
This tool lets you modify the land parcel itself as opposed to objects located on the land. Selecting this tool will change your pointer to a bulldozer.
A land parcel shares part of the terrain map for the region it is located in. The top portion of this tool allows you to reshape the terrain within the Limits for the region and adjoining land parcels. The terrain map is continuous, meaning you cannot tear holes in it. So any changes you make to one part of it will smoothly connect to neighboring parts.
Estate owners can also change the texture (images) for the surface, by changing the terrain map. External tools exist to edit it. Some special plants are created internally in the viewer software, and only count for one prim each. They can be found in the Library part of your inventory. Other plants are normal objects.
Select Land - The first button is used to select an area via click-drag across the land in the 3D view. A yellow outline will appear to show your selection. The other buttons will then give you the option of applying the change to the whole selection using the Apply button, or using the Bulldozer to adjust areas as you click-hold over them. Arrows will appear over the area you are working on, and the longer you hold the mouse button, the more the land will change. The Size and Strength sliders control how effective the bulldozer is.
About Land... - Opens the About Land floating window to see or edit the parcel information.
WARNING: The following three buttons will cause loss of parcel settings in the About Land window, and may cause loss of search listings, traffic score, and landmarks may fail.
Subdivide... - Opens Subdivide Land window to break selected land area into a separate parcel.
Join... - Opens Join Land window to join parcels. Any parcels you own that have parts in the selected area will be joined. It is not necessary to select the entire parcels.
Buy Land... - Opens Buy Land window to "buy" a land parcel. See the discussion there about how this is not an actual purchase, but payment for services.
Abandon Land... Opens Abandon Land window to return land to the region owner (Linden Lab or Estate owner). Note it is often better to sell than abandon a land parcel, since you get no payment when you abandon one.
